How to knit women's socks for beginners
There are several ways to knit socks. Some knit socks from thumb, down up. It’s so convenient to knit small house socks. The correct way is to knit socks with knitting needles, starting from the top elastic band. There is the simplest way to knit socks from two halves, which are simply sewn together. These socks are not very comfortable due to the presence of a seam on the sole, but you can knit a pair of socks in an hour, even without experience. For beginners this is a good result.
We will knit socks in the classic way, from top to bottom, from the elastic, with simple knitting of the heel.
Selection of materials
It is more convenient to knit socks using a special set of 5 knitting needles. A circle is cast on 4 knitting needles, the fifth is used as a working one.
Knitting needles for knitting socks are shorter than usual. This allows you to cast on short rows faster and knit patterns without difficulty. For socks, stocking needles number 3 are suitable.
The yarn can be either wool or synthetic. Don't use yarn that is too bulky. Thin threads are also not suitable for hand knitting. Choose yarn 150-200 meters per 100 grams.
Learning how to knit socks is an excellent opportunity to practice tying braids and elastic bands, the most difficult elements for beginners.
Measurements and knitting density
The size of the sock is not as critical as the size of leather shoes, but it would be unpleasant to miss the size. To determine the number of loops you need to take measurements.
The circumference is measured above the bone and from the instep to the heel. In the thinnest and thickest places. The numbers are added and divided by 2. We get average length circles. From this calculation we make a set of loops. It will be more convenient if there are the same number of loops on all 4 knitting needles. To do this, round the value of the circumference with loops to desired value, multiple of 4.
How to calculate knitting density. How many loops are there per 1 cm? With regular knitting, on average there are 3 loops per 1 cm. If you are knitting more tightly, using yarn less than 3 mm thick, count 4 stitches per cm. The height of the row is approximately equal to the height of the knitting needle used. If you knit with 3 needles, there will be approximately 3 rows in 1 cm.
The hardest thing about knitting is arithmetic primary school. You need to remember the number of loops, rows, you need to remember after how many loops the overlap is made.
Therefore, here you go helpful advice. Get yourself a cork or magnetic board on which you attach sheets of diagrams and work notes.
This is necessary so as not to turn into a creature absorbed in primitive calculations, constantly muttering to itself “18 by 3, 4 loops on the left” and other nonsense.
How to knit a sock - step by step instructions
Let's look at the process of knitting a sock step by step.
After casting on 4 knitting needles, we begin knitting an elastic band. Knitting an elastic band with knitting needles is done by alternating knit and purl stitches. For example, 2 knits, two purls. The height of the elastic depends entirely on your taste. On average, the correct height is 7-15 cm.
Let's start knitting the heel. To do this, we leave 2 knitting needles, transfer the loops from the remaining 2 knitting needles to one for convenience and knit the heel with regular stocking stitch.
The average heel height is 6 cm or 18 rows.
Now you need to knit the heel shape. This is done using the reduction method. Divide the number of heel loops by 3. If there is 1 loop left over, add it to the central part, if 2, then to the side ones. 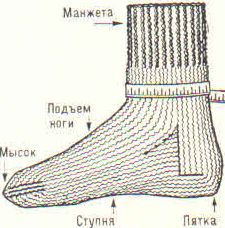
We knit the rows of the central part, while decreasing the side loops, grabbing them with a classic purl loop. 
We continue to decrease the side parts until exactly half of the number of loops with which we started working on the heel remains on the knitting needles. 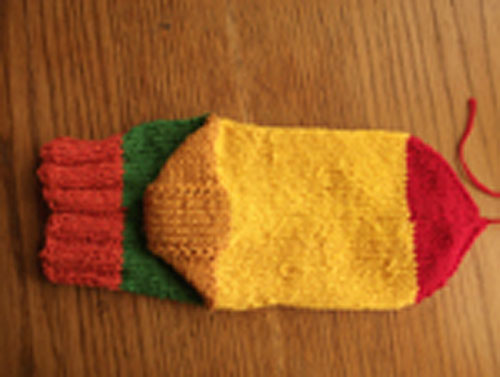
Stocking stitch is used to sew the middle part along the length of the foot. If you are knitting socks for the first time, it is advisable to try on the socks at this stage and write down the results on the board in stitches and in centimeters.
Reducing the loops on the fingers is done by simply knitting the edge. Usually decrease 1 loop on each side. 2 loops are knitted as 1, with a turn over. 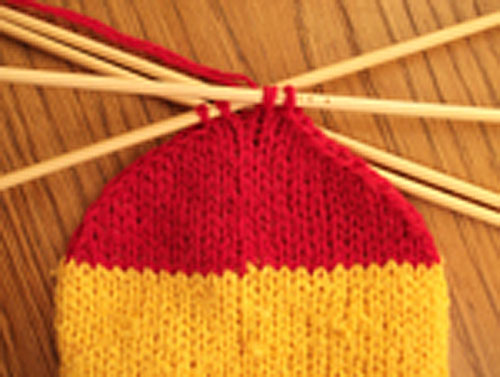
When only 2 loops remain, fasten the thread and make a strong knot. The socks are ready. 
It is better to write down all sizes. Most beginners are confident in their memory; it seems to them that a few prime numbers It's not difficult to remember. Perhaps this is true. But you better write it down.
With the onset of cold weather, the topic of insulation becomes relevant, and our feet are no exception. After all, it is known that if your feet are warm, there will be fewer sores. Warm knitted socks will help you out in winter and keep you from freezing. Today we’ll look at how to knit socks on knitting needles? The work process is not as complicated as it might seem at first glance. Don't believe me? Then try making your own socks.
What materials and tools are needed?
Every time you see a new hole in your recently purchased socks, you get a little upset and, at best, sew it up, read how to do this carefully in the article:, at worst, throw it away. Just imagine, with your own hands you can knit a lot of socks, of any size, for your whole family. Below is a description that will help you do this without much difficulty.
Knitting socks requires knitting skills and the ability to knit and purl stitches. If you have forgotten how to do this, refresh your memories with this article:.
- yarn - it can be any color. In our version, we propose to knit socks from the remains of different yarns. The result will be a rather “cheerful coloring”;
- knitting needles - to knit a sock you need to have five of them. The most relevant for this work is product number three.
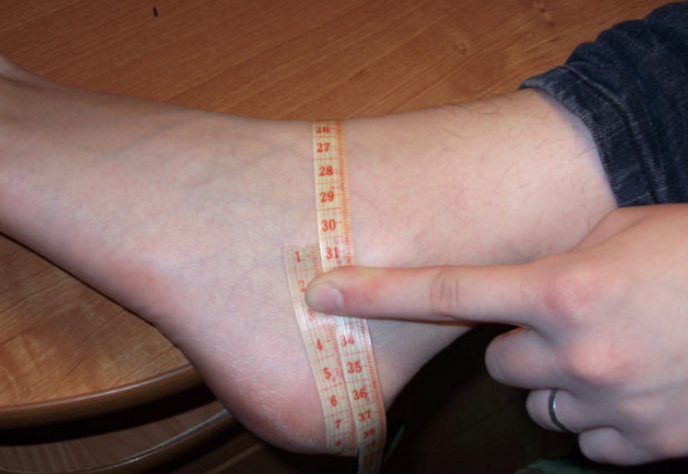
How are being done measurements to calculate loops?
Before thinking about the question of how to knit socks, you need to take two measurements, which will tell you how many loops you need to cast on so that the socks are suitable for your leg.
Measurement No1. Climb. How to do it? Look at the photo. In our case, it is 31 cm.
Measurement No2. Above the bone. Again, where to measure is indicated in the photo. Ours is 21 cm.
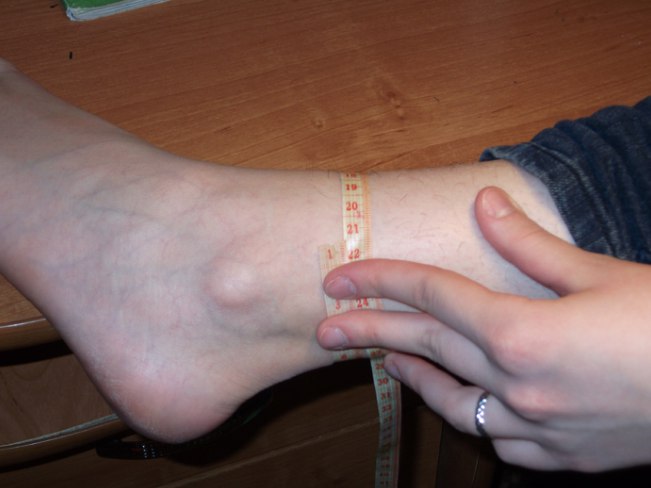
Now we add the numbers we got (31+21). The total sum gives 52. In order to find the average circumference, we divide the resulting sum in half, we get 26.
Based on the measurements obtained, you need to cast on 26 cm of stitches. In other words, cast on loops on the knitting needles until their cast-on length corresponds to the centimeters obtained in the calculation.
Legend
In order not to repeat the same terms each time when describing the work, we will use symbols of this nature:
- persons – front loop;
- purl – purl loop;
- n. - loop.
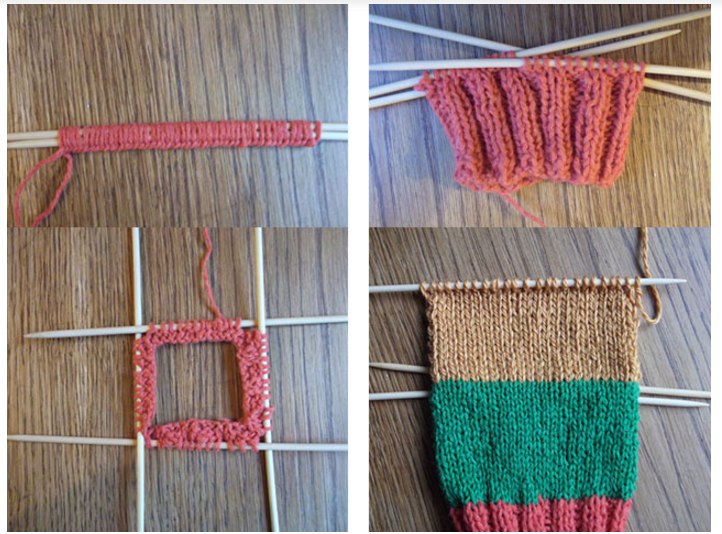
So, the socks are knitted from the top to the tip of the sock. In this case, a circular technique is used, in which the product is obtained without a seam. This allows the sock to “lie” perfectly on the foot, completely enveloping the foot.
How to knit an elastic sock?
Divide the cast-on loops, the number of which depends on the calculation (given above), equally into 4 knitting needles. The fifth remains free, and is called working. If the resulting number of loops is not divisible by 4, then add so that the number is a multiple of four.
There are two ways to tie an elastic band:
- Knit 1, purl 1;
- 2 stitches knit, 2 stitches purl.
You need to raise the elastic by 5 cm, but it all depends on the desired height of the sock and your preferences in the design of the product. Our elastic band is 6 cm. Pink colour.
Next, we knit another 6–8 cm in stockinette stitch. In the photo, the stockinette stitch up to the heel is knitted in green.
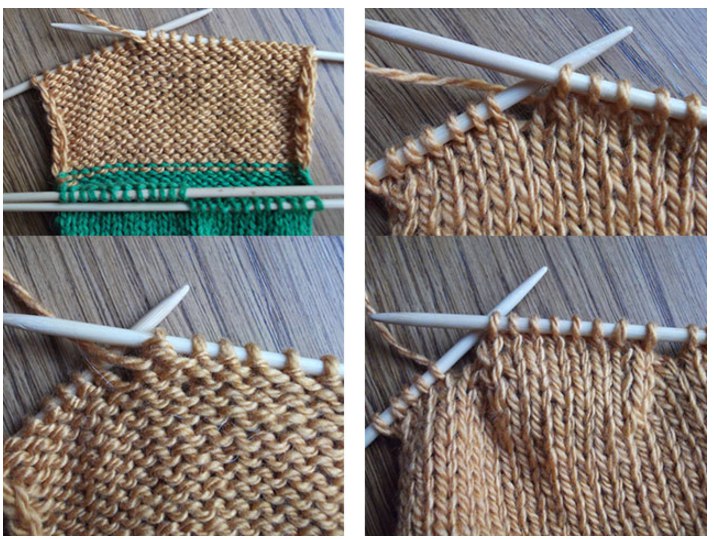
How to knit the heel of a sock?
Having knitted an elastic band and a piece of stockinette stitch, we began working on the heel. In order to knit the heel, we transfer the work from four knitting needles to three. In other words, transfer the loops from two knitting needles to one. Now we will work only with her. We knit 6 cm this way:
- outer row all p.l.;
- inner row all p.i.
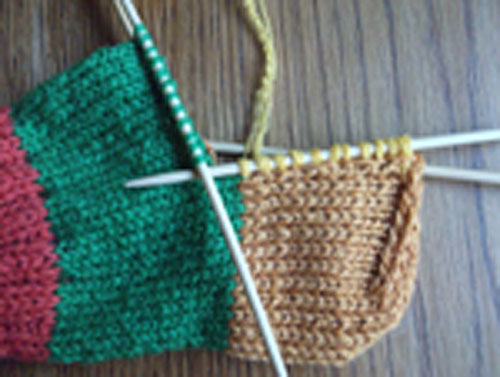
This part of the product is called the heel height and in the photo it is Brown. Now you should divide the loops on the knitting needle into three parts. If during division there are 1 or 2 sts left, then they are added to the central sts. We work with the central sts.
Next, let's look at how to knit the heel of a sock. To do this, it is necessary to knit only the central part of the separated loops, and at the end of each row, regardless of whether it is front or back, knit the edge stitch and 1 stitch from the side (set aside) stitches together. These actions are carried out until all the side sts are finished.
How to make the main part of a sock?
Next will be working on the main part of the sock. Initially, it is necessary to return the work to four knitting needles. To do this, in places where the heel is raised where there are no sts, you need to dial them in. In the photo this is done with yellow threads. The number of required points is calculated as follows. Since in the end we should end up with the same number of loops as on the two knitting needles that were not used, we will start from them. So, from the amount from these points, subtract the ones already available (from the central part) and divide the received ones into two (after all, there are two sides). The amount that will be obtained will need to be gained during the “loopless” heel lift.
Now knit as it was done in stockinette stitch (satin stitch) to the heel, in the round. We measure the size of the base along the leg, when you reach the end of the big toe bone, we finish with the main part.
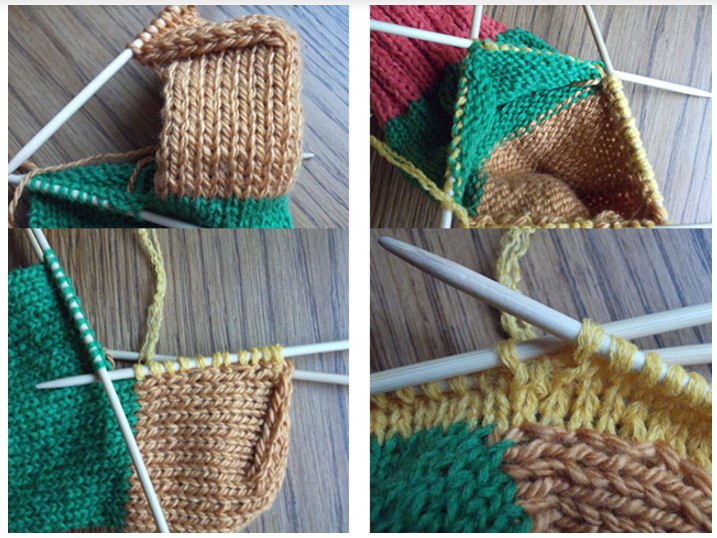
How to finish a sock correctly?
We make the toe, or as it is also called, red. The first row is knitted in the round, then on each knitting needle you need to knit the first two stitches together. Decrease until each side has two stitches left. Having achieved this result, break the yarn and pull it through all the remaining loops in a circle, pull it off. Hide the rest of the yarn (tail) inside.
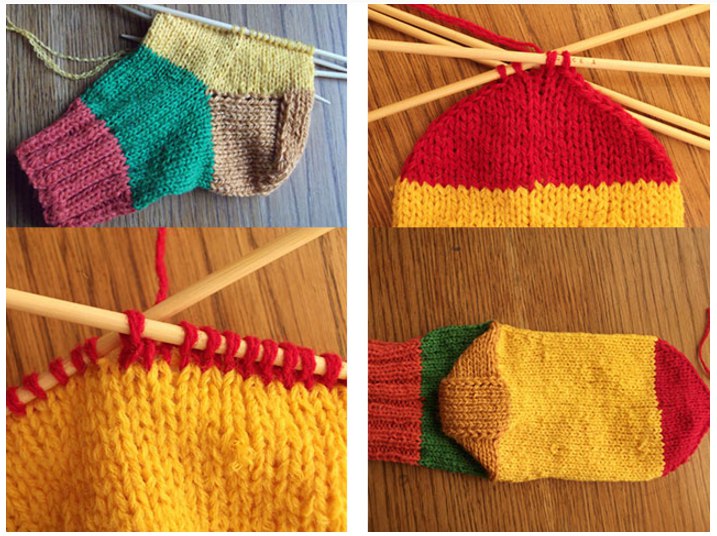
All! Now the product called the sock is ready. The second copy is knitted identically to the first.
These are the lovely, cheerful socks you end up with.
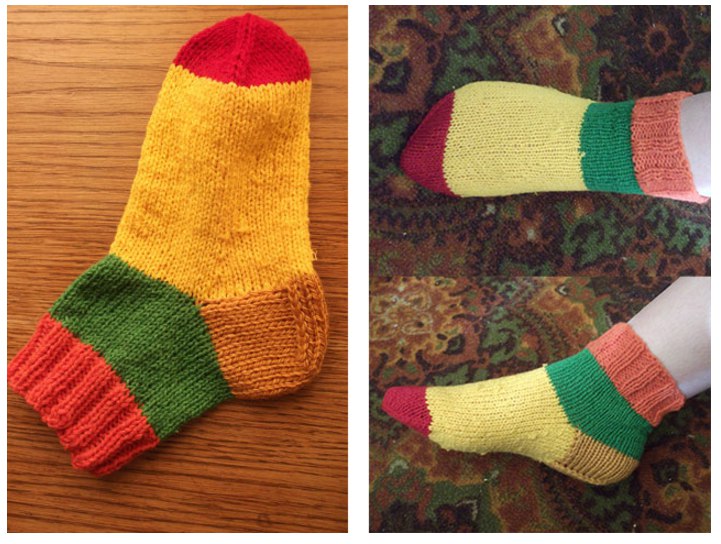
Agree, such a product can be given as a gift to a loved one or parents. The main thing is to present it beautifully. Instructions on how to do it gift box and how to pack a gift beautifully, you can find in the articles.
You will need
- In order to knit socks you will need 5 special knitting needles with a thickness of No. 2.5 (for thin yarn) or No. 3 (for medium-thick yarn) and thread.
Instructions
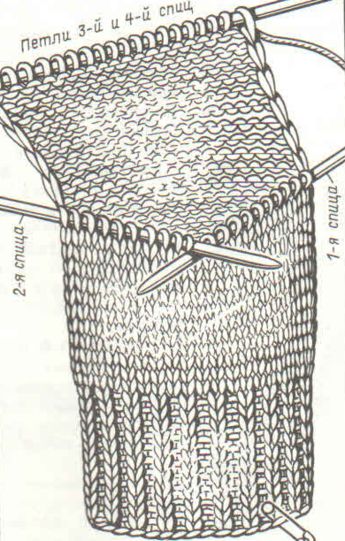
On the loops of the 4th (fourth) and 1st (first) knitting needles - on both sides of the back line of the middle, on 24 loops we knit straight and back with stockinette stitch. Thus, we should have a heel wall, the optimal height is 4.5 cm or 16 rows.
Next we knit the lower part of the heel, the loops need to be divided into three equal parts. If the number of loops is not divisible by exactly 3, then make sure that the 1st and 3rd parts have the same number of loops. In our case, we knit the heel wall with 28 loops, so after the first 8 loops we make the first mark, after the next 8 we make another one, and the last 8 loops remain. We knit the loops of the first two parts, without knitting the 1st loop before the 2nd mark. We knit this loop before the mark and the loop after it along with a tilt to the left, turn it and remove the 1st loop, as in purl knitting. Next, you need to purl the loops of the middle part of the heel, with the exception of 1 loop before the first mark. The loop before the mark and the loop after the mark are knitted together purlwise, turn and remove the 1st loop, as in purl knitting. It is necessary to decrease until we have knitted all the side loops, and only the loops of the middle part remain in our work. We turn the work and knit it to the middle.
Now we knit the instep wedge. To do this, we cast on 12 loops along each edge of the heel; as a result, we should end up with fewer stitches on the second and third stitches than on the first and fourth knitting needles. During the formation of the wedge of the instep, the extra loops must be gradually reduced - the last 2 loops of the 1st knitting needle are knitted together with the knitting needle, the first 2 loops of the 4th knitting needle - together with a tilt to the left. Until we reach the total initial number of loops, the same on each knitting needle, these decreases will have to be repeated in every 2nd row. Next we knit the foot to the required length, in our case another 16 cm to the toe.
We form the toe like this: knit the 3rd and 2nd loops of the 1st (first) knitting needle together, and knit the 2nd and 3rd loops of the 2nd (second) knitting needle together with a tilt to the left. Decrease at the end of the 3rd knitting needle, as on the 1st knitting needle, and at the beginning of the 4th knitting needle, as on the 2nd knitting needle. These decreases must be repeated five times in every 2nd row. The length of the foot for our size is 20 cm, the 8 loops remaining on the knitting needle are tightened with a working thread and secured to the wrong side of the sock.
HOW TO KNIT SOCKS, TIPS FOR BEGINNERS
Everyone likes knitted socks; socks for children are especially often knitted. Socks can be knitted with different patterns using threads different colors, socks made from blue melange yarn look great, they look like denim. Socks can be made with colored stripes and patterns, the top of the sock can be decorated . To knit one pair of women's socks you will need 120g of yarn, men's socks approximately 150g, and children's socks 80g. You can use leftover yarn to knit socks different color, you can knit them from goat fluff, then the socks will not only be warm, but also soft and fluffy. To ensure that down or natural wool socks are durable and last longer, the most worn areas can be reinforced by knitting. To do this, add a stronger thread to the main thread of fluff; usually the heels and the sole of the sock are most susceptible to wear. For those who want to learn how to knit socks, we advise you to read our recommendations and then start practical application skills.
The socks are knitted on five needles in the round, using regular stockinette stitch. Work begins with an ornamented cuff or elastic band. First you need to make a calculation. This is important especially for beginners, for those who do not yet know how to determine the size of a sock by eye. After all, often a sock turns out to be the right size, but it’s impossible to put it on, it turns out to be narrow in the instep. To prevent this from happening, we will take measurements of your legs. To ensure that the sock fits, especially in the instep, you must measure your foot.
We measure the volume of the leg at the ankle, how to correctly take measurements from the leg to determine the size of the future sock is shown in the diagram, we will take 23 cm as an example. Approximately 36-37 size. Then you need to make a knitting sample for the main sock pattern and determine the knitting density and then count the number of loops required to complete this sock. For example: 3 loops = 1 cm, your knitting needles are No. 2.5. This means 3 loops x 23 cm = 69 loops. We round the number 69 to an even number to divide it into four spokes. We get 72 loops, there will be 18 loops on each knitting needle, these are socks of size 36-37.
To practice, try knitting a sock using 40 stitches. We start knitting a sock with a set of stitches on two knitting needles folded together, this is as usual when . Pull one out and tightly knit one row with a 1x1 elastic band, at the same time distribute the stitches onto four knitting needles, 10 each. Pin to the stitches of the first knitting needle. You will use this spoke to guide you. Then tie the end of the thread to the working thread with a knot. The knitting will close in a circle, there will be no more edge loops.
Knit from right to left along the outside of the circle 5 cm with a 1x1 elastic band. After knitting the rib, work in stocking stitch 5cm to the ankle, then start at the heel.
 How to knit the heel of a sock correctly .
Often those who know how to knit find it difficult to perform this particular element at the sock, so we advise you to carefully read and knit the heel of the sock. Divide the knitting into 2 equal parts and knit the loops of only two knitting needles: the 3rd and 4th. For ease of knitting, tie the loops onto one knitting needle. Then knit the fabric in stocking stitch to heel height. You can determine the height of the heel of the sock by the number of loops .
The height of the heel affects the width of the sock in the instep, so in order for the sock to be comfortable to put on and not be too wide or squeeze the foot, you need to correctly calculate the number of loops for the height of the heel.
How to knit the heel of a sock correctly .
Often those who know how to knit find it difficult to perform this particular element at the sock, so we advise you to carefully read and knit the heel of the sock. Divide the knitting into 2 equal parts and knit the loops of only two knitting needles: the 3rd and 4th. For ease of knitting, tie the loops onto one knitting needle. Then knit the fabric in stocking stitch to heel height. You can determine the height of the heel of the sock by the number of loops .
The height of the heel affects the width of the sock in the instep, so in order for the sock to be comfortable to put on and not be too wide or squeeze the foot, you need to correctly calculate the number of loops for the height of the heel.
The number of outer loops should be equal to the number of loops on one knitting needle. In your case, this is 10. When you knit the fabric, knitting the front row, stop knitting. You need to shape the heel of the sock. It is achieved by decreasing the loops. Divide, including the outer loops, into 3 parts; if not divided, leave the rest in the middle. When knitting an experienced sock, distribute the loops as follows: six loops on the outer knitting needles and eight in the middle. Now let's start gradually learning how to knit the heel of the sock.
1st row: purl stitches, knit 6 loops of the 1st side part, then all the loops of the middle part except the last loop. Purl it together with the adjacent loop of the 2nd side part. Turn knitting.
2nd row: facial loops, Remove the outer loop and pull it tightly in the knitting needle. Then knit all the loops of the middle part, except for the last loop; knit it together with the adjacent loop of the 1st side part of the front part behind the back wall. Turn the work around. Repeat from the first row until there are no loops left on the sides of the sock. Only 8 loops of the middle part of the heel should remain on the knitting needle. To prevent the heels from fraying too quickly, you can add a synthetic thread to the main thread; after finishing knitting the heel, tear off the thread.
Now let's learn how to knit a sock until the toe decreases .
Knit this part of the sock in the round with knit stitches. In the future, the top of the toe can be knitted in openwork stitch or any pattern, and the sole, for convenience, only in stocking stitch. To do this, use the knitting needle on which the loops of the middle part are located, cast on front side sock additional loops from the outer loops of the fabric. From each outermost loop, there should be one knit stitch in your example. In your example, knit them with a free knitting needle and then with another knitting needle, 10 loops on the 2nd knitting needle. Using a free knitting needle, cast on new loops from the other edge of the heel fabric; there should be 10 of them. On it, knit half the loops of the middle part - 4 loops. There are again four spokes in your work. There should be more stitches on the 3rd and 4th than on the 1st and 2nd.
Knit in the round and at the same time decrease the extra stitches on the 3rd and 4th knitting needles, knitting them 2 together, purl through 2 rows of circular knitting. It is better to make decreases on the sides. When the original number of 10 loops remains on the knitting needles, stop decreasing and continue knitting until the end of the little finger.
You need to complete the sock by decreasing the stitches on the toe. How to knit a toe correctly. Some complete With two sides of the sock and make a decrease on both sides, which makes the toe flat. We recommend decreasing stitches on the toe of the sock evenly on all four needles. with this decrease, the toe turns out round and even, like a natural extension of the sock. At the beginning of the 1st knitting needle, knit 2 together knitted behind the back walls, at the end of the 2nd knitting needle - 2 knitted together behind the front walls, at the beginning of the 3rd - 2 knitted together behind the back walls and at the end of the 4th - two knitted together behind the front walls. Decrease until 1 stitch remains on the needles. Then break the thread, pull off the remaining loops with the end and hide it on the inside of the sock.
The sock is ready, you need to knit the second sock in the same way. The socks can be washed and stretched a little to give them shape. Children's socks are also knitted this way, but the size needs to be made smaller.


