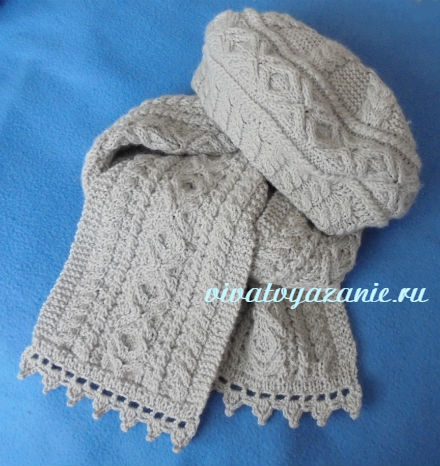
Knitting pattern for a beret with braids. My version of knitting a beret from voluminous braids (added)
Good day!
I immediately apologize for the quality of the photo. But it turned out to be difficult to take a photo of a black knitted product, and even on a phone...
Well, now about the beret itself:
A friend asked me to knit a beret for her. How happy I was when she sent me the chosen model, because there was a description for it.
I wanted to suggest that my friend knit something else, but I decided to experiment anyway. In general, I enlarged the picture, and away we go - “I twist, I twist, I want to confuse...”
Here's the result
Looks better on a "human" head 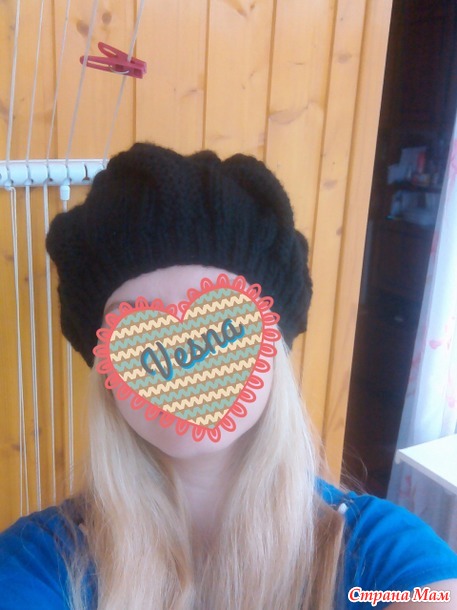
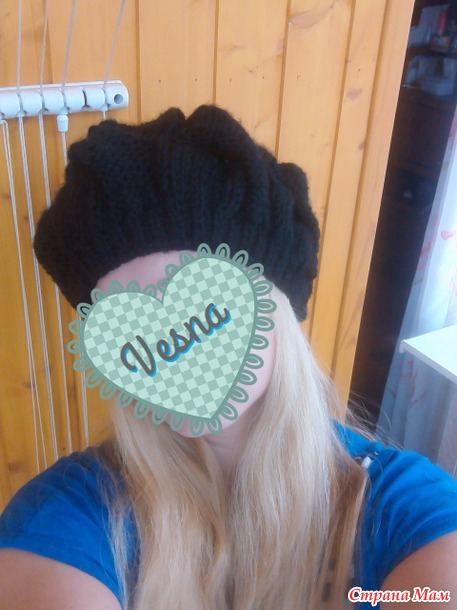
The top of the head is not visible in the original photo, I did it this way
And a little description.
The threads were quite thick
so I decided to try knitting needles big size. I knitted it simply with canvas (not in the round), so it has a seam at the back. I knitted an elastic band on needles No. 4 (90 + 2 loops, two rows with a hollow elastic band + 6 rows 1*1). In the last row I evenly added loops to make seven braids. In the original, it seems to me that there are still 8 of them, but the option with seven suited me. For braids I switched to needles No. 8. Well, and most importantly, I did the overlap of the braids in two steps. That is, I transferred 10 purls to the auxiliary needle before work, knitted 5 knits, then 10 purls from the auxiliary needle, then the remaining 5 knits. Purl row - I didn’t cross anything, but in the next knit row I did it again. I knitted 5 knits, then purled 10 on the auxiliary needle, knitted 5 knits, then purled from the auxiliary needle.
This way the braids turned out voluminous and didn’t pull anything
I hope my experience is useful to someone. The beret turned out maybe not exactly like the original, but it is very similar. The owner of the beret was satisfied
Addition. Description of the "crown"
Having knitted 20 or 22 rows with a braid pattern (I already gave it away, but my memory is failing me), I began to make decreases. I made decreases in the front rows, in the purl rows I simply knitted according to the pattern, as the loops look without decreasing. The braid consists of two parts: 10 purl and 10 knit. At first I didn’t touch the facial ones. I decreased only the purl part in each of the seven braids: the first two purl stitches together, then the six purl stitches, then the last two purl stitches together. And so on, in each subsequent row I knitted the first two and last two purl loops together. Repeated until there were 2 purl loops left (that is, the fabric was 10 knit, 2 purl, 10 knit, 2 purl, 10 knit, etc...) Then in the next knit row: the first two knit stitches together, six knit, last two knit stitches together tilted to the left (), two purl loops together with a purl (it turned out 8 knit 1 purl, 8 knit 1 purl...) In the remaining facial rows, I only decreased the knit stitches in the same way, I simply knitted the purl with the purl, it just separates the wedges of the crown. I repeated until there were two facial ones left in each wedge. I pulled the remaining loops together and made a back seam.
I hope I wrote it clearly. It turns out it’s easier to do than to explain, in practice it’s simple, but it’s more difficult to write
There was another nuance. Unsightly holes have formed in the area where the braids intersect near the back seam. In the rest of the canvas, this was not the case in other braid crossings. But a couple of swings of the hook solved this problem.
/ 01/26/2016 at 22:33
Good day, dear readers!
Finally, a real frosty and snowy winter has arrived, and you can’t do without hats. Even those who don’t like to wear them and think that no hats suit them (I’m definitely one of this number). But I still had to knit a beret for myself.
And its unusualness lies in the fact that I did not knit the beret traditional way- from the bottom from the rim to the top of the head, but in a slightly different way. And now about this in more detail.
To knit a beret, I needed less than 100 g of Pekhorka “Narodnaya” yarn (30% wool, 70% high-volume acrylic), knitting needles No. 3.5.
IMPORTANT! My calculations for loops are based on a head circumference of 54-56 cm. If you are used to knitting exactly according to ready-made descriptions, but these dimensions do not suit you, try changing the thickness of the knitting needles and yarn. Pre-knit sample patterns to determine the size.
I conceived the design of the beret as a team in a sense. That is, first I knitted a long vertical strip with a “Curly strand” pattern, and then tied a headband to this part and top part beret.
So, let's begin. First, we put 24 loops on the knitting needles (22 pattern loops + 2 edge loops) and knit the pattern according to the pattern (please look at the pattern in the article about ).
We make 12 repeats in height with a pattern and close the loops. The middle part of the beret with a transverse braid is ready (for the sake of convenience, I will further call this part “braid”). We will tie the rest of the beret to this part.
First we tie the headband. We do this: under the chains of edge loops of one edge of the knitted part of the “braid” we cast on loops for the rim as follows: insert a knitting needle under both walls of the edge loop and pull the loop through. We knit 5 loops in this way. For the 6th time, we knit 2 loops from one edge, picking up the edge loop with a knitting needle the first time under both of its walls, and the second time only under the front wall.
We repeat this until the end of the row, knitting 2 loops from every 6th loop of the edge row. As a result of this set of loops, we will get a slightly tightened edge of the “braid”, which will subsequently give the necessary expansion and volume to our beret.
After casting on stitches from the selvedge, I ended up with 113 stitches to knit the headband. We knit the next (purl) row with purl stitches. Then we knit the headband with an elastic band and braids.
Description of the pattern “Elastic band with braids”:
Row 1: P1, *k4, P1*;
Row 2 and all even rows: *K1, P4,* K1. (or, more simply, we knit according to the pattern);
3rd row: 1 purl, *move 4 loops to the left (slip 2 loops unknitted and leave ahead of the work, knit the next 2 loops, then knit the removed loops),* 1 purl;5th row: repeat from 1st row.
We knit a headband of the required height. My elastic band braids are intertwined 3 times in height, which seemed enough to me. After the last shift of the loops, we knit 1 more purl row and in the next row we close the loops in the rhythm of the elastic band (we close the loops of the braid by knitting them with knit loops, purl loops with purl loops). The headband is ready, although in fact, half of the beret is already ready. It remains to finish the upper part.
To do this, we collect loops from the other edge of the “braid”. Only now we don’t need to tighten the fabric as we did for the rim. Therefore, we cast on loops alternating every other time: once we knit 1 loop, inserting a knitting needle under both walls of the edge loop, and once we knit 2 loops - under both walls of the edge loop and under its front wall.
As a result of the set of loops, I got 146 loops. If suddenly it doesn’t come together a little, you don’t reach this number, then you need to adjust the quantity, since that’s exactly how many loops are needed to evenly distribute them across 8 wedges of the bottom of the beret and + edge loops.
By the way, you can adjust the quantity in the next purl row, which we will knit with purl loops - remove the extra ones somewhere by knitting 2 together, or add a crossed loop from the gap between the loops. I think you'll figure it out.
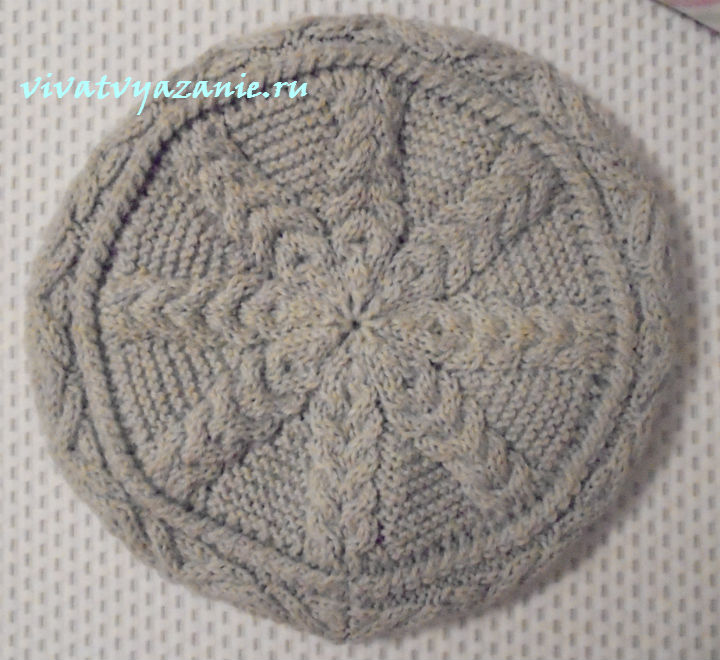
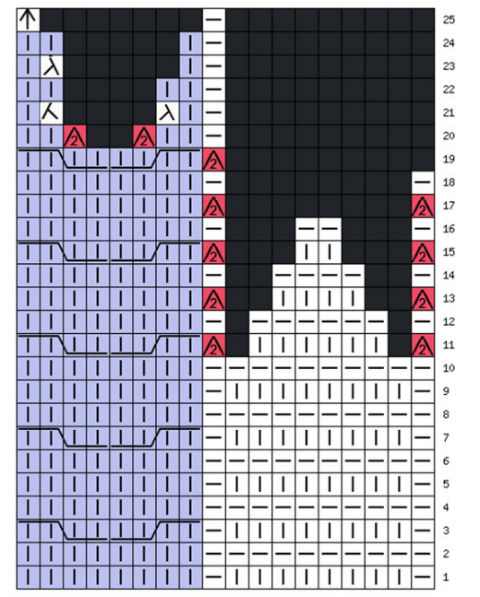
So, we have 146 loops on our knitting needles. We knit the bottom according to the given pattern. The diagram is given for one wedge. Just repeat it 8 times in a row. By evenly decreasing the loops of the wedges, we get a beautiful “flower” of eight petals.
The diagram shows both front and back rows. For greater clarity, I marked the loops of the braids on the bottom blue, and also highlighted the places where the loops were decreased in other colors.
After knitting all the rows according to the pattern, you should have approximately 18 loops left on the knitting needle. We break the working thread, thread it with a needle into these loops, tighten and fasten. All that remains is to sew it.
And, by the way, if you want it to be warmer, you can additionally knit and hem a cover under it. How can , I already wrote on the blog once before.
Good luck, dear knitters, and smooth stitches! Arinika was with you, see you again!
P.S. And later this beret was contacted by someone like this :

Beret with braids
Unfortunately, sometimes winter brings unpleasant surprises in the form of slush and greyness. If today the weather outside your window does not please you, then this is not at all a reason for frustration and melancholy. On the contrary, it means it's time to tie new item for your wardrobe. You can rest assured that by the time the design for this beautiful beret is completed, the weather will have changed better side, and you will have an extraordinary new thing.
If you decide to knit this headdress, then it is advisable to have an idea of what the braid pattern is and know the technique of its implementation. If you have never knitted with this pattern, first knit a small sample. So, it will be much easier for you to start knitting the pattern directly in the beret itself. In addition, this way you can accurately calculate the number of stitches that you will need to knit this wonderful beret.
M or L. The length of the finished product is approximately twenty-four centimeters.
Materials you will need for work:
One hundred and fifty grams of any yarn that contains at least a small amount of natural wool. This will allow you to stay warm in any weather. You also need circular knitting needles and double pointed knitting needles.
Knit the elastic with knitting needles that will be one size smaller than the knitting needles for knitting the pattern of the main beret fabric.
Thanks to this trick, your beret will fit perfectly to your head, and therefore hold on better.
Work density:
In a square pattern measuring ten by ten centimeters, you should get 17 loops and 22 rows.
Knitting sequence:
The pattern of this headdress is performed in circular rows, starting from bottom to top.
Using circular needles, cast on eighty-five or ninety-six stitches, depending on the size you need. You need to knit ten circular rows using the 3x3 rib pattern. After knitting these ten rows, make a transition row. To do this, you need to knit one circle according to the following pattern: * 3 purl, 1 knit, 1 yarn over, 1 knit, 1 yarn over, 2 knit, 1 purl, 2 knit, 1 yarn over, 1 knit, 1 yarn over, 1 knit *, repeat from star to star until the end of this row. At the end of this round you should have one hundred twelve or one hundred twenty eight stitches in your work.
Now go to the knitting needles bigger size and proceed to the most important part of the whole work. Here you switch to knitting a braid pattern and now knit according to this pattern: * 3 purl, then come the loops of the pattern attached above. Here the yarn over that you knitted in the previous row needs to be knitted as a knit yarn over the front thread *. Repeat from star to star until the end of the row. In a similar way, you should knit 7 - 8 repeats of the braid pattern with knitting needles. When reproducing a braid pattern, the most important thing is to count the loops correctly. And then no problems or difficulties will arise.
You will need double-pointed knitting needles at the moment when the total number of stitches cast on for the braid pattern does not allow you to do the work on circular knitting needles.
After you complete the entire braid pattern, you should have from forty-two to forty-eight loops on your knitting needles.
Now the next circular row must be performed according to this pattern: knit every three purl loops together with a purl stitch. At the end you will have between twenty-eight and thirty-two stitches left.
In the next row you need to knit two knit stitches together again using the front thread. And knit in the same way until the end of this row. All that remains is to cut the working thread and fasten it. To do this, pull it through the two remaining loops, pull it tight and cut it on the wrong side of the beret.
If you want to make a beret with braids even more unusual and original, then you have an excellent opportunity to show your imagination and design abilities. One way to decorate this beret can be with rhinestones, which you can glue to any free space in the braids. Any beads and sequins are also perfect. The scope for imagination is limitless. The main thing is, don’t be afraid to experiment and look for new opportunities to decorate a knitted product.
Your new beret with braids is ready. It remains to give it the most presentable appearance. Usually, no matter how skilled a needlewoman you are, the loops of a piece of work that has just been completed lie unevenly. In order for the fabric of the finished product to become beautiful and perfectly smooth, you just need to wash it lightly. warm water and dry on terry towel. That's the whole secret.
Once you have mastered knitting the proposed pattern with braids, be sure that now you can master any, even the most complex and intricate pattern. Now it's time to go for a walk and see your work done in action. And be sure that you have secured the admiring glances of passers-by.