Wooden Easter egg. DIY wooden egg painting
Lots of people love Easter. Even people who are not very religious prepare for this holiday. One of the main Easter symbols- egg. Usually people paint for Easter chicken eggs, but with a child you can also write wooden egg . The painting process is so exciting that you need to buy several blanks at once, since it is difficult for household members to resist starting to paint the crafts themselves :)
Murals wooden eggs We were taught by a wonderful and very modest craftswoman Natalya at a master class on creating souvenirs for Easter (details here).
So, to paint wooden eggs we will need:
- wooden egg
- simple pencil and eraser
- brushes, paints and palette
- spray bottle with water
- napkins

First of all, we prepare paints for painting.
Preparing paints for painting wooden eggs
Our advice:
1. It is better to take tempera paints - they are easy to wash if the design has spread on the wooden egg.
2. Squeeze a little paint into the palette. Light colors first, dark colors next to each other. Immediately add a drop of water to the palette to dilute with paints. It is very convenient to add water with a syringe without a needle.

Preparing paints
Preparing a drawing for a wooden egg
We draw a picture on our wooden egg symbolizing Easter.
If the testicle is standard - small (like a chicken), then we draw only the contours without details.
Our daughter wanted to depict Jesus Christ with Angels on one side of the testicle. And on the other side she wrote the letters XB (Christ is Risen).

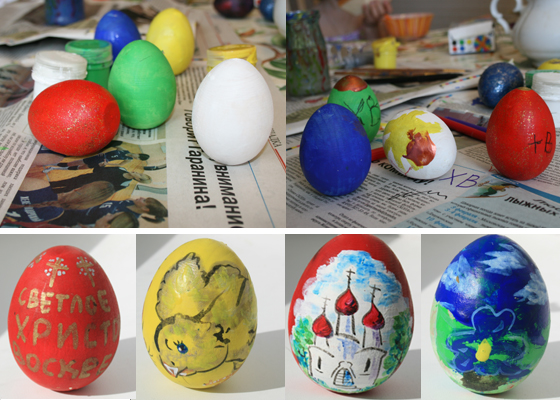
Now we start painting our egg - the main souvenir for Easter.
Painting a wooden egg
1. in one color, including places with a pencil drawing.

2. When the paint dries, use broad strokes to draw the contours of the future drawing (based on the translucent pencil sketch).

3. While the outlines of the drawing dry, draw patterns - in a bright, suitable color.
Since my daughter chose a blue background, she decided to draw the patterns in bright blue.

4. Draw the details: face, hair, luminous halo.

5. We trace the letters XB and our wooden egg is painted:

And here is the original, from which the drawing for our wooden egg was copied.

It seems to us that it is similar. Olesya is very pleased!

We also painted a huge wooden egg. Patterns were already drawn on it, and the children (later their parents) painted these patterns with paints. Impressive picture!
Here is the original appearance of the wooden egg:

And this is the painting process:

By the way, this painted wooden egg will be placed in front of our Annunciation Cathedral.
Have you, dear readers, ever painted wooden eggs ?
In order to paint Easter eggs, it is not at all necessary to be a master of a brush. In addition to traditional painting with an artistic brush, there are more simple techniques, some of which do not need this tool at all. Let's look at the most popular of them.
Bonded painting
To paint Easter eggs using this technique you will need:
- cotton swabs (pokes);
- acrylic paints;
- brushes;
- sponge;
- cotton pads;
- sunflower oil or furniture varnish.

Progress:
1. Boil an egg hard-boiled, dry and cool it. If you want to make a real Easter souvenir, carefully remove the contents of a raw egg through small holes in the bottom and top and paint the dried shell.
2. Using a foam sponge, cover the entire surface of the egg with white acrylic paint. Dry for a few minutes. If the coating is not thick enough, apply another layer.
3. Start painting the Easter egg. We suggest you decorate the shell with bunches of rowan berries. Dip a poke (cotton swab) into red paint and, applying it with perpendicular movements to the shell, draw 10-15 large berries, forming a bunch.
4. The second element of our Easter egg painting will be rowan leaves. First, using a cotton swab, draw lines with green paint - the bases of the leaves. To enliven the painting, apply a more saturated color stroke with a thin brush to each green line.
5. Yellow strokes made on the leaves with a thin brush will further enliven the painting and make it more voluminous.
6. Draw highlights on the berries and leaves by applying a few white strokes using a brush or cotton swab.
7. To create contrast, add a few black dots to the base of the berries.
8. After the painting on the Easter egg has dried, coat it with furniture varnish. A boiled egg can be processed for shine vegetable oil using a cotton pad.

Easter egg painting with wax
Easter eggs painted with wax are called pysanky. This technique is traditionally popular in Ukraine and allows you to create both simple souvenirs and genuine artistic masterpieces.
To paint eggs using wax technique you will need:
- a raw egg;
- pisachok - a device for applying hot wax to the shell. You can make your own pisachok by twisting a small piece of foil into a funnel and securing it to a wooden stick. Wax is placed in foil, heated over a flame to a liquid state and applied to the shell through a hole in the funnel;
- candle;
- vinegar;
- cotton pads.
Progress:
1. From a raw egg at room temperature (not cold!) Remove the contents through small holes at the bottom and top. Wipe the shell with a cotton pad soaked in vinegar.
2. Prepare egg dye - it can be natural or artificial dye.
4. Immerse the scribbler in the melted wax and heat the contents of the funnel over the flame again.
5. Apply the wax design by rotating the egg, but without moving the scribbler.
6. After the wax has hardened, dip the egg into the dye and let the paint dry.
7. While heating the wax painting over a candle flame, gradually remove the wax trace from the surface of the shell with a woolen cloth. The areas where the wax was applied will remain unpainted, and you will have a light design on a colored background.

Working with a pissy

The traditional color of Easter eggs is red


The Easter egg is a model of the world, so eggs are often painted with belts
(sky, earth and underworld) and draw animals and plants on them

The painting includes birds, flowers and patterns with waves.

Variety of colors and styles

This is what the Lusatian wax painting of Easter eggs looks like
Easter egg painting with engraving
Easter eggs painted in this original technology, are called “shkryabanks”. To create a painting-engraving you will need:
- chicken, duck or ostrich egg, cleared of contents;
- a sharp and thin tool for engraving, for example, a stationery knife;
- paint for Easter eggs.
Progress:
1. Dye the eggs in your chosen color using natural or artificial dye.
2. Dry the shell for 24 hours so that the dye hardens well.
3. Using a sharp tool, “scrape” out the eggshells selected ornament (you can use a stencil).


Modern scrap banks

Even a simple scraper can be performed masterfully
Ornaments for painting eggs
Browse our selection of Easter egg designs to see if one of them will inspire you to experiment.

A simple pattern for stanchion painting and painting with a traditional solstice

Traditional painting

Ornament "Intercessor"


By the way, you can decorate not only ordinary chicken eggs, but also wooden models- they definitely won’t crack, and a particularly beautiful design can be preserved for years. If it is customary for your family to exchange Easter souvenirs, do this.
There are several weeks left before the bright holiday of Easter, but everyday experience shows that gifts should be taken care of in advance. Therefore, today we will start making them: we will paint wooden Easter eggs. This creative activity Not only is it suitable for children of all ages, but it also seriously captivates some adults!
What we need:
- wooden blanks in the shape of eggs;
- acrylic paints;
— shiny gel for children's creativity;
- permanent markers of different colors or felt-tip pens, glitter markers;
- a jar for water;
- brushes of different thicknesses (wide, thin, medium);
- sponges for washing dishes.

Wooden blanks can be bought in art salons, shops for artists, or also ordered in online stores using an Internet search. Hurry up! The closer to Easter, the greater the likelihood that the preparations will be sold out.
Acrylic paints can be matte, but glossy and pearlescent ones look especially impressive and festive.
So, when everything you need is prepared, we begin the creative activity.
Step 1. Prepare the place for the lesson
Cover the table on which the eggs will be painted with newspapers. We dress the child in something that we don’t mind getting paint on, and we roll up the sleeves. Paint will behave unpredictably in small hands, so place a damp cloth or sponge nearby to immediately wash off stains from your hands or face.
Step 2. Choose paint for the background
The traditional color of the Easter egg is red. But for children's activities you can expand the palette and make multi-colored eggs. Let the child choose what color egg he will make.
Lightly moisten the brush with water, dip it in the paint and begin to apply paint to the testicle, from the top tip down, holding the testicle with the other hand. If the paint lays down thickly, we try to spread it thinner on the wooden surface. Help your child and encourage him! Even if it seems to you that it doesn’t turn out very well, rest assured: when the egg is finally painted and varnished, it will look very good.
The testicle tends to roll away, so we hold it with the other hand. If the egg slips out of your hands or there are fingerprints on it, if the paint has worn off a little, it’s okay. When the background is dry, the erased areas can be painted again.

Step 3. Dry the background
Place the eggs with the finished background in a row to dry. You can relax for 10-15 minutes and listen to a story about why it is customary to give eggs at Easter, think about what we now want to depict. You can practice writing the letters XB on a newspaper underneath.
Step 4. Take the egg with the dried background in your hands. And then the flight of fantasy begins!
- "Christ is Risen!"
Take a felt-tip pen or permanent marker and write the letters XB on the side of the egg.
If your baby doesn’t know how to write yet, you can write it in pencil and have him circle it with a marker.
If older kids are studying, the inscription can be decorated with monograms, flowers, dots, and stripes.
- Other images
On the egg you can draw flowers, multi-colored stripes and strokes, birds, a rainbow, the sun, the crown of a temple.
For such images, take a thinner brush. If, during application, the paint begins to flow down abundantly, it means that you have applied too much water to the brush. You can wipe the side of the egg with a sponge and start again.
When the image is ready, set it to dry again and take the next, unpainted egg.
- Shiny finish
When all the eggs are ready and dry, take glitter gels for children's creativity, glitter markers, and pearlescent paints. Adding some sparkly touches to the images. You can make “pearl” dots on the surface of the egg, stripes, paint the top of the egg, make shiny rays of the sun. You can highlight the letters XB with a shiny marker.
All is ready? Carefully place the eggs on the bases and go wash your hands.
If acrylic paint has hardened on the skin and is difficult to wash off, you need to rub it with a hard sponge (for example, a dish sponge) under running water.
- Varnishing
The testicles will look more impressive if the next day they are covered with one or two layers of clear acrylic varnish. To do this, dip a wide brush into the varnish and walk over the surface of the egg several times. If you have some parquet varnish left after repairs, you can also use it for coating. 

When republishing materials from the Matrony.ru website, a direct active link to the source text of the material is required.
Since you are here...
... we have a small request. The Matrona portal is actively developing, our audience is growing, but we do not have enough funds for the editorial office. Many topics that we would like to raise and that are of interest to you, our readers, remain uncovered due to financial restrictions.
Unlike many media outlets, we deliberately do not make a paid subscription, because we want our materials to be available to everyone. Easter is already approaching, and therefore it’s time to think about such an interesting and beloved activity by many as Easter egg painting
— . The latter is not just another hobby for needlewomen, but an entire tradition, the history of which goes back to ancient times. As you know, many peoples and even individual regions within the borders of one country have their own rules and customs of painting, using original designs and patterns. Accordingly, craftsmen are accustomed to distinguishing between several types of decorated Easter eggs, namely: – Easter eggs raw eggs
— , painted with beeswax or paints, Krashanki

— – hard-boiled eggs, painted in one shade without patterns, specks

— – multi-colored eggs with a single-color background and many multi-colored dots (speckles, spots or stripes) applied with melted wax, rags

— – Easter eggs, the main pattern of which is scratched onto their surface using any sharp object. As a rule, they have a monochromatic background obtained through the use of natural dye (piece ones are smeared and do not allow you to create neat designs), – little ones beautiful eggs

, decorated with any invented patterns applied with acrylic and other types of paints.
Painting Easter eggs with hot wax
- One of the most popular is painting them with hot wax, which is both a fascinating and concentration-requiring activity. In order to draw complex patterns on an egg, craftswomen use:
- wax crayons (sold in office supply stores) or melted paraffin candles, tinted with food coloring
- small metal containers (deep bottle caps or old tablespoons will do for the first time)
- copper wire or needle (crochet hook)
Progress:
1. dyes for eggs (natural or food)

2. After the egg is completely dry, you should start coloring it. To do this, you need to first melt the colored crayons (each separately), placing them in small containers placed above the flame. The latter can be fire from a tablet candle located on the desktop. In this case, it is important that the fire heats the wax all the time while the design is being applied, but does not bring it to a boil.
3. After all the necessary preparations, you can now begin to directly apply intricate patterns. On a needle or wire used as a painting brush, take a small amount of wax and draw a line or make a dot on the shell. Subsequently, it should be dipped in wax after applying each stroke.

If the egg will be painted in only one color, after applying all the necessary patterns, it must be wiped with a soft cloth, which will remove minor errors. Then grease the shell sunflower oil or fat that gives it shine.
If you plan to apply patterns of different shades, you must first apply strokes of the same color, wait for them to dry completely, and only then begin creating patterns of the next shade.


Perhaps, after reading all this, not everyone will understand how to act, and therefore below we present to you a master class on painting eggs with hot wax, after viewing which everything will finally become clear:
As you can see here, the craftswoman uses wax of several shades, which makes her Easter eggs look beautiful and festive, but this does not mean that monochromatic patterns are inferior to multi-colored ones:


It is clear that beginners simply cannot know all the possible options for painting eggs with molten wax. And for starters, you can use it ready-made templates, the number of which is very huge. For example, these could be the following drawings:

However, you can decorate eggs using this technique without pre-coloring them. In this case they might look like this:


No matter how beautiful the Easter eggs described above are, hot wax is not the only thing that can be used to decorate eggs. Alternatively, they can be:
- wrap it in an old colorful tie and dip it in vinegar for a few minutes,


This is what the result will be:

- paint the shell with a permanent marker,


- wrap eggs in lace and dip in food coloring,


- Cover the eggs with confectionery sprinkles.


The methods for decorating Easter eggs do not end there. They can also be wrapped with ribbons, placed in openwork nets (specially crocheted), paint with ordinary paints, decorate with leaves of plants and any other way that comes to mind. The main thing to remember is that bold experiments using toxic substances It’s better to do it on blown eggs that no one will eat.

But it is preferable to color hard-boiled krashanka with the help of natural dyes, which use not only onion peels, but also pomegranate juice, boiled spinach leaves, strong coffee or tea, leaves red cabbage and many other products.
If you want to please your loved one on Easter Sunday loved one unusual and a beautiful gift, then pay attention to the master class on painting an Easter egg offered on our website. With its help, if there is desire and necessary materials, you can create a wonderful souvenir that will keep the warmth and love of your heart for many years.
To paint an Easter egg you will need the following materials and tools:
- wooden egg blank;
- acrylic paint (white zinc) - will be used as a primer for wood;
- a set of acrylic paints;
- round, synthetic brushes of different sizes;
- acrylic, glossy varnish for decorative and applied works;
- awl (used for convenience during painting);
- pencil;
- eraser;
- palette;
- jar.
1. Before you start painting a wooden egg with paints, you need to prime the workpiece. Cover the surface 2-3 times with white acrylic paint. You can also use special professional compounds for wood or simple PVA glue as a primer. After PVA glue, the workpiece will be slightly shiny, and the protective film will be transparent, and after acrylic, the surface acquires a whitish tint, but the most characteristic wood pattern is preserved. If you have a desire to present painted eggs to all your friends, then it is better to prime the blanks all at once. Leave the primed egg to dry for at least 3 hours.

2. Place the wooden egg on an awl so that it is convenient for you to hold it when working with paints, and you do not smudge the drawing or get dirty.
Using a hard pencil, apply the main elements of the design to the workpiece. We suggest drawing Gorodets birds in a rose garden. In the middle of the egg, first draw one bird, and then opposite side- second. Surround the bird figures with flowers; at this stage there is no need to draw the elements; it is enough to create a beautiful, balanced composition.

3. The main colors present in Gorodets painting are red, pink, blue, light blue, green and yellow. As a rule, the base of the patterns - the underpaintings - is painted with paler shades of the above colors, so for the base, mix the colors with white. You should get circles of pink, blue and yellow shades. Use mixed colors to color the circles outlined in pencil. Try to evenly distribute circles of all colors on the surface of the workpiece.

4. Next green paint the foliage that frames the bird figures. The leaves in this composition are intended to unite the entire composition so that the flowers do not look like each one separately.
Then the same pink, with which you painted the bases of the flowers, color the wings of both birds.

5. The bird figures themselves must be painted black. Do this carefully and take your time. Hold the workpiece for painting by the handle of the awl; if necessary, simply twist the handle, and the egg will rotate around its own axis.

6. We move on to drawing the flowers and giving them a stylized volume. We start with “shading”. Shading in Gorodets painting is the drawing of details of elements more dark color. For the blue base, prepare a rich dark blue color so that it is clearly visible against the blue underpainting.
Decorate the middle of the blue flower with a blue circle of small diameter. Then use brackets to designate the petals.
On a pink flower, use a shade of red or burgundy. On the circle Pink colour on the left side draw a small circle, then draw the shape of a bud with a crescent and add petals at the end.
Repeat the same process with the yellow underpainting, only this time the paint color will be orange.

7. Also draw some shading on the leaves. It is better to start drawing from the bottom of the egg and move up.

8. The third stage of Gorodets painting is “living out”. With the help of animation you can transform and “revive” your painting. It is done in lighter shades than the underpainting, most often white.
We start with the same blue flower - first draw more petals, but smaller in size and place them on a circle of smaller diameter than the blue petals. In the center you can draw another small circle and add it in large petals at a fairly noticeable point.
On pink and yellow flowers, emphasize the middle by duplicating the outline of an oval or circle. Draw light petals on the bud, in the form of elongated, teardrop-shaped brackets, located towards each other.
On green foliage, also add 3-4 short strokes, imitating teeth or veins on the leaves.

9. When the blooming garden is finished, finish drawing the bird figures. On the tail of each bird you need to draw several feathers. Make 3 long strokes of pink and blue alternately.
Then start drawing the head - draw an eye, a beak. On the bird’s chest, make a “necklace” of dots of different sizes and teardrop-shaped strokes.

10. Draw a crest for the bird, add small feathers with small, short strokes. On the wings, draw a pattern reminiscent of flowers and complemented by imitation feathers.