Blurring the background in Photoshop. How to make a blurred background in a photo? Manual Blurs "Photoshop Tools"
Good day, dear readers. Blurred backgrounds are a fairly popular trend, especially when shooting portraits.
In the language of photographers, this effect is called bokeh. This effect is achieved due to a certain exposure setting and the quality of this effect directly depends on the lens.
You can easily repeat this effect in a graphics editor. Of course, we will not achieve such a result as in professional shooting, but a beautiful effect is ensured.
How to blur the background in Photoshop
I will show the solution to this problem in Photoshop version 2, since it is free. The procedure will be the same regardless of the software version.
- Open the desired photo in Photoshop. Not to affect anyone's rights to the photo, the role of a person will be played by a white rectangle.

- You need to create a duplicate of the layer. To do this, right-click on the layer and click "Duplicate Layer" ("Duplicate Layer").

- Now we need to separate the background into a separate layer. To do this, go to the top layer and open "Filter - Extract" or press Alt + Ctrl + X on the keyboard

- Use a marker to outline the part of the image that will not be blurred. Use the right toolbar to change the size and sensitivity of the marker.

- You can adjust the selection with the eraser. The path must be closed. After that you need to fill in the rest of the image and click "OK"

- As a result, we have two layers. On one foreground, on the second - back. We just need to blur the background.
- Open "Filter - Blur - Gaussian Blur" and use the slider to set the intensity of the blur.

- To save the result, click "OK"
- Save the image to your computer (Shift + Ctrl + S)
That's all. Here is the result.
Hello to all those who came to my blog. The weather is so cool today. Finally spring is felt. And with such a spring mood, I would like to tell you about one thing. Now many people already have cameras with which we can take beautiful portrait photos with a clear display of the main characters and a blurred background.
But still, not every cameraman has such a function (mainly only SLR cameras), and most people use smartphones, which also cannot shoot with a blurred background, but you want a beautiful photo. Am I correct? There is a way out as usual and today I will tell you how to make a blurred background in Photoshop. It's not difficult at all.
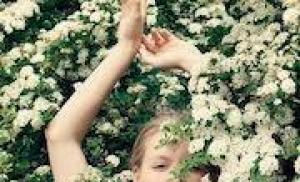
The easiest way to do this is to use a familiar one. But first, let's open the image in Photoshop where we want to blur the background. I chose a photo of a girl in Red Square.

Do it carefully. If you suddenly hurt too much, then always. But don't do it all in one click. It is better to periodically release the mouse so that in case of an error you do not return to the beginning.
Well, that seems to be all. Looks nice. But let's see a couple of other ways to broaden your horizons.
Eraser
In principle, everything is the same here as in the previous example, with a small exception.

Many people prefer to use a layer mask in these cases, although I do without it in such cases. But just in case, I'll show you anyway. It won't take a lot of time.
Layer mask

That seems to be all. Whichever method you choose, the result will be the same: Our friend is depicted with normal definition, and the background is blurred. That is, it immediately becomes more beautiful and more effective. see for yourself. By the way, what method did you like the most? Write, otherwise I'm interested.

No, after all, Photoshop is a great tool for working with images. I am still amazed - what a powerful, convenient and interesting editor it is. And at least knowledge of the basics will always come in handy in everyday life.
By the way, if you want to learn Adobe Photoshop in the shortest possible time, then be sure to take a look. this wonderful video course... All lessons are built in order, no extra water, everything is on the shelves. And the main thing is that everything is shown with live examples and told in human language. It will be clear to any user level.
Well, on this I finish today's lesson. I really hope that it was interesting and useful for you. Therefore, I recommend that you subscribe to blog updates to keep abreast of everything interesting. Well, I say goodbye to you for today, see you in other articles. Bye Bye!
Best regards, Dmitry Kostin
To blur the background in the photo many users turn to online services or to photoshop... You need to spend time on this and have some image processing skills. The effort is worth the effort - blurry edges with high sharpness on the subject look very beautiful. And the Bokeh effect, when the background turns into fabulous special effects, is completely discouraging.
But the blurred background can be made easier and faster on Android devices!
How to make a blurred background in a photo in principle?
On SLR camera very easy to get good blurred background effect... This requires sufficient lighting, fully open aperture and increased focal length.
Developers have learned to model bokeh effect previously available exclusively for DSLRs. The most important thing is to decide on the focus point. You must understand what will get high sharpness and clarity in the frame, and what will blur and become the background.
Today we will analyze the simplest method of creating a photo with a blurred background on Android devices.
The effect is amazing. But the programmatic method may not always work... For example, there are problems with mirrored surfaces (sometimes they do not blur). It's hard to capture and fast moving targets.

What you need to blur your photo:
Smartphone with a good camera;
Pre-installed version of Android 4.4 KitKat or higher;
Sufficient performance for image processing (otherwise the process will be very long);
One of the example applications below.
How to blur the background of a photo in Android using Google Camera?

Official app cameras from google very cool. And recently it has become available not only on Nexus- and Pixel-devices. To you would need Little practice, but the result will definitely delight everyone!
1. Download the app for free Google Camera and install it: https://play.google.com/store/apps/details?id=com.google.Android.GoogleCamera
2. After starting, you can refuse or agree with the geo-referencing (consumes battery power).
3. Hook the menu on the left side of the screen with a swipe to the right and select "Blur".
4. Now you will be shown instructions on how to use the background blur mode on the photo.

5. After activating the camera, focus on the subject, press the shutter button and slowly move the smartphone upward, keeping the subject in the center.
6. After you have taken the picture, edit the result by blurring the background more or by shifting the center of focus.
Realistic background blur on an existing photo or when shooting on Android

You can also achieve a realistic bokeh effect, like on an open aperture of a DSLR camera, using the application AfterFocus for Android devices. Edit existing photos or take a new photo according to the principle indicated for Google Cameras.
1. Download the free app AfterFocus: https://play.google.com/store/apps/details?id=com.motionone.afterfocus
2. After opening it, you will see in the interface " Smart focus
", In which you need to click on the button with the icon of the person in focus and outline the area where blur is not required.
3. Now select the soft focus area by clicking on the focus crown icon and marking the soft blur areas.

4. Icon with nature in focus is responsible for the hard mode of blurring the background - you need to paint the background area for maximum blur.
More applications for blurring the background on the photo for Android:
ASUS PixelMaster Camera.
Focus Effect by Dumpling Sandwich.
PicsArt Photo Studio & Collage by PicsArt.
"Photo Editor" by Aviary.
This Photoshop tutorial will show you how to add a blur effect to the background of your photo.
In this tutorial, we will use a type of blur such as radial or ray-like. And we will apply it only to the background.
So, open your photo in photoshop:
First, we need to separate the main image from the background.
1. To make a selection qualitatively better use the Quick Mask Mode tool
Make sure the colors are set in this position black / white

Take the brush tool and start painting over the part you want to separate from the background (in our case, it's a girl)


After you have completely selected the girl, click on the button to the left of the button with the "quick mask" - it will return you to normal mode. You will see that a selection has appeared.

2. Press the combination Ctrl + J to copy the selected background to a separate layer.
The layer panel will look like this:

3. Now apply the "radial blur" filter to the new background layer.
Filter> Blur> Radial Blur.
Set the following parameters in the window that appears:
Amount: 20 (set this parameter at your discretion)
Method: Zoom

Once all the settings are in place, click OK to see the result!

Photoshop has tremendous capabilities that allow you to make almost any changes to the image. A blurred background is widely used by many photographers. In real life, this effect is achieved thanks to the functions of the camera. But when the photo has already been taken, you can use the graphics editor Photoshop. This is the topic of this article.
Preparation
The blurring of the back occurs in two stages. It should be said right away that only minimal knowledge of this program is required from you. And even if this is your first time with Photoshop, then a ten-minute excursion through all the most necessary tools will allow you to achieve a blurred background. Any version of the program can be used. For this job, it is best to choose a quality image.
Instructions
The main idea of this method is to separate the background from the main part of the image, and only then apply filters to the desired area of the photo.

additional information
You can additionally use the "blur" tool and slightly correct the mistakes made at the selection stage. If you used a different method to create a selection, you can skip steps 4, 5, 6. The main thing is to understand that you need to separate the background from the main part of the photo. And how this will happen does not matter. Therefore, if you are better at using another instrument and do not handle the pen well, then it is better to use a tool that is convenient for you.

Conclusion
In Photoshop, you can perform a wide variety of image operations and change the background at your discretion. Combine meaning and take advantage of new opportunities. Fortunately, this program allows us to experiment endlessly and achieve the best result.