After installing the motherboard, the computer does not turn on. How to properly replace the motherboard and untie Windows from the old hardware
To get accurate information about a critical error that has occurred instead of rebooting, you need to disable automatic reboot mode in the Windows boot loader menu. This can be done if at the very beginning of the download you press F8 and select the download option - Disable automatic reboot on system failure
When loading in this mode, if a critical error occurs, the so-called Windows “blue screen of death” will be displayed on the monitor screen or BSOD - B lue S creen O f D eath. This term arose during the first operating systems of the Windows family, due to the fact that information about critical errors was displayed on a blue background. Such an error cannot be corrected by the OS itself, and to minimize the loss of user data, its operation is terminated abnormally. Critical errors can be caused by hardware failures or malfunctions, errors in system components, driver errors, or lack of driver errors for critical devices.
Critical error STOP: 0x0000007B Inaccessible Boot Device, which occurs when replacing the motherboard or changing the operating mode of the hard disk controller, occurs either because the new controller is not recognized by the system as a hard disk controller, or it is not possible to launch a driver that can service this controller.
At the very beginning of the operating system boot process, there are no drivers, including those that provide work with the hard drive, in the computer memory and special BIOS routines are used to perform I/O operations (for working with the hard drive - interrupt functions INT 13H functions 41h - 49h and 4Eh for LBA addressing). Hard disk data is accessed not using device drivers, but through calls to BIOS routines that allow the boot loader to perform standard disk I/O operations. So, for example, to read sectors of a hard disk, an interrupt is used Int 13h function 42h- extended reading. Function 42h transfers sectors from a specified area of the disk to the memory buffer. Before calling an interrupt, the following values must be written to the registers:
In AN - the value of the extended reading function is 42h;
In DL - drive number;
In DS: SI - the address of the disk address packet ((Disk Address Packet), which contains the information necessary to search and read data from disk media and place the results of the operation in RAM.
Then the interrupt command is executed INT 13h. In this case, the BIOS subroutine receives control, reading data from the disk and transferring it to RAM in accordance with the parameters of the disk address packet. Based on the result of the operation, function 42h returns in the AH register an indication of the successful (or unsuccessful) execution of the operation. Causing an interruption INT 13 the program again takes control and processes the received data. This is why the system starts loading and proceeds normally for some time. Calling BIOS interrupts allows the bootloader to perform necessary I/O operations, including keyboard, display, and file system operations. However, at a certain stage of boot, the search and reading of drivers that enable Windows to operate begins, since the OS itself does not use BIOS interrupts to perform I/O operations. The loading into memory and initialization of drivers and system services begins, information about which is stored in the registry section
HKLM\SYSTEM\CurrentControlSet\Services
Each driver has its own key, which includes the parameter Start, which determines at what stage of system boot the driver or service is loaded and initialized. The Start parameter can take the following values:
0 - BOOT - the driver is loaded by the bootloader.
1 - SYSTEM - the driver is loaded during kernel initialization.
2 - AUTO - the service starts automatically when the system boots.
3 - MANUAL - the service is started manually.
4 - DISABLE – driver is disabled.
At the initial boot stage, low-level device drivers are read and initialized from the system disk, the Start parameter of which is equal to 0
, including drivers through which access to the boot device will be provided. Thus, the system must determine the parameters of the boot device and load the driver it needs. If it is impossible to determine the parameters of the boot device, or it is impossible to load the required driver, the system cannot continue to operate, and it ends with a critical error of unavailability of the boot device (stop 7B).
When replacing the motherboard with a board of a different type, the hard drive controller, from the point of view of the operating system, will become a different, new device. During the initial boot process, Plug-n-Play (PnP) devices are identified by the system using a special code (PnP-ID), depending on the chipset on which the device is assembled, or chipset, and the new HDD controller assembled on a different chipset will have a different identifier. If the system “knows” the new PnP-ID of the HDD controller, and there is a driver to service it, then replacing the motherboard will take place without any problems. Otherwise, the HDD controller identifier, unknown to the installed system, will not allow it to load the driver necessary for operation. In other words, to get rid of a critical error Stop 7B it is necessary that the system classifies the new hard disk controller as a disk device class and has the ability to load a driver to service this class.
In light of the above information about the Windows boot process, there are 2 options for solving the problem:
Make the system work with the new hard drive controller using standard Microsoft drivers.
- add a new hard disk controller driver from the equipment manufacturer to a non-working system.
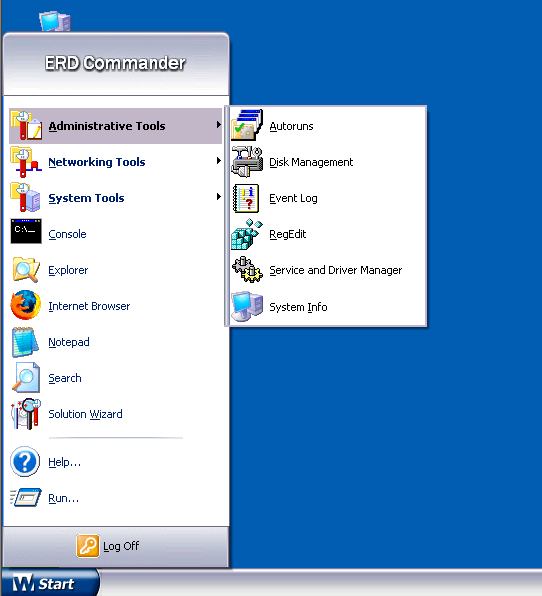
The first option is much simpler, safer and can be easily done using the usual import of several keys into the registry of a broken system, for example, using a rescue disk Microsoft DaRT, his predecessor ERD Commander or any other tool based on the Windows Preinstall Environment (Windows PE).
The second option is a little more complicated, since it is required not only to add an identification entry for the HDD controller, but also to associate the corresponding driver with it, as well as ensure its loading and initialization.
One of the ways to eliminate stop error 7B is to sequentially perform the following actions:
Switching the controller, if necessary, in the motherboard BIOS settings to Compatible Mode with a standard IDE controller
Typically, this is done in the hard drive controller configuration section and can have different settings,
Controller Mode: Compatible
Configure SATA as: IDE
SATA Operation as ATA
AHCI Mode: Disabled
SATA Native Mode: Disable
Using standard drivers from the Windows distribution to boot the system.
This usually doesn't require any special effort other than checking a few registry values.
In operating systems Windows 7 and older, there are standard drivers not only for the compatible mode (ATA, IDE), but also for the advanced mode (AHCI-Advanced Host Controller Interface), which allows you to use a simpler method for fixing the Stop 7B error, based on enabling the advanced mode operation of the hard drive controller in the BIOS settings (SATA AHCI) and changing the startup mode of the standard driver.
Resolving stop error 7B using standard Microsoft drivers.
There is no standard driver supporting SATA AHCI controllers in Windows XP, so the hard disk controller must be switched to compatible IDE (ATA) mode, but if Stop 7B error occurs in this mode, then the reason may be either use in the system (up to replacing the motherboard) a non-standard driver from the hard drive controller manufacturer, or the inability to recognize a new controller at the boot stage, which is not surprising for an outdated OS.The Windows XP distribution includes standard drivers for working with IDE (ATA) HDD controllers (atapi.sys, pciide.sys, pciidex.sys, intelide.sys), which can be used for any IDE-compatible disk controller, ensuring its recognition in as a standard IDE controller.
In rare cases, BSOD 7B may occur in Windows Vista / 7 due to the inability to recognize the HDD controller as a hard disk controller using the PnP identifier. In this case, just like for Windows XP, it is necessary to ensure that the disk controller is recognized by its PnP. But most often, the cause of Stop Error 7B for OS data is that the standard driver that could be used has settings that do not allow it to be used during the boot phase (which will be discussed below).
First, a little theory. Information about devices known to the system is created based on .inf files when installing new equipment and is stored in the registry section:
HKEY_LOCAL_MACHINE\SYSTEM\CurrentControlSet\Control\CriticalDeviceDatabase\
Therefore, the solution to the problem of correctly recognizing the disk controller is as follows:
Determine the ID of the new hard disk controller.
- make, based on the identifier, a change in the registry of a system that terminates with a "Stop 7B" error, allowing the use of standard drivers from the Windows distribution. In other words, indicate to the system that a device with such and such a PnP-ID is a standard ATA hard drive controller.
To solve the problem, we need any program that allows us to obtain the PnP device identifier, for example, in the case of Windows XP -
This utility was developed quite a long time ago, and before the advent of Windows Vista it was perhaps one of the simplest and most convenient software tools for determining PnP identifiers. However, at the moment, the utility is outdated and does not work in Windows Vista and older operating systems, as well as in emergency recovery disks based on Windows PE2 and later (ERD Commander versions older than DaRT 5.0). As a modern alternative to the program, it is best to use a universal and portable program that runs on any Windows OS, including Windows PE, such as the utility from NirSoft DevManView, designed as an alternative to the standard Windows Device Manager:
The Devmanview utility does not require installation on the system and can be used in any Windows operating system from Windows XP\2000 to Windows 10. And as a means of working with a non-bootable system, you can use a boot disk or flash drive based on Windows PE, the most convenient is a disk created using Microsoft Dianostic and Recovery Toolset ( DaRT), formerly known as ERD Commander (ERDC).
ERD Commander was specially developed by specialists from Winternals Software as a convenient disaster recovery tool ( E mergency R epair D isk – ERD). Following the acquisition of Winternals Software by Microsoft, ERDC became part of an optimization suite called Microsoft Diagnostic and Recovery Toolset (MS DaRT or DaRT). However, among specialists, the old and now unofficial name is often still used - ERD Commander ( ERDC):
DaRT 5.0 - ERDC 5.0- for Windows XP
DaRT 6.0 - ERDC 6.0- for Windows Vista
DaRT 6.5 7.0 - ERDC 6.5 7.0- for Windows 7
DaRT 8.0 - ERDC 8.0- for Windows 8
DaRT 8.1 - ERDC 8.1- for Windows 8.1
DaRT 10 - ERDC 10- for Windows 10
Each release of MS DaRT allows you to work with Windows OS corresponding to the bit depth (32 or 64).
A detailed description of ERD Commander and practical instructions for working with different versions are provided on the page
MS DaRT (ERDC) is a software shell based on Windows PE (for Windows Vista and later - based on Windows PE2 or older), which allows you to boot from a CD or other removable media, connect to the problematic Windows and gain convenient access to its components - file system, system log, registry, drivers and services, etc. The recovery environment provides the user with a set of software tools (Tools) with which you can access many resources of a connected Windows in the same way as during its normal boot. You can use Explorer, view system logs, disable or enable services and drivers, work with the registry editor, change local user passwords, securely destroy data on your hard drive, etc. In addition, in the DaRT environment (ERD Commander), it is possible to run almost any portable program (or a program for which the absence of certain entries in the Windows registry that are executed during installation of the application is not critical).
Programs DevManView(devmanview.exe) and (APciInfo.exe) can be executed in the ERD Commander environment without the need to install the application. APCIinfo - only in 32-bit versions for Windows XP or earlier OS. The APCIINFO archive contains the utility itself and the drivers required for its operation. After downloading, you need to unzip the contents into a folder whose name does not contain characters of the Russian alphabet and write it to some media, for example, a flash drive, in order to be able to launch the utility after downloading ERDC. When downloading begins, the media must be connected to the computer. DevManView archives contain the executable module and help information and are used in the same way without installation.
Fixing Stop 7B error for Windows XP/2000 OS

If there is no suitable edition of ERD Commander, then you can get by with any boot disk based on Windows PE, which will be discussed below.
After selecting the system, you enter the ERDC user shell and the tools for working with it become available through the button menu Start
Launch the Advanced PCI Info Utility (executable module apciinfo.exe) via “Start” - “Run”. The utility will display a list of PCI devices

VID is the manufacturer identifier ( Vendor ID), column DID- device identifier ( Device ID). Column Device name- this is the device name assigned by the operating system, in this case, ERD Commander.
By double clicking you can call up the properties of the selected device.

The hard drive controller in this example has Vendor/Device ID - 8086/7111.
Usage DevManView even simpler than this and also allows you to determine the PnP identifier of the hard drive controller:
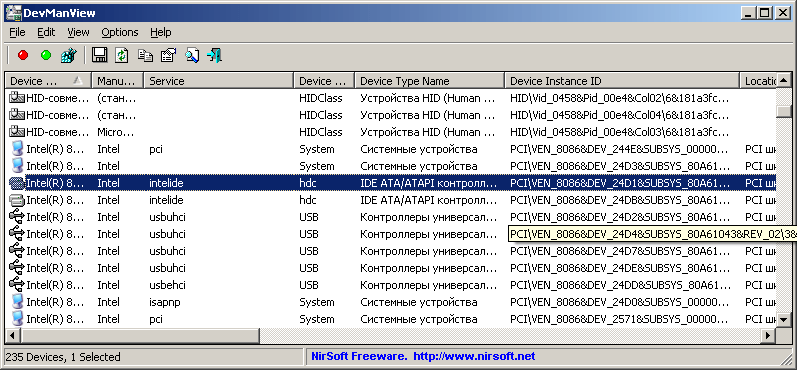
The hard drive controller in this example has Vendor ID / Device ID - 8086/24D1.
Knowing the values of the PnP device identifier, you can make an entry in the section CriticalDeviceDatabase registry of the problematic system, indicating that this device belongs to the class of hard disk controllers. The easiest way to perform this action is to create a reg file for subsequent import into the registry, with the following content:
Windows Registry Editor Version 5.00
"Service" = "intelide"
"ClassGUID" = "(4D36E96A-E325-11CE -BFC1-08002BE10318)"
Devices in Windows are divided into classes, for example, the class of video devices, printers, modems, network adapters, etc. Any device must belong to some class. Each class is identified by its unique class identifier or GUID- global unique identifier. A list of standard Windows device classes is provided
Registry key name pci#ven_8086&dev_7111 corresponds to the PnP identifier of our hard drive controller, and the value ClassGUID indicates that the device with this PnP identifier belongs to the class of hard disk controllers (HDD). The class identifier is written as 32 hexadecimal digits surrounded by curly braces. After adding such an entry to the registry, the system boot loader will be able to determine that the device with Vendor/Device ID, equal 8086/7111
is a HDD controller, and will load a standard driver for it intelide. There will be no Stop7B error.
To avoid typing this data manually, you can use the contents of the pnpid.reg file, which I placed in the utility archive. You can edit its contents using the ERDC notepad ("Start" - "Notepad")
You only need to change the PNP ID to the one that will be obtained using the Advanced PCI Info utility or the DevManView utility. The "Service" line specifies the driver that will service the device. The driver file must exist in the directory \WINDOWS\SYSTEM32\DRIVERS and be efficient. The "ClassGUID" line should indicate that the device with this PnP-ID belongs to the class of hard drive controllers.
Entries have been added to the beginning of the pnpid.reg file to ensure that standard or most common drivers are used. If there is no entry for the required PnP-Id, you will have to add it, or correct an existing one.
To check the presence of drivers in the system, you can use the service and driver manager included in ERD Commander. Launched through the menu "Start" - "Administrative Tools" - "Service and Drivers Manager"
To import data into the registry of the problematic system, launch the ERDC registry editor via
Start - Administrative Tools - Regedit
In the ERD Commander environment, the registry editor will work not with the registry of the ERDC itself, but with the registry of the system that we connected in the login window when loading ERD Commander. The import will be performed into the registry of a non-booting system and, upon reboot, the new hard drive controller will be correctly recognized as a hard drive controller.
The pnpid.reg file mentioned above has entries for adding standard drivers pciide.sys, intelide.sys, atapi.sys. These files and the pciidex.sys file must be present in the drivers directory \WINDOWS\SYSTEM32\DRIVERS. Usually, during a standard installation, they are present there. If not, you can take it from the distribution kit or from the catalog of a similar OS.
Fixing Stop 7B error for Windows Vista, 7,8,10 operating systems
Typically, the “blue screen of death” with error code STOP 0x0000007B “INACCESSIBLE_BOOT_DEVICE” is not displayed with standard Windows settings, and the system automatically reboots due to a critical error. For operating systems Windows 7-10, in the vast majority of cases, the problem of critical error STOP 7B when replacing the motherboard or changing the operating mode of the hard drive controller is easier to solve than in the case of Windows XP. Typically, HDD controllers are correctly recognized as devices of the hard disk controller class, but often, standard drivers are either disabled or are set to startup mode after download complete. The driver startup sequence is determined by the parameter Start, stored in the registry for each of them. To initialize the driver during the boot process, this parameter must be equal to 0 . Modern Windows operating systems almost always contain a set of drivers that provide standard operation with hard drive controllers in advanced mode AHCI, and in standard IDE, but the parameter Start for them the value is 3-4, i.e. The driver is started manually (Start is 3) or disabled (Start is 4).
Example registry entry for a standard SATA AHCI controller driver msahci with parameters that are created during the installation of Windows 7 (registry key HKLM\SYSTEM\Current ControlSet\Services\msahci):
"Group"="SCSI Miniport"
"ImagePath"=\SystemRoot\system32\ drivers\msahci.sys
"ErrorControl"=dword:00000003
"Start"=dword:00000004
"Type"=dword:00000001
Starting with Windows 8, the standard SATA AHCI controller is called storahci Therefore, you need to work with the section
The set of parameters for the Microsoft Standard SATA AHCI Driver may differ in different versions of Windows, but the parameter Start is mandatory for all driver components stored in the Windows registry without exception. Meaning Start determines at what stage of system boot and operation each specific driver will be loaded. As mentioned above, a driver that has the parameter Start equal to zero is loaded by the bootloader.
As we see, in the example under consideration, the parameter Start equals 4 - which means the driver is disabled. Even if the device is operational and there is a driver installed on the system, the bootloader will not be able to launch it, since it only loads drivers with the Start parameter equal to zero, and the system will end with a “blue screen of death” STOP 0x0000007B “INACCESSIBLE_BOOT_DEVICE”. Even if the driver is not disabled, but its startup mode is set to a value, for example, “Automatic” or “Manual”, further loading of Windows is impossible. It is for this reason that the Stop 7b critical error most often occurs when changing motherboards on computers with relatively new versions of Windows. If the system has a standard SATA AHCI driver from Microsoft, it cannot be started by the bootloader if the driver from the manufacturer was installed before replacing the motherboard, and the standard one was disabled or its startup mode was changed. However, the driver msahci.sys for Windows 7 or storahci.sys for Windows 8 and older, will be loaded successfully if its parameter Start has a value equal to 0 . Therefore, in order to get rid of the critical error Stop 7B in the vast majority of cases of replacing motherboards of computers running Windows 7 and later, it is enough to change the parameter Start standard AHCI driver. If the system could be booted, at least in safe mode, then this task would be solved without the slightest effort, but the error Stop 7B occurs much earlier than the initialization of safe mode (like any other) begins. That is, changing the parameter Start The registry of the problematic Windows must be executed from some other system. This is quite easy to do using the Windows PE-based disaster recovery disk registry editor and, in particular, using the same ERD Commander (MS DaRT). In cases where you have a boot disk or flash drive of the MS DaRT version (7.0-10) corresponding to the Windows you are using, you can even do without editing the registry by setting the startup type Bootable (Bootable) for driver msahci or drivers storahci through the "Computer Management" menu, and the "Service and Driver Manager" section. You can edit the registry in the MS DaRT environment by setting the parameter value Start, equal 0 .
To enable driver download mode, for example msahci, you can do without MS DaRT (ERD Commander), for which you just need to boot into any OS with the ability to edit the registry, for example, Windows PE from a CD or flash drive. You can even temporarily connect the disk with the problematic Windows to a working computer and manually fix the Start parameter using a regular registry editor regedit.exe
The standard Windows registry editor allows you to work not only with data from your “own” registry, but also to process files that are the registry of another operating system. For this
Boot into another operating system with the ability to launch the registry editor.
- Launch Registry Editor.
- In the left part of the window, where the registry tree is displayed, click on the HKEY_LOCAL_MACHINE section.
- On the menu Registry(In other versions of Registry Editor, this menu item may be called " File") select command "Load Hive".
- select a bush system on the disk with Windows that won't boot (file named system without extension, which is located in the \windows\system32\config folder).
- Click the button Open.
- In field Chapter Enter a temporary name that will be assigned to the boot hive in the Registry Editor tree. For example, 123
.
After clicking OK, select the section with the assigned name 123
and find the subsection \SYSTEM\ControlSet00х\services\msahci in case of “repairing” the blue screen of Windows 7 and \SYSTEM\ControlSet00х\services\storahci in the case of Windows 8-10. As ControlSet00х you need to select the section with the maximum value x, i.e. if the registry section connected to the editor contains ControlSet001 and ControlSet002, then you need to edit the driver parameters in the section \SYSTEM\ControlSet002\services\msahci

After changing the parameter Start, in the left side of the Registry Editor window, select the connected hive ( 123 ) and execute the menu item "Unload bush". Changed parameter value Start, equal 0 will be saved in the registry of the problematic Windows.
In cases where enabling driver launch mode msahci or storahci Windows bootloader did not allow me to get rid of the blue screen Stop 7B, you can try setting the parameter Start equal to zero for the following drivers:
atapi
ataport
pciide
intelide
iaStorA
iaStorF
iaStorV
Loading an extra driver is not a serious problem with Windows and in reality does not affect its operation in any way. Although, to save resources and reduce loading time, it is advisable not to include unnecessary drivers. After the Stop 7B error is resolved, the list of actually used drivers can be viewed in the device manager, and unnecessary ones can be disabled (Start=4) or switched to manual start mode (Start=3).
If you do not have sufficient qualifications to work with ERD Commander, or have difficulty determining the required driver, you can use a very simple technique:
Boot on a new motherboard on any system where it is possible. As a last resort, you can even temporarily install Windows on another partition or on another disk connected to this HDD controller. Then you need to export the section contents to a file
HKEY_LOCAL_MACHINE\SYSTEM\CurrentControlSet\Control\CriticalDeviceDatabase
The contents of this section will give a list of PnP identifiers, among which there will certainly be one that corresponds to the HDD controller of the installed system.
You can also determine which drivers support the hard drive controller.
Uploading to ERDC and importing data from the file created in the previous paragraph into the registry of the problem system. If you use drivers msahci.sys, storahci.sys, iaStor... for Windows 7-10, you need to check or change the parameter Start
After the Stop7B error is resolved, the additionally installed system can be removed by first configuring the system boot loader to load the patched Windows by default.
And, the problem is solved quite simply if you have the opportunity to obtain exported data CriticalDeviceDatabase from the operating system of another computer with the same motherboard, or rather even with the same PnP identifier of the hard drive controller. If in the BIOS settings for the same motherboards, different operating modes of the controllers are set, for example, on one AHCI and on the other IDE, then they will have different PnP identifiers and be served by different drivers.
To transfer the list of PnP identifiers, simply import this data into the registry of the problematic Windows and the Stop7B error will be eliminated if the problem was caused by recognizing the HDD controller. If the problem is caused by the Start parameter, then you can get a list of driver files for a similar working Windows that service this controller, using the usual device manager - “Properties” - “Driver” - click the “Details” button

In this example, the hard disk controller is served by drivers atapi.sys, ataport.sys, msahci.sys And pciidex.sys. Not all drivers listed may have entries in the registry key HKLM\System\CurrentControlSet\Services, for example, in this case, the Start attribute equal to 0 must be msahci And atapi, and the rest are loaded as an addition to them. The presence of a non-zero Start parameter for any driver listed in the list will result in a “blue screen of death”
Fixing the Stop 7B error when migrating the system to virtual machines.
In cases where it is necessary, for example, to transfer the saved configuration of a real computer to a virtual machine, as a rule, the same “blue screen of death” problem occurs. STOP 0x0000007B "INACCESSIBLE_BOOT_DEVICE". The cause of the error, as in the case of replacing the motherboard, is the inability to correctly identify the hard drive controller and load the driver required for it. This situation often arises when, in a VMware Workstaion or Oracle VM Virtualbox environment, you need to restore the state of a real computer from AOMEI Backupper or Acronis True Image images as a virtual machine. Typically, in such cases, a new virtual machine is created with an empty disk, and a CD/DVD drive with an image or recovery disk (for example, an Acronis True Image image) is used as the boot device. The recovery image is connected either as a removable USB drive or via a local network. Recovery is performed in the same way as on real hardware, but with a high degree of probability, loading the virtual machine will end with a stop error STOP 0x0000007B "INACCESSIBLE_BOOT_DEVICE". The situation is quite predictable, but has a simpler solution due to the fact that the virtualization system emulates a virtual hard disk with a previously known specific PnP identifier. So, for example, Oracle VM VirtualBox creates a virtual SATA disk by default:

In addition, the VirtualBox environment emulates standard Intel chipsets - PIIX3 or ICH9, which allows you to prepare the appropriate reg files in advance to correct the Stop 7B error for the specified chipsets. In a VMware Workstation environment, virtual disks can be emulated as SATA, SCSI or IDE. The default is SCSI. Just as in the case of using real hard drive controllers for the VMware Workstation environment, you can use standard drivers from Microsoft for IDE – “Intel(R) 82371AB/EB PCI Bus Master IDE Controller” (intelide.sys), for SATA – “Standard” SATA AHCI Controller”(msahci or storahci depending on the version of Windows) and for SCSI – “LSI Adapter, SAS 3000 series, 8-port with 1068”. You can clarify information about the disk devices used by the virtual machine using the previously mentioned utility DevManView.exe:

In general, the problem with the Stop 7B error when transferring an image of a real computer to a virtual machine can be solved by adding all emulated hard drive controllers to the list of critical devices and enabling the loading of all standard drivers that ensure the operation of the hard drive.
Resolving Stop 7B error using Acronis Universal Restore.
Acronis Universal Restore finds and installs device drivers needed to run the operating system restored to new hardware. In practice, Acronis Universal Restore allows you to perform in a few clicks most of the steps to eliminate the critical Stop 7B error that were described above. Before you apply Universal Restore to the Windows operating system, you must prepare a set of drivers for the new hard drive controller and chipset (motherboard chipset). These drivers are critical to running the operating system. Driver files must have INF, SYS, or OEM extensions. If the drivers were downloaded in EXE, CAB, or ZIP formats, extract them using a third-party application such as the free 7-Zip archiver. If you have a large number of computers, it is advisable to create your own driver repository, sorted by device types or computer hardware configurations. A copy of the repository is best used on standard removable media supported by almost any operating system - on CD/DVD disks and flash drives.
Acronis Universal Restore is free, but only owners of registered Acronis Backup and Acronis Backup Advanced products can download it from the developer’s official website. Also, at least for representatives of educational institutions, it is possible to register on the company’s website and receive a 30-day version of these products, including Acronis Universal Restore as part of the Acronis Backup or Acronis Backup Advanced package. Versions of Acronis Backup are not compatible with Acronis True Image products and it is not possible to restore Linux operating systems using Universal Restore.
After loading the Acronis Universal Restore environment, the main window is displayed, divided into 3 parts:

The program displays the found Windows OS for which recovery will be performed, and also allows you to specify search sources for drivers of the Hardware Access Layer (HAL), hard drive controller and network adapters. If the drivers are on a manufacturer's disk or other removable media, select the checkbox Search on removable media. If the drivers are located in a local or network folder, specify the path to this folder by clicking Add folder.
While running, Acronus Universal Restore also searches the standard Windows driver storage folder (usually the \WINDOWS\INF).
Settings Install storage device drivers anyway allows you to specify specific drivers that should be installed on the system. This is usually required if you have special hard drive controllers - SCSI, SAS, Raid, etc.
After pressing the button Add driver you need to specify the path to the driver files and check the boxes required for mandatory installation:

After specifying the above parameters, click the button OK. The task of installing the drivers required by the system will begin. If Acronis Universal Restore does not detect a compatible driver in the specified locations, a request will appear indicating the PnP identifier of the problematic device and suggestions for further installation - repeat the request after adding the required driver to the location, skip its installation, or stop working. After completing the driver installation task, you can change the installation settings and repeat the task. As a rule, on standard hardware configurations, Acronis Universal Restore quickly and easily returns Windows to a working state. After the system boots, other drivers are installed in the standard way.
In addition to disk subsystem drivers, Acronis Universal Restore installs network adapter drivers. The network adapter driver will install silently if it is digitally signed by Microsoft. Otherwise, Windows will display a standard message asking you to confirm installing the unsigned driver.
In conclusion, I will add that the Stop 7B error can also be caused by a hardware malfunction, damage to the logical data structure on the disk, accidental deletion of driver files or registry entries, etc. However, in reality, such cases are extremely rare.
This guide is intended for users who would like to replace the motherboard on their computers without reinstalling the system. In particular, this article may be useful to you if:
- you are going to upgrade your motherboard, but want to keep your current Windows installation along with settings and programs without reinstalling them from the very beginning;
- You want to switch the SATA controller mode from IDE to AHCI or RAID (or vice versa) to achieve better disk subsystem performance.
If one of the above scenarios applies to you, then you should know that regardless of your goal - replacing the motherboard or switching the SATA controller to a different mode - the result will be the same: Blue Screen of Death (BSOD) error STOP 0x0000007B INACCESSABLE_BOOT_DEVICE when loading the operating system.
The cause of this unfortunate incident is Windows' inability to find the proper drivers for the SATA controller. Fortunately, there is a workaround to the problem, thereby avoiding having to reinstall Windows. To do this, you just need to “tell” the operating system to use the standard SATA controller driver at startup, and .
To make the appropriate changes in the Windows registry, simply follow the instructions below.
Before we begin, please review the information in the two points below, as one of them will determine your plan of action:
1. The motherboard has not yet been replaced, so Windows boots normally. In this case, you need to make changes to the registry in a normal Windows operating environment and only then proceed to update the motherboard.
2. The operating system does not boot because you have already installed a different motherboard, or because you changed the SATA mode in the BIOS. In this case, you will have to use the offline registry editor.
Changing the registry before upgrading the motherboard (Windows boots normally)
These instructions are only for those who have Windows running normally because the motherboard has not yet been replaced. If you already have another board and Windows does not boot, then follow the instructions in the next section of the article.
So, turn on your computer normally and then open the Windows Registry Editor. To do this, press +R, type regedit, press Enter.

Inside the registry, follow this path (in the left pane of the window):
HKEY_LOCAL_MACHINE\SYSTEM\CurrentControlSet\services\msahci

In the right pane of the window, double-click on the parameter Start and change its value to 0 (zero). Then click OK.
Now do the same in the following registry key:
HKEY_LOCAL_MACHINE\SYSTEM\CurrentControlSet\services\pciide

If you are using RAID (otherwise skip this step), then you need to do the same modification in this section:
HKEY_LOCAL_MACHINE\SYSTEM\CurrentControlSet\services\iaStorV
That's all. Your machine is now ready for the update. Turn off your computer, install the new motherboard and connect all the necessary components to it. Then start the system, enter the BIOS and set the ATA mode (IDE-ATA, AHCI or RAID) or leave the default value. Windows should start without problems. When the operating system finishes installing the controller driver, continue installing drivers for the remaining devices on the new motherboard.
Windows won't boot: Changing the registry using the offline editor
Use this instruction if the operating system will not boot because you have already replaced the motherboard, or changed the SATA controller mode in the BIOS.
In this case, you need to use the offline registry editor. To solve this problem, I prefer to use a recovery environment, which can be accessed, for example, using an operating system installation disk.
To open the Registry Editor using the installation DVD or USB drive, follow these steps:
Boot your computer using the installation disc. You may need to select DVD/CD or USB as the first boot device in BIOS settings. For this:
- turn on the computer and press the DEL or F1 or F2 or F10 key to enter the BIOS (the BIOS entry key depends on the computer manufacturer);
- inside the BIOS menu, find the Boot Order option (this option is usually located inside the Advanced BIOS Features menu);
- In Boot Order, select CD/DVDRW or USB (depending on what type of media the Windows installation files are on) as the first boot device. Save your changes and restart your computer by pressing F10.
After rebooting, the computer will begin booting from the installation disk.
After loading, on the very first screen, click “Next” and then select “System Restore”.

If you have Windows 7, in the recovery options window, click Next, and on the next screen, launch Command Prompt.

If you are using Windows 8.x or Windows 10, then you need to go to Diagnostics -> Advanced Options -> Command Prompt.

At the command prompt, enter regedit and press Enter.

In the registry editor, select the branch HKEY_LOCAL_MACHINE, and from the File menu, click Load Hive.

Open the drive on which the operating system is installed.
Go to the Windows\system32\config directory, select the file system and click "Open".

Enter a name for the section (for example, Offline) and click OK.

By expanding the HKEY_LOCAL_MACHINE branch, you will see the created section (in our example it is called Offline).

Expand the new section and go to the following subsection:
HKEY_LOCAL_MACHINE\Offline\ControlSet001\services\msahci
Open the parameter Start, change its value to 0 (zero), click OK.

Perform the same operation in a subkey:
HKEY_LOCAL_MACHINE\Offline\ControlSet001\services\pciide

If you are using RAID (otherwise skip this step), do the same here:
HKEY_LOCAL_MACHINE\Offline\ControlSet001\services\iaStorV
Close Registry Editor, Command Prompt, and restart your computer. Remove the installation disc so that the operating system can boot normally. Windows should now start without any problems and then install the necessary hard drive controller drivers.
That's all!
Have a great day!
The motherboard has this name for the reason that it is through it that all other parts of the computer are connected. It is not surprising that if it fails, the operation of the machine becomes impossible.
To restore your computer's functionality, you need to know Why is your motherboard not working? The interested reader will find a lot of useful information that can help in the proposed material.
Main types of faults and methods for identifying them
Not a single mechanism breaks or fails just like that. Any malfunction has its own reasons, and the ability to independently identify them will save you a lot of time and nerve cells. Considering the technical complexity of the product in question and the presence of a huge number of working elements, the failure scenario and further methods for solving the problem differ in each individual case.
For simplicity, our service invites the reader to classify a specific problem according to the prerequisites for its occurrence in order to identify the reasons why motherboard won't start, with maximum accuracy and without unnecessary movements. In most cases, malfunctions occur due to the factors described below.
Problems appearing after replacing hardware
Many owners of desktop computers like to supplement and upgrade it themselves (which is very simple due to the block design of the power supply). Install a powerful video card to play the latest games with huge system requirements; add more RAM for working with professional graphic editors and samplers; introduce a super-powerful processor to increase performance - all this is well known to those who want to squeeze the maximum out of their hardware.
If your computer fails after one of these upgrades, most likely you have simply exceeded the limit of its capabilities. Unfortunately, each specific model has its own ceiling - and the more powerful the devices installed in the system unit, the more energy they consume.
Most likely, the last part installed exceeded the maximum permissible power limit. Reverse replacement (downgrade) in most cases solves the problem. It’s worse if some time has passed since the installation of the new hardware - the contacts on the board, which was working at the limit of its capabilities, could simply burn out, which will require complex diagnostics.
Failure due to power surges
Voltage surges and emergency power outages are a common occurrence in most regions of the country. It’s especially scary when, after an emergency shutdown, repairmen supply a voltage of 380 volts to the household network - fuses, circuit breakers and panels spark and burn like sparklers. And, worst of all, they don’t always save the equipment.
Sudden surges and voltage drops can lead to a lot of unpleasant consequences - in the form of burned out and short-circuited transistors on the motherboard. Disassembling the system unit with removal and step-by-step testing of the tracks with a voltmeter is the surest way to find the cause of the malfunction.
Lack of performance without logically explainable reasons
An old desktop computer can work like a charm for several years - although it will not impress the owner with outstanding performance characteristics for its time. Then it stops loading even the BIOS, without any first alarm signals that could inform the owner in advance about the imminent failure of the hardware.
Wear of individual components of the unit in question is one of the most common risk factors. Only a total diagnosis performed by a person who understands the meaning of the manipulations will help here.
Repair procedure
It is extremely difficult for an unprepared person to understand why motherboard won't start, and it is even more difficult to understand the intricacies of solving this problem. Arm yourself with a set of screwdrivers and a voltmeter - the information below will help you quickly find the root cause of the trouble and save on repairs.
Deductive method
First of all, you need to make sure that the actual cause of the malfunction is a problem with the board itself. To do this, a personal computer user will need to do two relatively simple things.
The first is to remove the side panel of the system unit and remove the motherboard. It must first be disconnected from the network. After disconnecting the element under test, reconnect the unit to the network and press the power button. If the coolers are working, then the problem really lies in the board.
Second, place the board on an insulated surface and connect it to the power supply. One of the LEDs, indicating the presence of standby voltage, should light up automatically. The absence of a reaction from any light indicators will give you the opportunity to automatically cut off possible problems with lost BIOS settings - then a voltmeter will be used.
If the computer stops working after updating the hardware, visually inspect the unit for signs of overheating after removing dust from the surface. If they are missing, try replacing the recently installed unit with a previously functioning one; In most cases, it solves the problem.
Are you experiencing problems with your BIOS? A simple reset of its settings to factory values will help. The main question is how to do this without having software access to launch the BIOS using a computer.
Fortunately, the ability to manually reboot it is provided by the board's functionality. What do you need to do to manually reboot the BIOS?
- It is necessary to turn off the power to the system unit and remove its side cover. Carefully remove a layer of dust from the motherboard and look for the inscription CMOS on it.
- Nearby you will find a remarkable silver battery, recessed into a special socket. Try to remove it as carefully as possible - and just as carefully insert it back after fifteen minutes. This measure will automatically reset the settings
- If you doubt the possibility of carefully removing the battery, try to find a small jumper that looks like a noticeable red cap placed on two long vertical contacts. The third contact is located nearby. Remove the jumper and place it on the middle terminal and the one that was exposed. Wait fifteen minutes and return the jumper to its original position. The effect is similar to removing the battery.
Please note: this method only helps if the product is fully operational (or has no critical breakdowns). If there is no voltage supply, there are short circuits and damage to the circuits, all the manipulations described above will not have any effect.
Self-diagnosis
The problem is not exceeding the maximum power or incorrect BIOS settings? This means that there are purely technical problems.
First of all, unplug the board and carefully clean it of dust. It is advisable to do this with dry wipes in a clean workplace, wearing rubber gloves on your hands. Blowing chips with a hairdryer or cleaning with a vacuum cleaner is a frankly unwise decision.
It is highly recommended to have a magnifying glass on hand and perform a visual inspection in a bright light - this will reduce the likelihood of missing significant damage. Pay attention to the presence of scratches, chips and dark spots dangerously close to the circuits.
No damage found? Consider the capacitors - they look like small barrels, somewhat similar to AA batteries. They break down most often on older motherboards. The presence of drips, swelling and oxides indicates the need to replace damaged or exhausted capacitors - they must be carefully removed using a soldering iron, and similar new ones installed, just as carefully soldering them to the vacant spaces.
Pay attention to the plus and minus marked on the board at the location where the removed product is attached. When replacing a capacitor, it is necessary to observe the polarity - otherwise a miracle will not happen and the computer will not work.
Using a voltmeter, ring the transistors - small rectangular objects that are present in large numbers on the product being repaired. If there is a short circuit, the built-in protection system simply will not allow it to start. Identify all sources of faults and carefully rewrite the markings of all short-circuited elements. To replace them, the user will need a soldering iron and some free time (and, of course, new transistors that are completely identical to the failed ones).
Unfortunately, the proposed solution methods do not help in all cases. . Self-repair in such a situation is practically impossible even with the hands of an advanced user who understands hardware. If you have checked and corrected everything that was possible, but the result was disappointing, it is better to take the faulty element to a service center.
If you don’t feel confident that you can handle the repairs yourself, it’s better not to try. The motherboard requires extremely delicate handling - a careless attempt at self-service can lead to even more serious damage. Take on this matter personally only if you are completely confident in your skills in handling the tools necessary for diagnosis and repair; Otherwise, leave it to the professionals.
The failure of the motherboard to start can be associated with both minor malfunctions in the system, which can be easily fixed, and with serious problems that can lead to complete inoperability of this component. To fix this problem, you will need to disassemble your computer.
The motherboard may refuse to start due to one reason or several at the same time. Most often, these are the reasons that can disable it:
- Connecting a component to your computer that is not compatible with the current motherboard. In this case, you will simply have to disconnect the problematic device, after connecting which the board stopped working;
- The cables for connecting the front panel have come loose or worn out (there are various indicators, a power button and a reset button on it);
- There was a problem with the BIOS settings;
- The power supply has failed (for example, due to a sudden voltage drop in the network);
- Any element on the motherboard is faulty (RAM stick, processor, video card, etc.). This problem rarely causes the motherboard to become completely inoperable; usually only the damaged element does not work;
- Transistors and/or capacitors have oxidized;
- The board has chips or other physical damage;
- The board is worn out (this only happens with models that are 5 or more years old). In this case, you will have to change the motherboard.
Method 1: external diagnostics
Step-by-step instructions for conducting an external inspection of the motherboard look like this:

If an external examination does not yield any results and the computer still does not turn on normally, then you will have to resuscitate the motherboard in other ways.
Method 2: Troubleshooting BIOS Problems
Sometimes resetting the BIOS to factory settings helps solve the problem of the mother card not working. Use these instructions to reset your BIOS to default settings:

You bought a motherboard without installation. Everything seemed to be done correctly and carefully, all the connectors and all the wiring were connected to the appropriate places, installed, turned on, but it doesn’t work. Or it works somehow wrong. Not the way it should be. What are the most likely reasons?
Connected equipment is not working properly. That is, other spare parts. And there are several of them:
The processor is not working. Both the processor and the mother failed. This is not such a rare situation. We took the laptop for testing and received the conclusion “Faulty motherboard.” That's right, but no one specifically tested the processor. Didn't order. And the tester had no special desire. Moreover, sometimes there are processors that “burn out” motherboards. The client is unlikely to want to pay for it. If some service doesn’t fix anything itself (or puts up inflated price tags for repairs), and makes money from testing, then most likely it will be so. Having such a conclusion in hand, the laptop owner thinks that he will buy a motherboard and everything will be resolved. He doesn’t want to pay for installation (especially since he recklessly already paid money for testing). Buys, installs. But a miracle doesn’t happen. There are one or more parts that need to be replaced. In such a situation, carrying (sending) the motherboard for exchange is a pointless exercise. It will not solve anything, it will only give the buyer a reason to blame the seller for all the troubles. I bought one, it doesn't work. I changed the second one, changed the third one, it doesn’t work... Apparently they are selling defects. The last thing a person will look for is a reason on his side. A conscientious seller has absolutely no need for such a development of events. Moreover, they can burn several of them. Therefore, if something does not start, we remove the battery and take the device to.
Processor not compatible with this version of the motherboard. Motherboards may have the same geometric characteristics, but differ in firmware versions. Be designed for different processors, not interchangeable. (see example) The buyer may, without consulting and not having sufficient knowledge in this area, buy a spare part of the wrong version. The result is, at a minimum, no launch. At most, the motherboard fails due to the use of an inappropriate processor.
Faulty cooling system. This is also not a rare case. The thermopipe has depressurized and heat is not transferred to the radiator. Mechanical damage to the thermotube; the contact pad does not fit tightly to the crystal and does not remove heat as it should. As a result, overheating, protection activation, or, even worse, chip failure. Sometimes in a laptop it all starts with a defective heat pipe, which leads to failure of the processor, which, in turn, damages the motherboard. The problem cannot be solved without contacting service. And we need to prepare for new expenses.
Use of cheap, low-quality heat-conducting materials. Unsuitable thermal paste, thermal rubber, thermal pad. The unlucky installer may not even know that there was a thermal pad in this place. She could have gotten lost while in various grief services. Here instead they smeared a thick layer of KPT-8 and expect everything to work well. Sometimes it rolls if the heat dissipation of the chip is not high. But often the result is overheating and failure of the product. The seller should not be held responsible for the buyer's unqualified actions.
Installation defects. When a laptop is not assembled properly by a client, a short circuit often occurs between the conductors on the motherboard. The wiring was not noticed, the isolating pad was not glued, for various reasons. The same as in previous cases. Does not work, in some cases it fails.
Mechanical damage. How did your laptop die? We didn't see this. This often occurs as a result of an impact or falling of the device. The client may not know about this. If a child, for example, made a mistake or someone else. The contacts were bent; when reassembling, the person did not see it, and the new motherboard burned out when turned on, just like the old one.
Memory module failure. Sometimes both at once. Under service conditions, it is checked “once”. The buyer does not always have the opportunity to check this. In some cases, it can also lead to damage to associated equipment.
Power supply failure(adapter) laptop. This also happens. It doesn't work and that's it. The solution is to replace the power supply with a working one.