Remote access to laptop. Remote access to PC
Many people have this need quite often. This may be necessary to manage your work or home computer from anywhere you have access to the Internet. Now technology has reached such a level that this is not difficult. Therefore, there are many ways to connect to remote computers. We will consider the most convenient of them...
In what ways can you connect to a remote computer?
First, we need to decide what we are going to do on the remote computer and select the best way access. In addition, you need to consider the possibility of such a connection - it is not always possible to connect to a remote machine everywhere.
Managing the graphical shell of a remote computer
There are several ways to connect to a traditional desktop.
RDP - Remote Desktop Protocol

Remote Desktop Control Protocol from Microsoft. Opportunities for its use are built into any Windows. Including the remote desktop connection client.

Setup is quite easy. The best option for managing Windows machines - it shows the best performance and convenience.
For Linux there is a Remmina client and an Xrdp server - mediocre performance.

Remmina - contains errors that create significant inconvenience during use. However, in the absence of options and if necessary, a completely workable solution.
As for security, encryption is built into the RDP protocol.
VNC - Virtual Network Computing.
Free analogue of RDP. However, it uses a different principle; it works through the old RFB (remote framebiffer) protocol. Without encryption, for security you must use encryption using other protocols. It is usually used to manage unix hosts, where graphical shell management is necessary. This is rarely necessary, since nix systems have a very powerful console text interface that provides absolutely complete control over the OS. Often used in virtualization systems to connect virtual machines to the graphical console.
Has implementations for Windows, both client and server.
Third party programs
This is, first of all, the most popular Teamviewer and the lesser known Ammyy Admin. There are others that there is no point in mentioning. Very convenient software, which, however, has significant drawbacks. The main one is that when you use this software, you essentially provide access to your data to the developers of this software.

It is not known exactly on what basis these programs work. In addition, they have extremely low performance, especially if you have a mediocre Internet connection. The most important advantage is that it does not require any knowledge to organize a remote connection: downloaded - installed - provided an identifier and password - a connection was established. It is enough that both parties have access to the Internet. Users do not need to know the network topology; they do not need to know any IP addresses, ports or protocols.
Why do I describe this as an advantage of this method - because all the other methods described here require the need to know addresses, ports and protocols. And here it is easy and fast. It’s perfect for simple tasks like diagnostics, monitoring, or quickly performing simple actions. But I wouldn’t wish it on my enemy to try to work fully through teamviewer :)
There are others, but they are specific, and we will not mention them here.
Managing a remote computer via a text interface - command line
Telnet
The oldest and simplest network control protocol. Allows you to control anything via the command line. On this moment, as a rule, is used only as a diagnostic and debugging tool. Also, simple network equipment, if necessary, is usually controlled via telnet - for example, modems. Few people know, but many people at home allow you to connect via telnet. Has security problems due to its simplicity.
Rlogin- practically the same as telnet. Used (rarely) on UNIX.
SSH - Secure SHell
This is something without which the existence of the modern Internet would be unthinkable. Although the average user has usually not heard anything about this, it is the most optimal and effective method managing remote computers.

Used in system administration. The essence is providing access to control the command line, text interface through a secure encrypted connection. Again, the average user is not aware, but 95% of which the Internet basically consists of are controlled through. Therefore, if you are really interested in the topic of remote control, you can’t ignore this. However, there are disadvantages that push the technology into the background:
Firstly, for the average user, managing a computer via the command line is difficult.
Secondly, this will not allow you to control a Windows machine without tricks, due to its wretchedness command line and the lack of SSH by default.
However, ssh allows you to do other things that will be very useful for the average user to set up access to a remote computer. This is tunneling, and it is encrypted. SSH allows you to create tunnels and use any of the protocols described here within them.
Netcat - raw network connection
It's totally exotic. Without encryption and any standards or limits. Simple as a wheel. Allows you to do anything, including remote access. Wilds system administration, hacking and hacking. Quite difficult to use, rarely used. However, I couldn’t help but mention it.
What you need to connect to a remote computer.
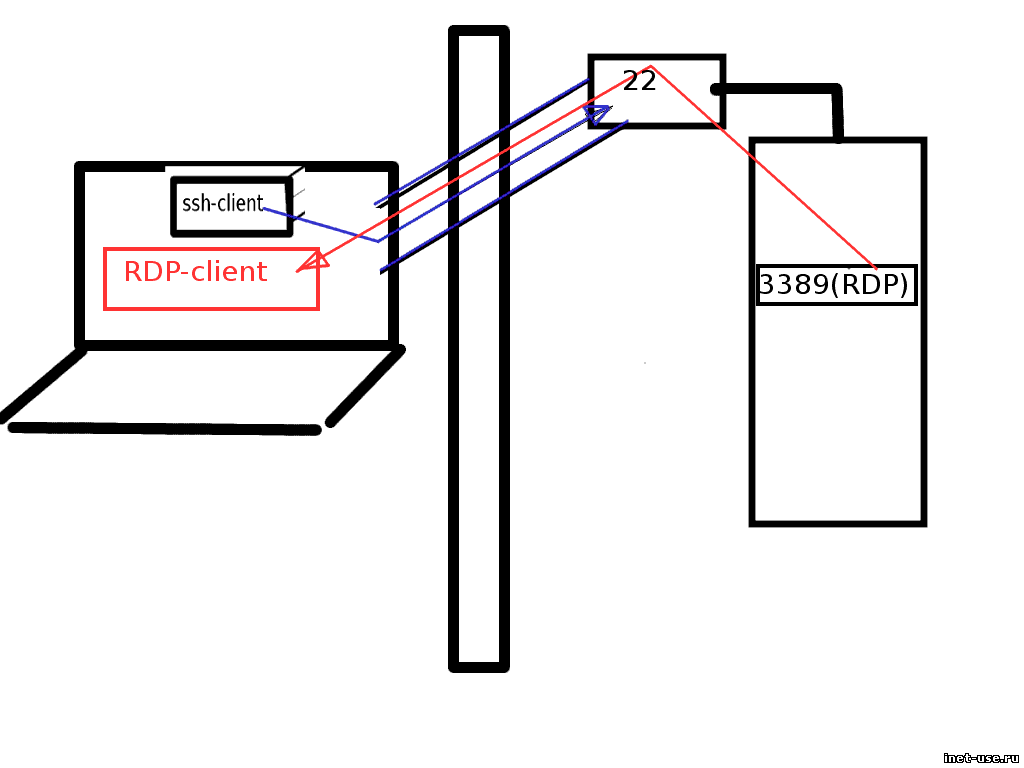
There needs to be a connection between them. For example, if a user needs RDP access to manage his home computer, then he must somehow gain direct access to the port on which the RDP server (service) running on the home computer is available. Literally speaking, you need to somehow have access to port 3389 of the remote machine. Or 5901 if it’s VNC, and 22 if you need to connect via SSH. (these are default ports, which can be different if necessary and desired). And here the second part begins - how this can be done.
Perform port forwarding(NAT and PAT)
This is done on firewalls or servers. For example, if this is a home computer and it is connected to the Internet through a router, you need to connect it to your computer.

In addition, you need to know the outside of your network. We can't describe it here because there is no one specific way. Since the conditions for connecting to the Internet, devices and providers are different for everyone. But general scheme like in the picture. Usually, you can easily find port forwarding instructions for your device.
VPN - Virtual Private Network
It has many implementations and variants, for example Hamachi. But the essence is the same - a “local” network is created on top of the Internet. Accordingly, each device that appears in it has its own “local” IP address and they have a direct connection with each other. 
And this allows you to “see” and connect to the required ports directly. Thus, using the method entails certain difficulties and requires some knowledge. The best option is to create a VPN yourself. When using third-party services like Hamachi, the method is basically no different from using Teamviewer.
SSH tunneling
Essentially, it allows you to build a VPN without using complex software and equipment, without using third-party services. However, it requires an external connection point. ()
However, the need for a connection point is also required for the two methods described above. And when connecting via teamviewer or hamachi - such a thing definitely exists - servers belonging to these companies. The connection will be made through them. Only this way, and no other way. That is why, when talking about teamviewer, we say that you are providing access to your data to someone unknown. Of course, it is extremely unlikely that anyone will use this data, but the possibility exists.

What is meant here by a connection point is a certain device that has a known external IP address. You've probably heard about dynamic and static external IPs. So, to connect and control a remote computer, it really doesn’t matter whether it’s dynamic or static. For example, as a rule, it has a dynamic external IP.

It is important to know it, but statics or dynamics are absolutely indifferent. It also doesn’t make much difference where it is located - on the client side, on the server side, or somewhere in a third place, as a separate server. It is important that both parties have access to each other in one way or another - directly, or through a third point.
Good day, dear readers.
A remote connection to a computer allows you to exchange information between two remote computers that have access to worldwide network- Internet. At the same time, you can transfer files to a remote computer, manage your desktop, launch and configure software on a remote computer. To organize such management there is no need to install additional programs on the computer.

On the remote computer, you must first allow remote use computer. Go to Control Panel and open the section System or on the desktop, right-click on My computer and select Properties. In the menu on the left, open the subsection Setting up remote access.

In this window you need to install (enable) permission to connect to this computer , for which check the appropriate box. Then select one of the proposed options for connecting to a computer. You can Allow computer connections with network level authentication (this will be safer) or any version of the remote connection utility. You can also deny access altogether if this is not necessary. In this case, you must select a user or group of users who will be allowed to connect to the computer. You can also allow all users to connect to the computer. After configuring all remote access settings, save your changes by clicking OK.

Before you start connecting from another computer, you should look at the computer name, username and password that you may need to connect. You can view your computer name in the System section, and your username and password in the User Accounts section of your computer's Control Panel.
To connect to a remote computer, go to the menu Start and expand the list All programs,

go to standard programs and run the utility Remote Desktop Connection.

Enter the computer name or IP address in the line Computer and click on the button To plug. Finding out the IP address of a computer is quite simple; you don’t need to go through any complicated procedures. There are currently many online online services providing such services, for example, you can use this: .
You can also determine the computer's IP using the commands: Start Further Execute recruiting a team cmd in the command line that opens, enter ipconfig. If you are connected to the Internet, your IP and address will be shown in local network.

You may be prompted to enter the remote computer's username and password, which will open a window showing the remote computer's desktop. You have successfully connected.
To configure connection parameters, click on the arrow button hide or show parameters.

The window will open, and on the appropriate tabs set the necessary connection settings. Here you can change the settings for displaying elements on the screen, change the settings for using hot keys when working with a remote desktop, adjust the sound, specify the programs that will be launched when connected, optimize the connection speed, etc. You can save connection settings for subsequent connections to a remote computer on the tab Are common by pressing the button Save in subsection Connection settings.
You should also know that the IP address on the remote machine must be static, otherwise you need to use third-party utilities to organize remote control of the computer. To perform most tasks for remotely managing a computer, the tools built into Windows are quite sufficient.
However, many users note inconveniences and difficulties encountered during connection setup. In this case, use third-party utilities that allow you to simply connect to the desktop of a remote computer. Some of the most popular utilities are: // and others.
It is enough to configure the utility on the remote machine, remember the identification number and connection password in order to organize remote control of the computer. On the computer from which control will take place, you must enter an identification number, name and password and you can immediately begin control, which is much easier than using standard remote control tools. Bye everyone and see you again.
Video:
Since our site is designed for average users, some disagreements arose within the non-Oshibka.Ru team regarding the usefulness of this article. Typically, such material is supplied for more experienced users, at least have a good knowledge of Windows OS.
On the other hand, where should a novice user go who has only a vague idea of what RDP, TCP, UDP are? But you really want to know? Again, is this necessary for the average user? Maybe one simple program is enough for him?
A difficult situation.
Explain in one article what remote access to a computer via the Internet is, but in such a way as not to frighten off the visitor.
We decided to experiment. Talk about difficult things as clearly as possible. We will take your comments into account.
What is this article about?
This article will tell you about two types of remote connection, briefly tell you what it is ID. Will tell you about the programs Remote access And Remote Desktop. We will also try to configure your computer in order to access it remotely without using third-party programs. Complex terms in the article are highlighted in brown and provided with explanations in the form of tooltips.
Remote access concept
Remote access to a computer via the Internet refers to operating system tools or a third-party program that allows you to gain visual or file access to a computer located at a remote distance, but still connected to the Internet.
How is the required computer identified on the Internet?
Conventionally, all remote access programs can be divided into two groups according to the type of connection:
- Using ID
- Using IP addresses And domain names
Remote access programs using ID
Of great interest are programs that use ID(unique identificator). Receipt method ID something like this: when a remote access program is launched on the computer to which you plan to connect, it sends a request to its server through which the connection will occur.
Having received this data, the server generates for the computer unique identification number — ID. This number is assigned to the computer. In the screenshot below it is highlighted in red.
Knowing this identification number and password, you can connect to a computer from anywhere in the world with this ID.
It remains unchanged until the hardware is replaced or the OS is reinstalled.
So using such programs is very convenient. When you change Internet provider, city, and even country, your computer ID Will not change.
Lack of programs using ID one - they are paid or shareware. Condition - you must not use the program for commercial purposes.
Example of programs using ID— TeamViewer, Ammy Admin. But the list is not limited to these two. They are simply the most popular and always heard by users.
We will not spend a lot of time on these programs, since their interface is simple and allows you to learn the program in 5-10 minutes. We may look at each of them in the future.
You won't have any problems with these programs. Use it for your health without overusing it. If TeamViewer will connect to a large number of ID- then sooner or later, the communication session will be limited to five minutes.
Remote access programs using an IP address or domain name
With this category everything is a little more complicated. They need a static IP address or domain name. Connection via IP address, this is a classic connection type. It does not allow as much flexibility in the location of the computer and is most often used in "office space".
In order to use it, you need to do the following.
Connecting a fixed IP address or domain.
You need to activate an additional service from your provider - Fixed IP address . This service is provided by many providers, including mobile ones. This service will assign your home network external IP address format 123.123.123.123
It is this address that will allow you to find your computer from outside.
An alternative to a fixed IP address can be the service DynDNS. When registering, you will be given a custom domain, for example:
neoshibka.dyn.com
Next, you simply install a program on your computer that, when turned on, will track your current IP address and send it to the server DynDNS, which in turn will match your current dynamic ip address , with address yourlogin.dyn.com
Thus, no matter where you are, no matter what provider you use, no matter how often your IP address—the address of your computer—changes, yourlogin.dyn.com
We won’t undertake to say, but getting a fixed IP address from a provider is somewhat easier and cheaper than using DynDNS. For example, at the time of writing this article, the cost of a dedicated IP address was only 20 rubles. / month
Advertising
Opening a port to a target - a remote computer.
Even now, knowing our IP address or assigned to us DynDNS domain, we can hardly connect to the computer - the firewall will not let us through. Most likely the port 3389 used by the program Remote Desktop which we will tame in this article will be closed. For everything to work as it should, we will have to open it and redirect it to the desired computer on the network.
Difficult? Not at all. Let's try to figure it out in practice.
Remote access to a computer via the Internet using Remote Desktop
So, first what we did was get a fixed ip address from our ISP. Let's remember, write it down, draw it.
Second. Let's find out intranet IP address our computer. To do this, let's go through next path: Network and Sharing Center => Local Area Connection => Details  As you can see in the screenshot, the address of our computer within the network 192.168.1.102
Third the point will be opening the port 3389 to the above address. To do this, let's go into the router. In our case it is ADSL modem TP-LINK. We will show everything using his example. There’s nothing you can do about it, but you can’t do without instructions if you don’t know how to configure the modem yourself.
In our case we enter through Google Chrome by the address 192.168.1.1 and under the combination admin/admin. We get to the information page.
Let's go to Advanced Setup => NAT => Virtual Servers and press the button

Here you can choose ready-made services or create your own.
We will create our own and call it Udalenka, but the name can be absolutely anything. We register the local address of the computer, the one we spied earlier. In the table we enter the port everywhere 3389 and select the protocol TCP/UDP. We do all this based on a standard Windows application. Remote Desktop. For other programs, the ports may be different. A good list of applications and the ports they use is provided. (What we are learning may even be useful for games).
If, for example, you want to use Remote Desktop, and advanced RAdmin, then you will have to register a different port for it: 4899 .
Press the button

Item fourth, we will run on the computer we are going to control - Terminal Server Service. It’s worth clarifying something here.
Using the method described below is not recommended from the point of view of licensing purity if you do this in the organization where you work. Not sure about Windows 10, but in Windows XP - 7, the license was not violated if only one user connected to the computer.
We do all this for the purpose of familiarization and in order to learn the principles of remote access to a computer via the Internet.
So, to run it on your computer Terminal Server Service. In Windows XP this was done simply - Go to Administration — Services and applications — Services found it and simply turned it on. This allowed one user to connect to the computer. In this case, the user who was sitting locally was disconnected.
In Windows 10 we need to do things a little differently. We need a special patch. You can download it from here. This patch will allow you to run on the system Windows 10 terminal service.
IN Lately, search engines Google and Yandex began to consider this file as a virus threat. In fact, the file lay on the site for two years, and not a single scanner ever considered it to be malware. However, the file is now stored outside of notOshibka.Ru - you download it at your own peril and risk.
Let's unpack the downloaded file to any location. For example on Desktop. Run as Administrator file install.bat

A successful result will be reported black window command line with the following content:

Fifth In this paragraph, we will set a password for our user, and also add him to the group.
For this purpose on the icon Computer and right-click to select Control.

In the window that opens, on the left side, we need to expand the list Local users and groups, select sub-item Users.
In the list of users, you need to find yourself and right-click.

Enter your password twice, press

Now we need to add our user to the group Remote Desktop Users.
To do this:
Right click on the user − Properties.
In the window that opens, go to the tab Group Membership and press the button <Добавить…>

Next, do everything in the same order as in the screenshot: 
As a result of the work done - Remote Desktop Users should appear in general list groups to which the user belongs.

We would like to draw your attention to the following. The above describes how to assign a password to your user. But it’s better to create a new one and add it to the groups. Otherwise, you may end up losing some data. For example, we logged out wherever possible. I had to enter all the passwords again.
Let's check if we were able to gain remote access to the computer via the Internet using Remote Desktop.
We go to another computer, go to START menu => All programs => Accessories and run the program "Remote Desktop Connection".
Enter the IP address previously assigned to us by the provider into the window that appears, click the button <Подключить> .

If we did everything we did earlier correctly, then we will be asked almost immediately Name And Password user on Remote machine. Enter them and don't forget to check the box to remember your credentials.

And the last “security touch” will be checking the Remote Machine certificate. Here, too, you need to agree with everything. And also check the box.

That's all. If everything works as it should, you can go through the Remote Desktop program settings. Here you can turn on/off the sound, change the picture quality, connect local resources to the remote machine.
Remote Assistant is the most useful option in the Windows operating system. It allows two PCs to interact at a distance, in this situation the computer has two users at once - one who sits directly in front of the real computer and the second who is in a completely different place, but on his PC he can not only observe what is happening on the display first, but also to control it. Remote assistance is an excellent solution when an inexperienced user needs to quickly configure or fix something, and he does not know how to cope with this task. However, to start using Remote Assistance, it must be configured accordingly. We will look at the process of activating Remote Assistance, and also tell you how to how to set up remote access using the example of a PC running Windows 7.
How to activate the remote PC access option?
Activation of remote access to a PC is carried out through the Windows Control Panel. We follow the following instructions:
3. Click on the “System” link.

4. A new window will open in front of us, click on the “Setting up remote access” link in it.

5. Now click on the “Remote Access” tab and check the “Allow remote assistance connections to this computer” box.

6. Click the “Advanced” button; the “Remote Assistance Settings” window will open in front of us. If you check the “Allow remote control of this computer” box, the remote assistant will not only be able to see your PC’s screen, but also control it. Also here you can set the maximum time during which the help session will be active.

7. After installation additional settings, click “OK”.
8. Done! We have activated Remote Assistance.
So, we have activated the remote assistant, but that's not all. Now you need to “make friends” of the computer on which the setup is being carried out with the computer with which you want to interact via remote access. Setting up remote access is a more complicated procedure than activating it, but if you carefully follow the instructions below step by step, everything will work out. So:
1. Click the “Start” button, click on the “Maintenance” folder in the menu, and select “Windows Remote Assistance” in it.

2. A window will appear, in it click on “Invite someone you trust to provide assistance.” Pay attention to the explanation of the link - “The assistant with whom you want to interact will be able to see and control your PC display.” However, nevertheless, if you set the control ban in the previous instructions, you will only be able to view the screen.

3. Now you can select the type of invitation, the most universal option is “Save invitation as file”, you can save the invitation on your computer and send it out in ways not only via mail, but also through, for example.

4. So, click on the item “Save invitation as file”, specify the path to save and click “Save” - at this step a remote access window will be launched with a password for it - at the bottom you will see the line “Waiting for incoming connection”.


5. Now you need to transfer the file to the assistant in any way convenient for you, it will open as follows, send the user a password.

6. To see your desktop, the assistant will only have to enter your password, after which you will see a confirmation window on your desktop to allow remote access, click “Yes” and the management session will begin.

7. However, for now, your assistant can only see your desktop, not control it. To start control, you need to send a control request (at the top left in Remote Assistance, click “Request control”), you, in turn, must accept it.


8. That's all, now the assistant can start controlling, and you can end the session, pause it, or open a dialog box at any time.
Important! If, at the “Save invitation as file” step, the PC tells you that this PC is not configured to send invitations, most likely the problem is in the firewall settings. Reconfiguring them is very simple - go to the “Control Panel”, select the “Windows Firewall” item.


In the “Allow programs to communicate through Windows Firewall” window, click the “Change settings” button.

And then check the two boxes opposite the line “Remote Assistance” and click “OK”.

Results
So, now you know how to set up remote access and in an emergency you can ask your friend, who understands hardware better than you, to help you figure it out difficult situation. We hope this article helps you solve your problems! Good luck!
Remote computer access via the Internet will allow you to control your PC, even if it is located thousands of kilometers from your location.
The technology works on the principle of assigning a unique identifier to the user on the global network. Using this data, a connection to remote control is made.
The function can be configured both using system functions of the Windows operating system and using additional programs (their use is usually free).
Notice! In order to access a remote computer through another PC, the remote PC must be turned on and have an Internet connection. Also, the function or program that allows for remote connection must be enabled on both devices.
Using the Internet ID feature in Windows
Assigning a unique identification number on the network can significantly simplify the connection process.
Using this feature, computers no longer need to configure the reverse connection process each time.
Also, the Internet ID function is quite easy to use and even an ordinary user can configure its operation.
How does Internet ID work? The connection of two computers occurs through a connection to a single Host.
The interface is displayed using the NAT protocol or a standard firewall.
Follow the instructions below to set up remote access to your PC yourself using the Internet ID option:
- First, you need to obtain an identifier with which two computers can establish a connection. The procedure for issuing an identifier is carried out by the host free of charge;
- Some builds of Windows may not have a previously installed utility. You can download it from the link http://db.repairdll.org/internetidadmin.exe/ru-download-50.html.
- Install the tool on both computers and get started;
- After installation, a host icon will appear on the desktop toolbar. Right-click on it and select connection settings;

- Then in the new window, click on the appropriate button to obtain an Internet ID. This procedure must be done on the computer from which another PC will be controlled;

- After a few seconds, a window will appear with a text field in which an identifier will be indicated that allows remote connection of two PCs. Remember it, because without specifying the identifier on another PC, you will not be able to set up a connection;

- Now you need to perform several actions on the client personal computer (to which you will connect). Run the installed utility, select the operating mode as “Client”;
- Click on the button to create a new connection and in the window that opens, specify the name of the connection and the identifier itself. You can choose any name, and the Internet ID must match the one issued on the first PC. Click on the OK key;

- Next, the connection properties will open. Select the connection mode via ID as shown in the figure below and enter it again in the corresponding text field;

Now wait a few seconds and wait for the connection to complete.
In subsequent attempts to gain remote access to another PC, you will need to enter only the identifier on the administrator’s side, and on the client’s side, select the previously created connection template.
In addition to the proposed method for setting up remote access, you can use special programs, which are even easier to configure.
TeamViewer program

The main feature of the utility: the user does not need to deal with the client and server parts of the program separately.
You just need to install the program on both computers and set up the connection in a few mouse clicks.
After the first startup, the application window displays your personal computer ID and access password.
To connect to another computer, just enter its ID in the Partner ID field and click the Connect button.
TeamViewer benefits:
- Availability of several modes of operation of two computers at once: remote access, file and folder transfer mode, VPN;
- During the connection, you can open a chat window, this will allow two users to communicate in real time, without being distracted by other instant messengers;
- To ensure full-scale system administration of another PC, you can enable the option of 24/7 remote access. In inactive mode, the function consumes few resources and does not load personal computers;
- Speed and stable connection. Thanks to the availability of quality hosts, users do not face the problem of access failure (this only happens in case of poor connection to global network Internet);
- Please note that TeamViewer cannot be used for commercial purposes. The developer has built into the program a utility for determining a commercial connection. If it is detected, access to the PC will be immediately blocked.
If you want to use modules for corporate connection, you will need to buy a paid version of the application.
Helpful information:
Pay attention to the program. Using this utility, you can connect to any computer from a distance, gaining access to videos, photos, documents and other files. And, although the program has many analogues, it has a simple and intuitive interface,
Ammyy admin
Available operating modes include the ability to view and remotely control other personal computer or the user's laptop.

The program can be used without installing it on two devices. All you need to do is open the portable version on your computer.
The utility is not intended for use in commercial organizations and in enterprises.
To get started, launch Ammy admin on both computers. Then enter the server computer ID on the client computer. Click on the “Connect” button.
The connection diagram is also shown in Figure 8.
This application is more suitable for organizing a one-time connection than for long-term and regular work.
Among the advantages over other similar software are a simplified connection process, an intuitive interface and high speed.
Among the disadvantages of the application, it can be noted that it is not available on mobile devices and tablet PCs. There is also no mode for transferring folders and files.
Use of the program is limited to fifteen hours per month. This feature is designed to eliminate the possibility of commercial use.
Server and client parts of the program
Also, unlike TeamViewer and Ammy admin, a unique identifier for the server PC is assigned only once (at first launch).
It will not change in the future.
This will allow you to quickly remember it and not have problems entering it on the client side in the future.
Users also have the opportunity to independently set their online ID.
The program itself is paid, however, if you do not need to use it for commercial purposes, you can download the LiteManager Free version.
It is free and its operation is limited only by a filter that determines a possible commercial connection.
The application contains a large number of modes for connecting two PCs, namely:
- Remote access;
- Data transfer;
- Chat mode;
- Ability to access the registers of two PCs;
- Task Manager.
Appearance of the program
The application also has very good speed. The first connection occurs in a matter of seconds.
You also have the opportunity to access the BIOS of a remote computer.
The utility cannot configure a connection without specifying the IP address of the server PC, that is, connecting by ID is impossible.
All modern applications for working with remote access are different fast work and convenient user interface.
Choose the appropriate connection method based on whether it will be regular or one-time.
Thematic videos: