DIY invitation cards. DIY wedding invitations, photo ideas and tips.
Business card The newlyweds are considered an invitation, because thanks to it the guests will learn about the decision of the couple in love to get married and about the appointed date and time for the ceremony. The range of cards offered in wedding salons is very rich, but they are all banal and monotonous. If you want to surprise your guests and do something original, you can easily make your own wedding invitations.
How to create a wedding invitation: step-by-step instructions
When starting to make hand-made wedding invitations, follow the following sequence of actions:
- Decide on a style and color scheme wedding celebration, invitations must correspond to the overall theme of the wedding. Using your imagination, you should choose the design and pattern of the postcard.
- Choose a performance technique. Popular techniques include: quilling, scrapbooking, invitations in the form of scrolls, posters, candies, and puzzles. Postcards created in Photoshop are no less popular.
- Buy necessary materials. As a rule, to make such things with your own hands, various ribbons, lace, decorative cardboard, flowers and other little things are used. If the invitations are created in Photoshop, you won’t need any materials, only your imagination will come in handy.
- Come up with a text. It can be standard, decorated in poems or with a joke - it all depends on your wishes and preferences.
- Start making your card.
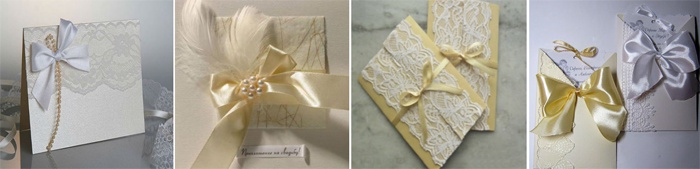
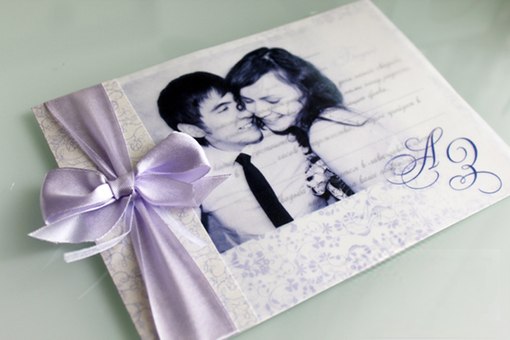
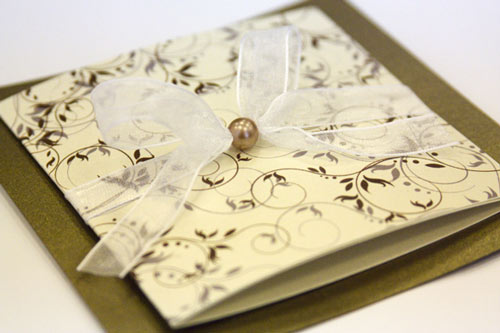
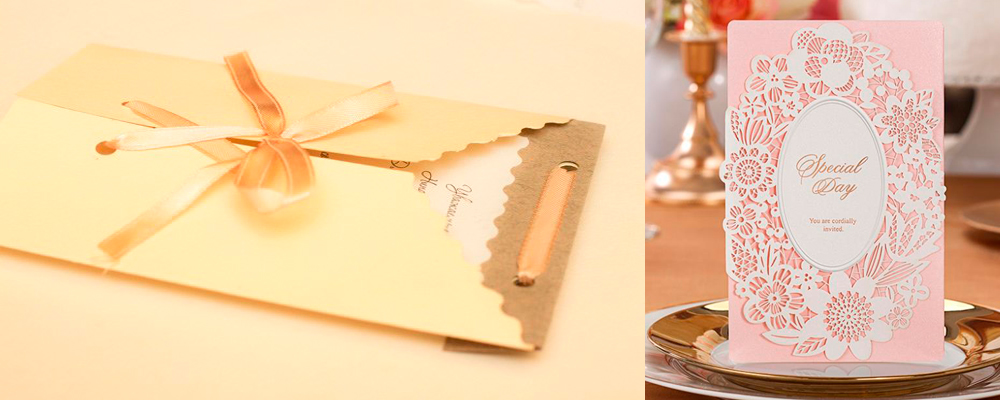
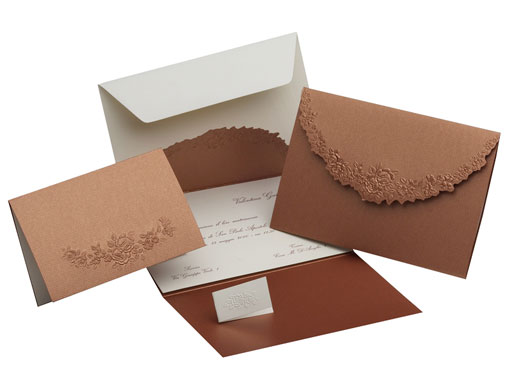
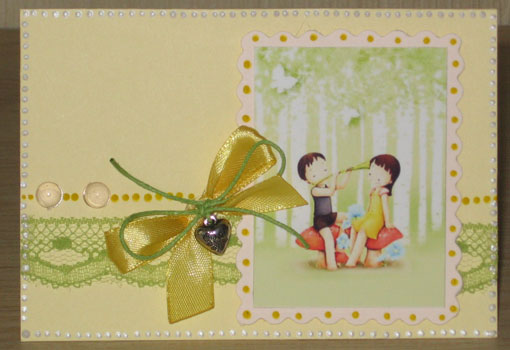
Lace and bows
It’s easy to make an original invitation with your own hands using bows and lace, and it doesn’t require large material costs. You will need: designer cardboard or beautiful paper, lace, braid, ribbons, beads, sequins, rhinestones.
Here's how you can create a DIY vintage invitation:
- Take a sheet of thick designer paper or cardboard and fold it in half.
- Decorate the title side of the sheet with lace and ribbon bows.
- Write text in the middle or paste a template previously printed on a printer.
Such a wedding invitation will look delicate, and as decoration you can use the ribbons and lace that are found on the bride’s dress. See the photo below for similar examples.
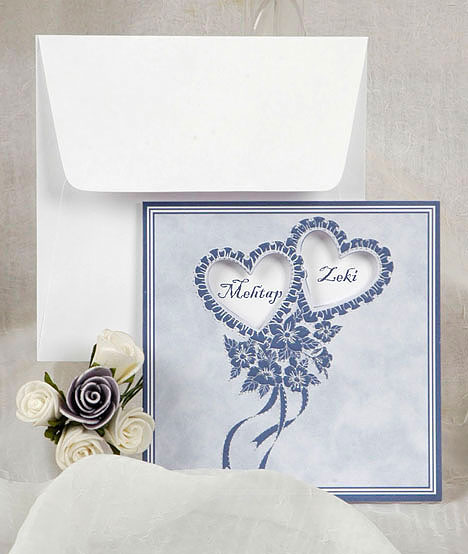
Hearts and ribbons
An original wedding invitation will be created by using hearts cut out of paper with a beautiful print, as well as bright ribbons to match the main colors of the wedding celebration.
To make these DIY wedding invitations, cut out a heart (or a couple of hearts) from paper and glue them onto the prepared blank. Decorate your items with ribbons, paper flowers and beads.
Quilling technique>
Quilling is a recently fashionable technique that has gained extraordinary popularity. With the help of quilling, unique paintings are created; it is also often used to design cards, including wedding ones. What is the essence of quilling? This is a kind of application. You roll small, thin strips of paper with your own hands and then, using individual parts, create a composition.

To decorate wedding tickets, they often use a composition of flowers, the image of a bride, or a couple - a man and a woman. Creating such invitations with your own hands requires meticulousness and a lot of time. But the result will delight you and amaze those invited.
Before designing the product, you need to think through the design, draw the outlines of the composition, cut strips (or buy blanks), roll up all the pieces of paper and then lay them out, bringing the idea to life.

For the supplied equipment, you will first need beautiful paper, a variety of ribbons, buttons, beads, clippings, threads, chains, flowers - whatever you have at hand. You will need: glue, scissors, tape. There are no clear recommendations or rules in the scrapbooking style - everything is done the way you like.
It will take a lot of time to create such a masterpiece, but you will be one hundred percent satisfied with the result. And most importantly - get a unique and inimitable postcard made by yourself.
You can see an example of creating wedding invitations in scrapbooking style in the master class in the video below:
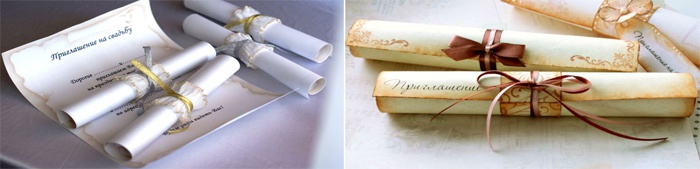
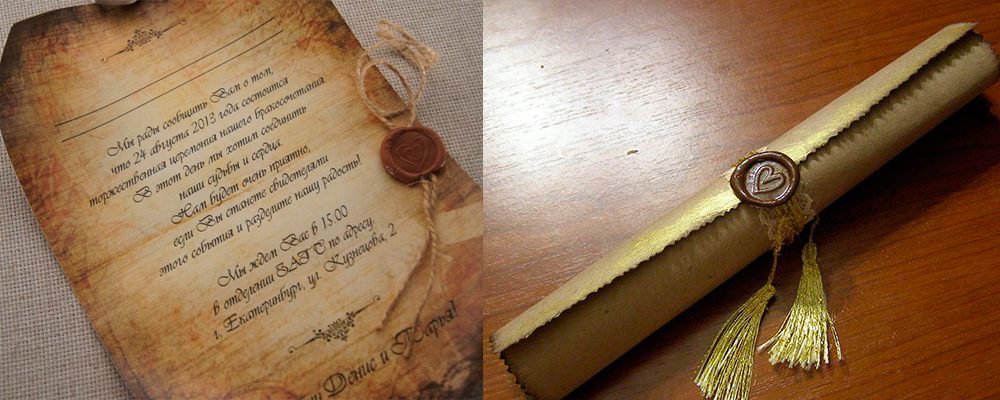
Scroll
Handmade wedding invitations in the form of scrolls are quite popular. Such scrolls can be made “antique” or simply using beautiful paper and fabric elements.
To expertly age or tint paper at home, use this master class:
To make the scroll itself, print the text on a tinted (or simply beautiful) sheet of paper and roll the sheet into a tube, tying it with a ribbon or brocade rope. You can decorate the scroll with a pendant in the form of doves or just flowers (for example, roses). Looks like this wedding card original and will definitely not leave anyone indifferent.
To create a hand-made invitation in the form of a poster, you will need the text of the invitation, a couple of your photographs, an inscription reminiscent of a poster, and whatman paper. See the photo below for an example.
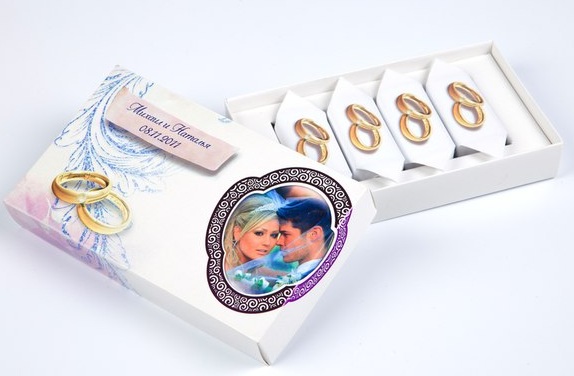
In the form of candies
To please your guests not only with the upcoming wedding, but also with delicious chocolate, send them a sweet wedding surprise created with your own hands. To do this you will need a chocolate bar, your photo and a color printer. Print out a new chocolate cover, place it over (or instead of) the old one, and send it to your guests. Such an invitation will be greeted with a bang.
You may prefer to use small candies rather than chocolate. To do this, place the candy in a homemade organza bag, and roll the invitation text into a small scroll and place it at the bottom of the bag. This wedding card will be a delicious surprise for guests.
Puzzles
If you want to torment your guests a little and make their brains think, use puzzle-shaped invitation cards. Look at the photo to see how it might look.
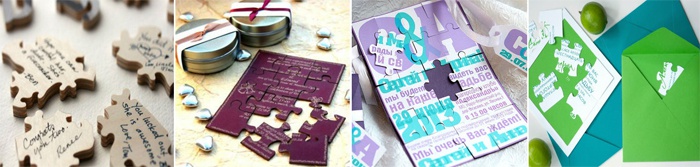
To make it yourself, cut the printed wedding card into several uneven pieces and fold it neatly into an envelope (which you can also make yourself). A frame in which you will need to put the puzzle elements will make it easier to complete the task.
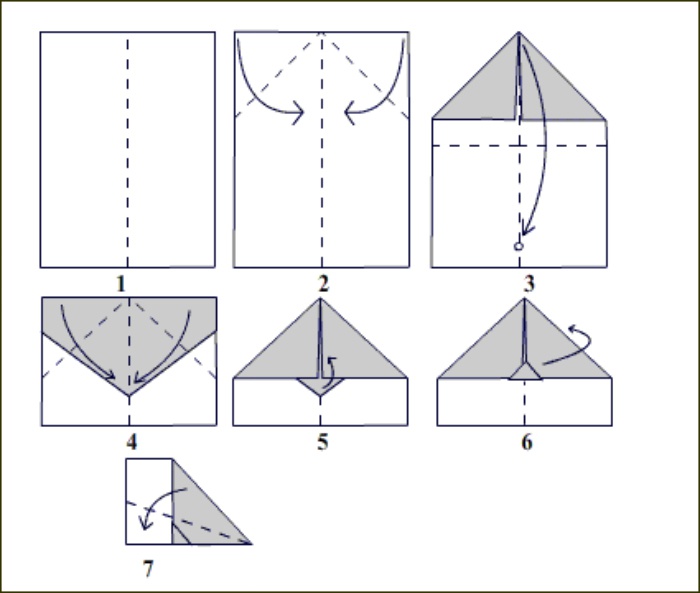
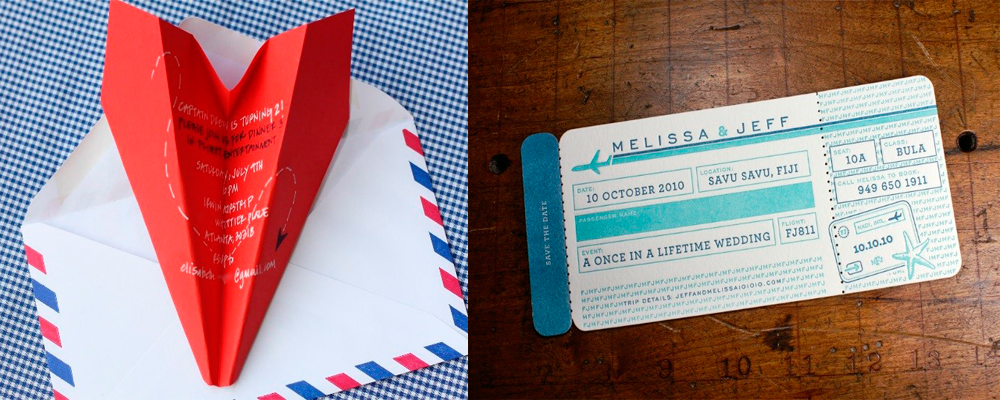
Airplane
Often invitation cards are made in the shape of airplanes. A sheet with printed text is folded into the shape of an airplane and given to the guests in this form. If you have forgotten how airplanes are made, look at the instructions below and create such unique invitations with your own hands.
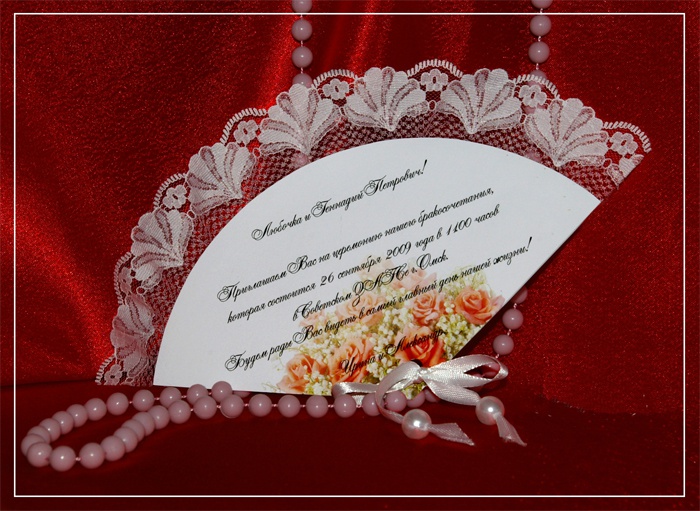
Fan
A handmade wedding invitation in the form of a fan looks original. Fold the text printed on a sheet of paper into a fan, decorate with ribbons or flowers, and your masterpiece will be ready. The technique is simple, but the result will exceed all expectations.
Envelope
Typically, invitation cards are sent in an envelope. Envelopes are especially necessary for invitations in the form of puzzles, cards made in the style of quilling or scrapbooking. To make your own envelope, watch the video below:
Crossword
If the bride and groom love Mind games, you can get your guests to practice by solving a crossword puzzle. To create it, use your mind, ingenuity and imagination. You shouldn’t ask complex questions in a crossword puzzle; it’s better to do everything in a humorous way. Tangible help in creating a crossword puzzle with your own hands will be provided by special programs to create puzzles.
![]()
In Photoshop
The ability to use Photoshop will be useful for creating invitation cards using this program. Your photographs, collages, or simply beautiful pictures or images found on the Internet. You can print invitations at a printing house or in a photo salon. For an example of creating an invitation card in Photoshop, see the master class:
Texts for invitations
You can use a variety of texts for invitation cards: standard, rhyming or in a comic form. It is also possible to use original fonts, which will only add sophistication to the invitation cards.
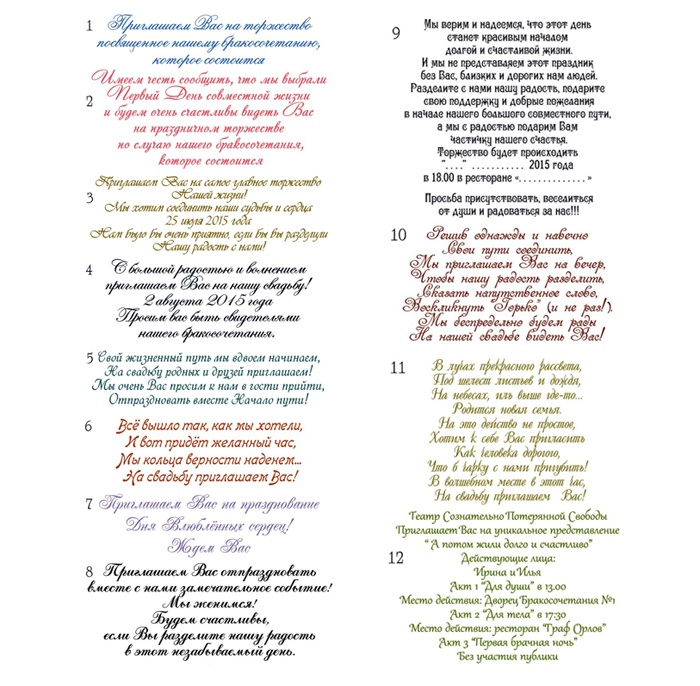
Here are sample texts used in wedding invitations:
What wedding invitations can you make with your own hands, what ideas are relevant now? This is what our article is about. First steps to creating new family done, the wedding date has been determined, it’s time to think about the guests. A wedding without guests is like New Year without Santa Claus.
If letters of wishes are written to an old man in a red sheepskin coat, then relatives and friends are given wedding invitations. This must be done in such a way that it will be remembered for a long time and it will be impossible to refuse.
Ordering wedding invitations from a printing house is not cheap, and you need to take care of the circulation in advance due to technological features production. Invitations, even with an exclusive design and execution, will be just beautifully printed cards, as opposed to those made by hand.
DIY wedding invitations
Handmade products are more touching than stamped factory ones. They are individual, original, with a piece of the master’s soul. It is almost impossible to repeat such work. This is the beauty when hand-made invitations are given to relatives, friends, and colleagues.
Unique postcards will be remembered for a long time, and hidden meaning, invested in them, will make guests excited in anticipation of the celebration.
Sometimes you want to implement several ideas for invitations. In this case, guests can be divided into categories. Self-possessed, strict, official for work colleagues and management.
Classic for parents and older guests. Crazy, eccentric, playful for close friends.
The cost of handmade invitations will depend on the prices for Consumables and tools.
![]()
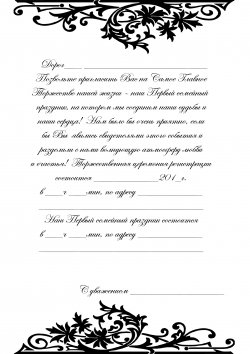
Text for wedding invitations
An important component of the invitation is the text. Wedding online portals offer a variety of texts. If it’s difficult to compose a poetic or prose text for invitations yourself, you can use ready-made examples or create your own unique one based on them.
(load position dia)
In addition to the main text, the invitation Special attention given to the names of those invited. It is advisable to enter them manually in beautiful handwriting and without errors.
Emphasis on the event, date, time and location. An insert with an event plan will help guide guests who may not make it in time for the start of the celebration.
A themed wedding involves certain style clothes, information about this is also indicated in the invitation.
The signature of the bride and groom completes the text component.
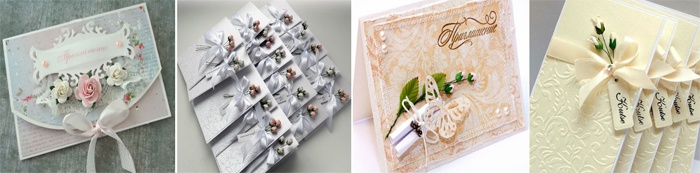
Wedding Invitation Ideas
Having decided on the main points of the invitations, the stage of choosing a design style begins. Invitations, the ideas of which are thought out no less carefully than the celebration itself, should make it clear at first glance the essence and style of the celebration.
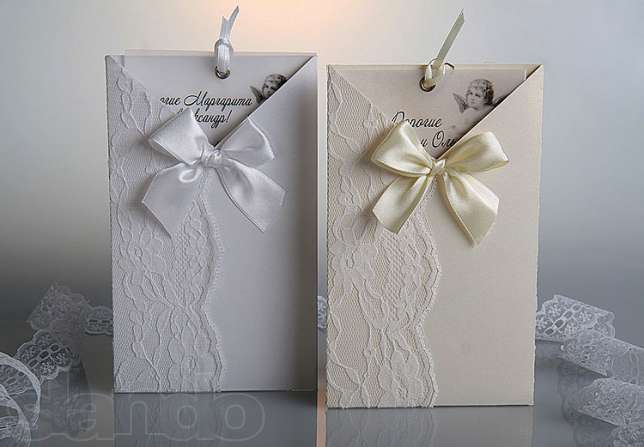
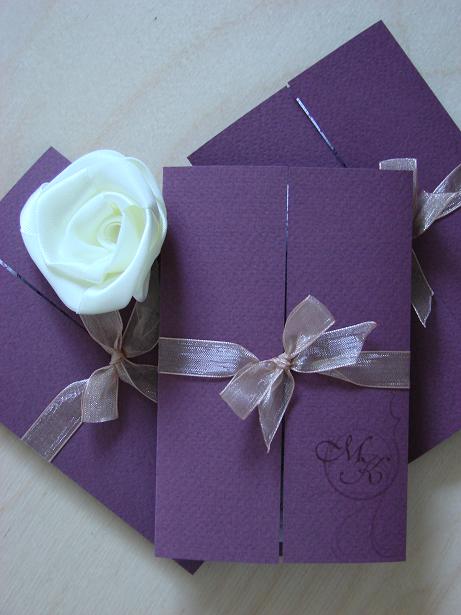
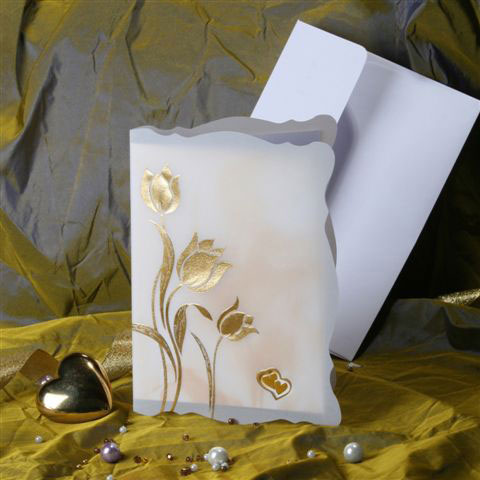
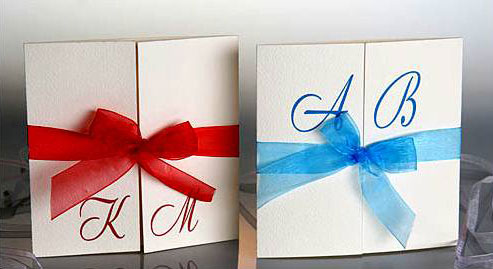
Invitations to a classic wedding are restrained, made in pastel colors, decorated with thin lace or cute bows.
To make, for example, such an invitation, you will need a minimum of time and materials.
From a sheet of printer paper with a density of 200 g/m2 in A4 format, two invitations are obtained. The text is printed in advance, taking into account that the sheet will be cut in half vertically and then folded again.
The bottom of the card is decorated with a figured hole punch (in the proposed version it is a heart). Lace ribbons are attached to the edges with transparent glue. A small satin ribbon is threaded through the hearts and a bow is tied. Thus, the two halves of the card are fastened, and the invitee will read the text by untying the bow.
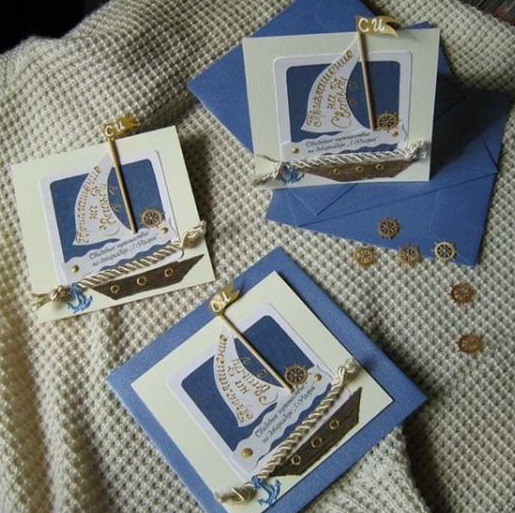
The idea of a wedding in a nautical style is realized in invitations with a dominance of blue or blue flowers- symbols of the sea. Small shells, dried starfish, and beads imitating pearls can be used as decorative elements.
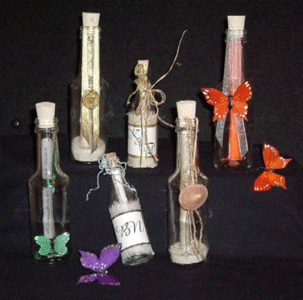
Scroll invitations sealed in a bottle are spectacular and unusual. The first thought will be about a shipwreck, therefore something related to the sea.
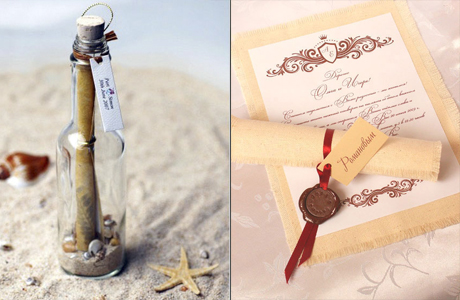
The fact that the wedding party is planned on a yacht will be hinted at by an invitation with a sailboat, made, again, in blue colors and stylization of marine paraphernalia.
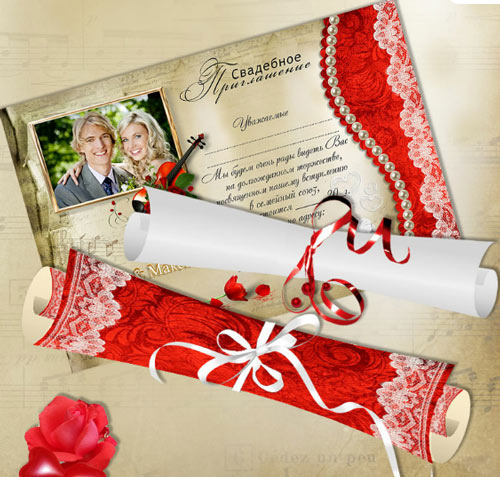
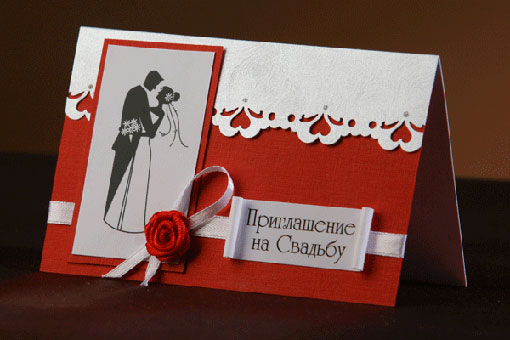
The brave and determined will be invited to a bright celebration with wedding invitations in red flowers or decorated with red decor. For example, invitations in the form of scrolls can be white, but tied with a catchy ribbon, or red scrolls with a delicate white bow.
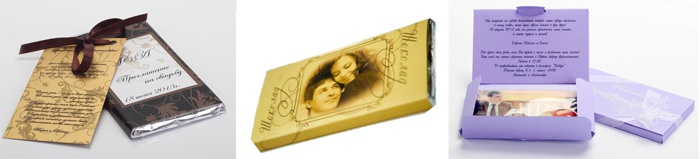
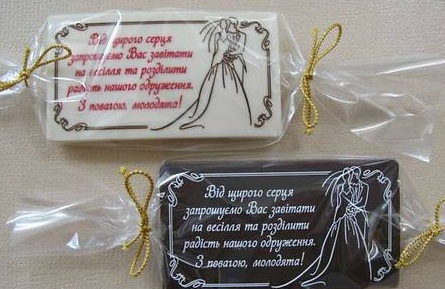
Those with a sweet tooth will undoubtedly appreciate the delicious edible invitations.
In a confectionery shop you can order chocolate with the main details of the celebration, which are duplicated on the packaging (insert).
Or buy delicious candies in the store and make them yourself (order from a printing house) boxes and/or wrappers for candies with text.
Electronic wedding invitations
IN Lately Electronic wedding invitations are gaining popularity, allowing you to notify relatives and friends about the upcoming celebration in the shortest possible time. Electronic invitations have several advantages.
Firstly, having chosen the design and text of the invitation, you can print it and send it out in a natural way. After a short period of time, duplicate the invitation electronically with a request for a final response that will help approve the list of guests.
Original wedding invitations
Adults enjoy putting together puzzles. Original invitations will undoubtedly surprise you and make you immediately start putting together the puzzle.
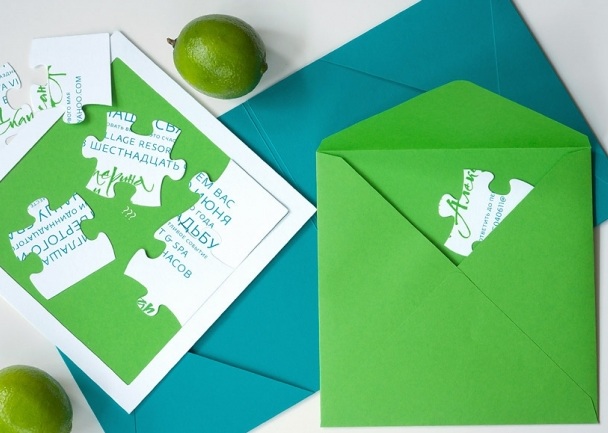
The cardboard puzzle can be replaced with a magnetic one, and the invitations will remain on guests’ refrigerators for a long time, decorating them and reminding them of the upcoming date.
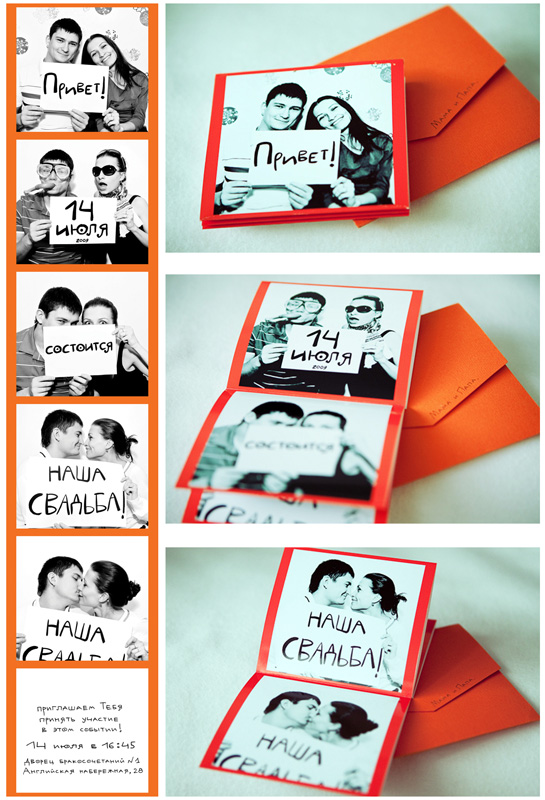
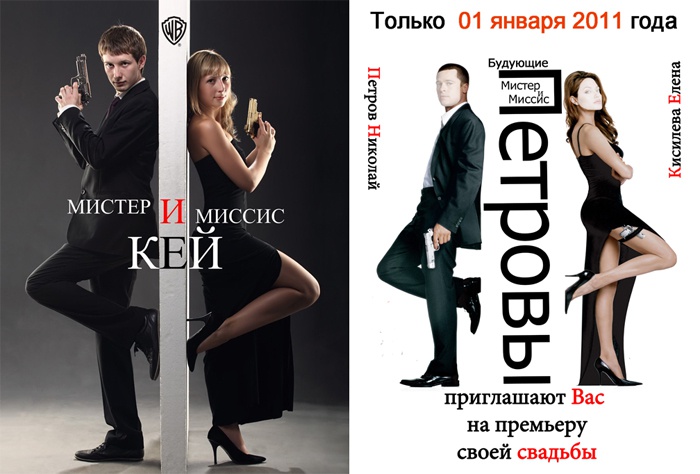
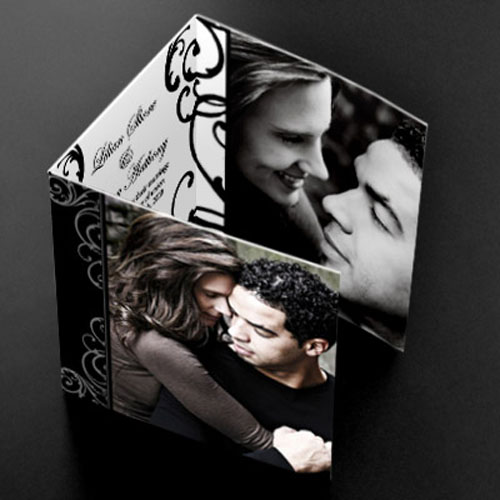
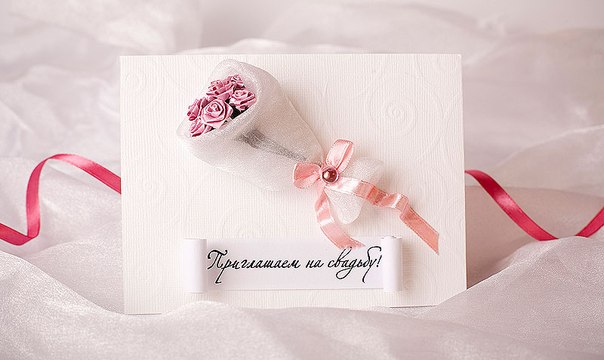
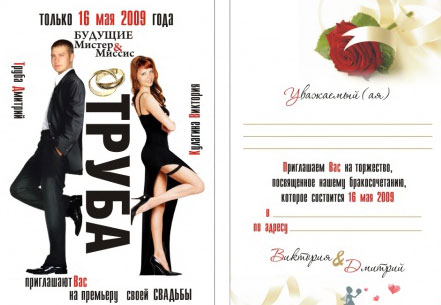
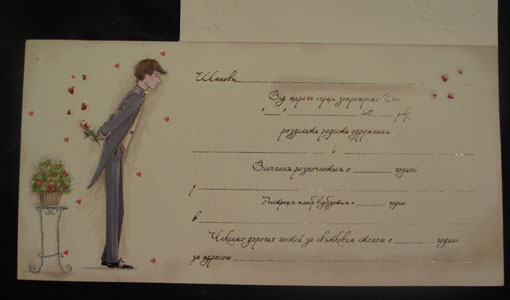
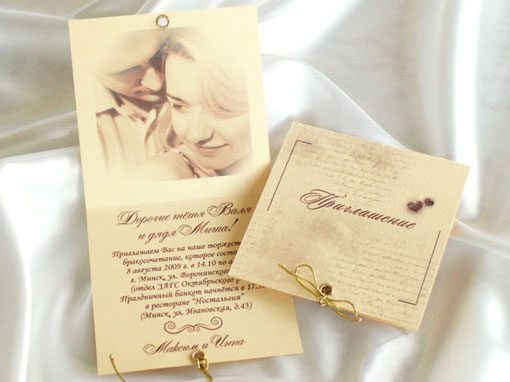
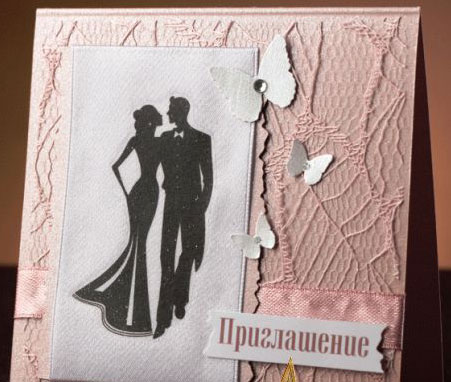
Wedding invitations with photos
Wedding invitations with photos of the bride and groom look touching and sometimes extravagant.
Laconically, without frills, the text is framed by photographs of the couple. There is no need for unnecessary words, feelings, captured by a photographer, they say themselves.
Becoming tabloid stars couldn't be easier. A stylish invitation on the front page of a popular publication is an incredibly intriguing invitation. In addition to photographs of the newlyweds, the page can be decorated with text sketches about the first meeting, the first kiss, and so on.
Invitations in the form of posters are no less popular. In such an invitation you can play on a popular film loved by many.
A comic invitation with the faces of the heroes of the occasion will immediately set the guests up for a fun wedding. Great mood guaranteed for everyone.
Another option for an invitation card using a photo. To make it, you will need colored printer paper, from which a rectangle with sides 18.5 by 15.5 cm is cut out. 2 cm is measured on the narrow side of the rectangle, and the segment is folded. The rest of the sheet is divided in half and also bent.
![]()
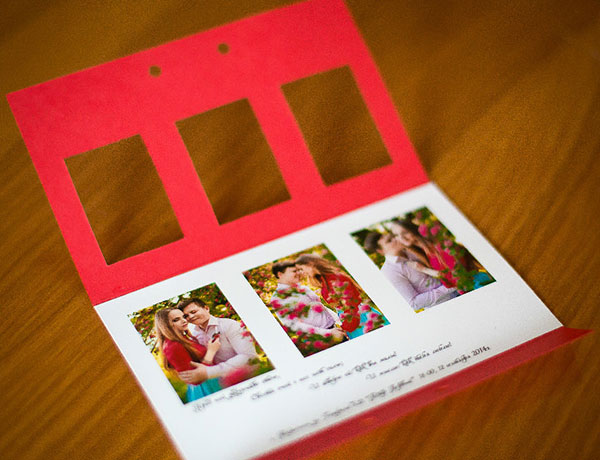
On the front side, which is the cover of the postcard, windows are cut out for the photo. The length of the window is 4.5 cm, width – 3.5. The windows are located at a distance of 1 cm from the fold line. The distance between them is 1.5 cm and 1 cm from the edges of the postcard. At the bottom in the middle, two holes are punched with a hole punch.
Inserts with photographs are made in any graphics application. The insert size is 14*9 cm, the photo size is 6*5 cm - these parameters are set when creating the document. The space between photographs and the top and side edges is 1 cm. The text is located in the bottom margin. The printed insert is placed in an envelope and decorated with a bow.
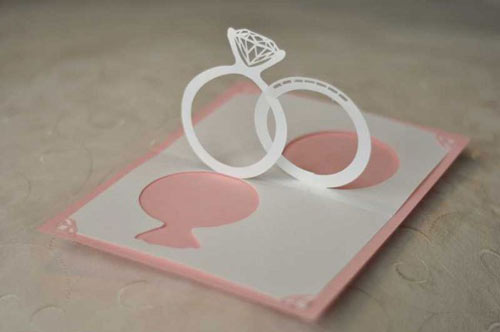
Three-dimensional invitations look chic, stunning, and incredible.
Making such invitations with your own hands is quite difficult. You need to be diligent, patient, and work painstakingly on every detail. Ordering from a printing house is not an option for everyone, if only because of the complexity of the work and, accordingly, the cost.
Less complex, voluminous invitations can be made using templates found on the Internet. This is an option when you really want to make something airy, but you don’t have the skills to draw and think through the details.
Invitations made using the quilling technique are incredibly romantic. You can master a couple of simple paper rolling techniques in a couple of minutes. The beauty of such invitations is that many, especially people of the older generation, are not familiar with this type of needlework, and such invitations will probably be kept for years.
To present such invitations to guests, you will need white designer cardboard, 13*8 cm in size, on which text is written or printed.
On designer cardboard lilac color(32*12 cm) the silhouette of the bride is printed on the right side. The cardboard is folded in half and the text is glued inside in the middle.
The bride's corset is cut out of white, slightly transparent paper and glued on. The skirt is formed from parts pressed together using the quilling technique. To do this, you can purchase special white strips in the store or cut them yourself from white “Snegurochka” type paper, strip width 3 mm. These wedding invitations should be interesting. Standard A4 paper is cut lengthwise.
Using a special rolling tool or a toothpick with a split tip to grab the tip of the strip, a not too tight roll is spun, the outer tip of the strip is glued, then the roll on one side is slightly flattened with your fingers to make a droplet. Droplets form a skirt.
For a bouquet, a spiral consisting of several turns is drawn on a sheet of red paper. The spiral is cut along the lines. The resulting strip is twisted with your fingers and fixed in the girl’s hands.
There is a die cut in the upper left corner, which you can cut yourself or purchase at a craft store.
There are many ideas for wedding invitations, each of them is stunning and unique.
The lovers, having begun to embody the chosen one, will make it unique, extraordinary, chic, and wedding celebration a bright and unsurpassed event in the life of everyone present.
DIY wedding invitations - photo tutorial
There will be a wedding in your house soon and it’s time to invite guests. The holiday begins with an invitation. This means that special attention must be paid to its design.
Every year there is a growing desire among young people to arrange the most unusual and memorable wedding. The bride and groom are trying to find their own special and unique style, to hold a wedding with a specific theme, which means that the invitation must correspond to the general spirit of creativity. Moreover, not only the services of wedding salons, designers and decorators, but also modern technologies will come to the aid of newlyweds.
You can make your wedding invitations interesting and elegant with your own hands. They will keep your hands warm and good energy. In addition, this is a fun activity that you can involve your loved ones or friends in. Maybe you will discover previously unknown talents in yourself.
Our ideas are your execution! If desired, you can realize the most beautiful and unusual fantasies to surprise your guests.
Hastily
You can quickly and easily design a wedding invitation with your own hands in any program like Fotoshop. Whether you use ready-made wedding pictures (templates) or beautifully designed photos of your own, you will need thick paper to execute your plans. High Quality. After experimenting with fonts and effects, print the finished cards on a printer (preferably an inkjet). Please note that invitations should be compact and not too bulky. Unless you plan to deliver them personally rather than use the post office.

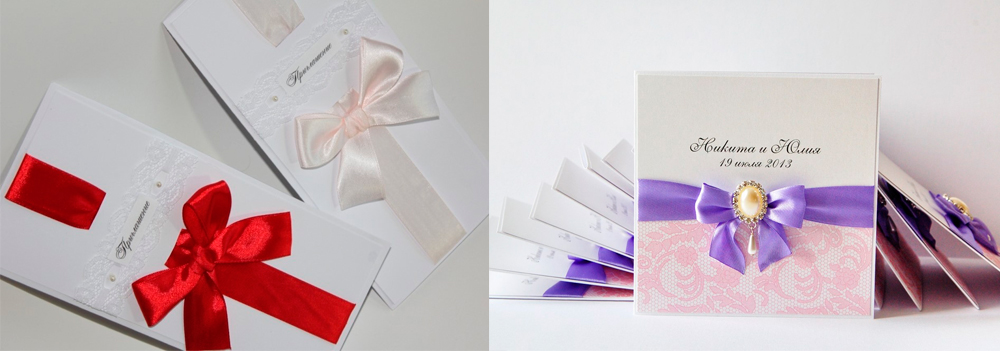
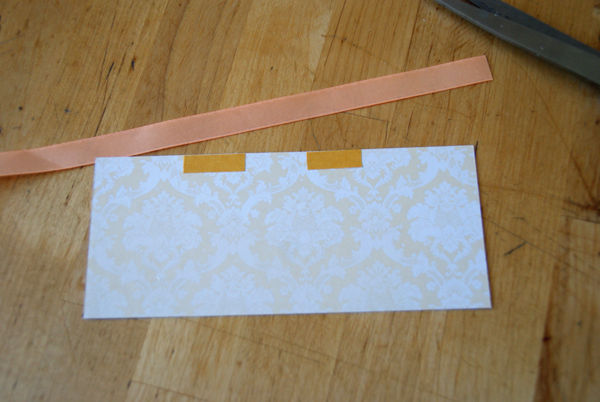
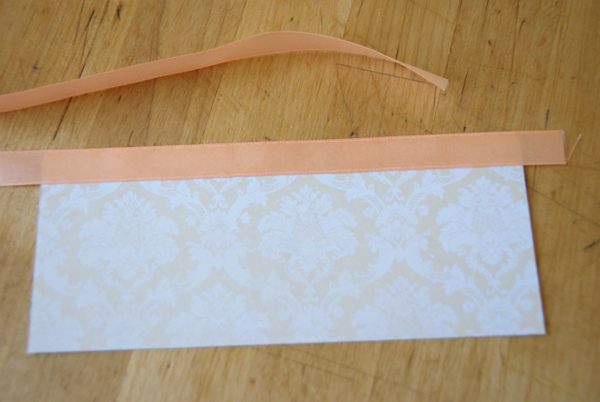
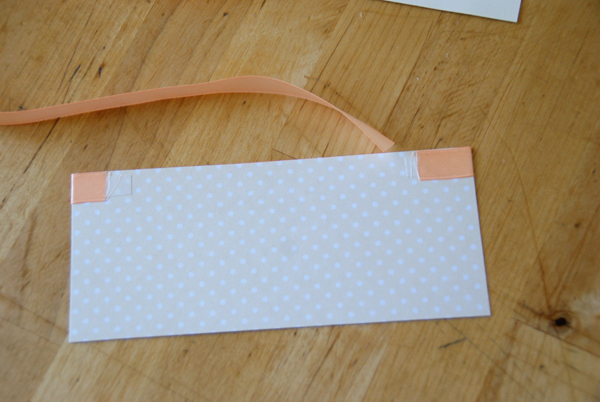
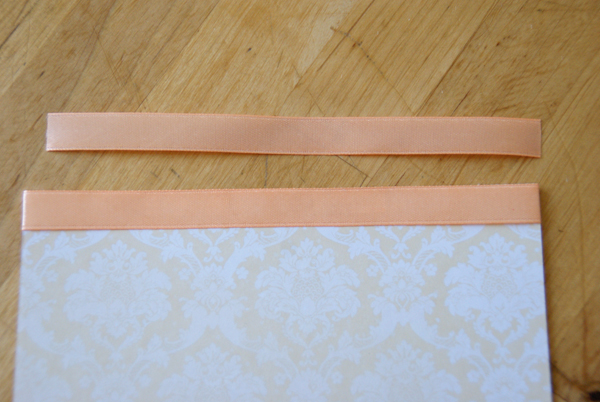
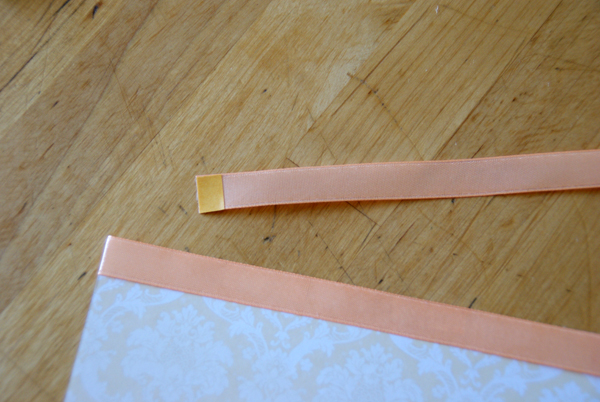
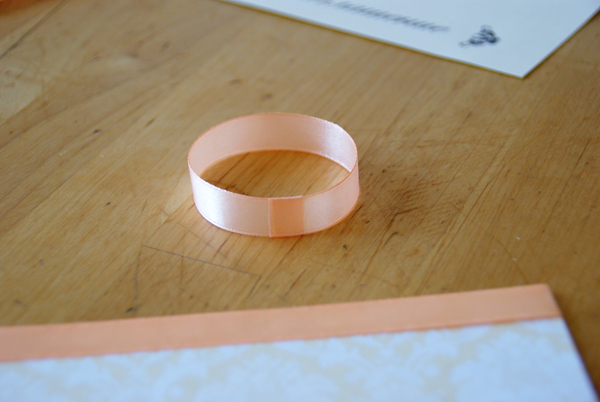
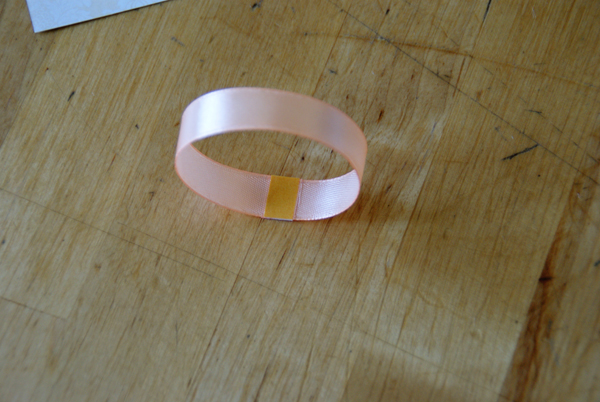
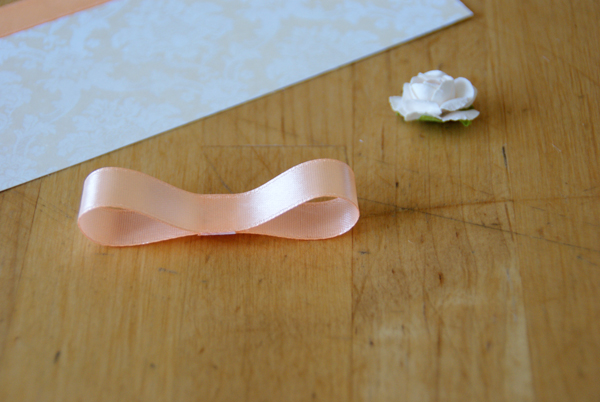
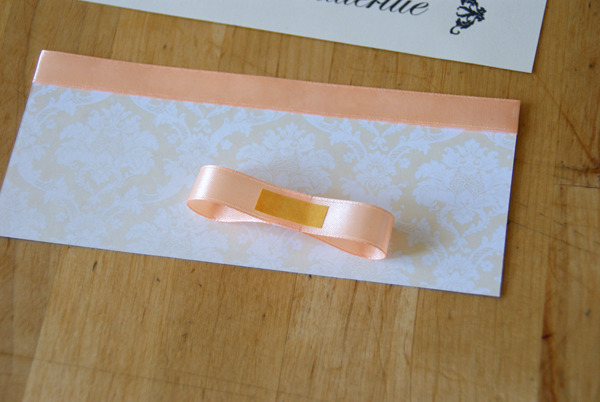
Card with ribbons
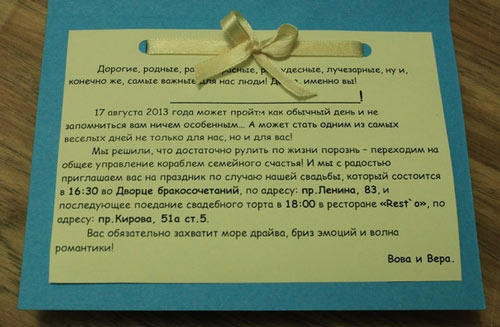
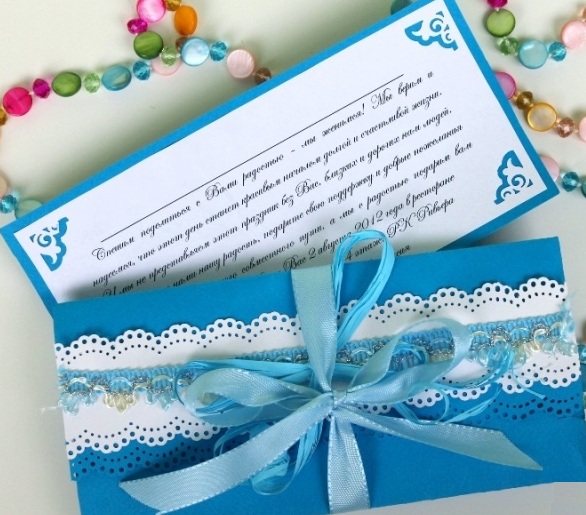
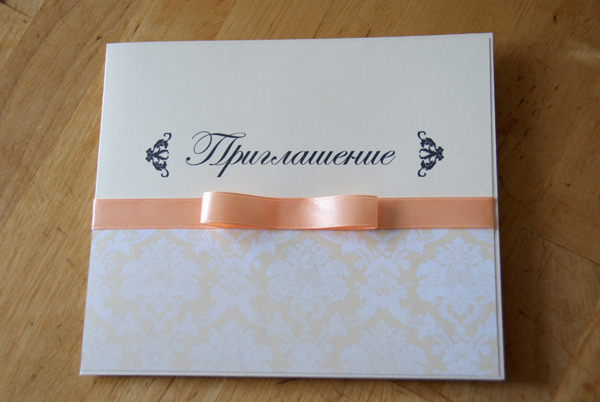
The good old classic will never go out of style - an opening card with the invitation text on the inner sheet and a decorative cover on the outer sheet.
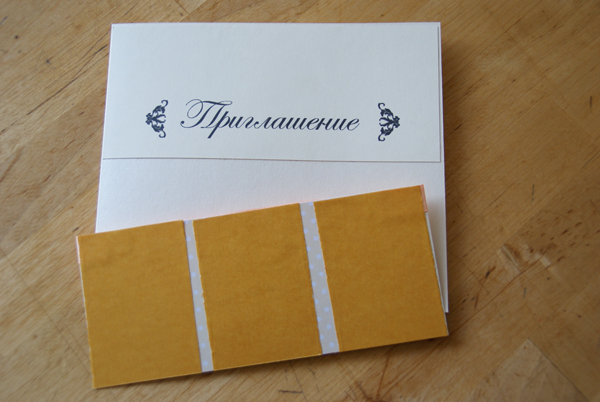
You will need: high-quality paper with a density of 210-230 g/m (2 sheets different colors), ribbon up to 7 mm wide (nylon or satin), double-sided tape, beads, color printer.
You will need to cut a 12x12 cm square for the outer part of the future postcard. You need to draw a pattern on a sheet of A4 paper or select a ready-made one on the Internet and print it.
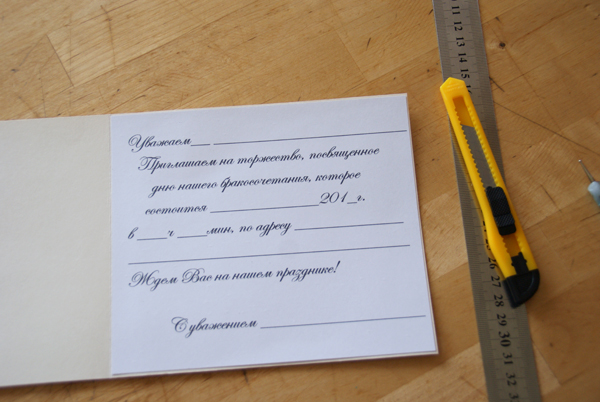
Cut the sheet into thirds by eye. Enter the name of the guest on the left, the text of the invitation in the center, and the signatures of the newlyweds on the right. Thick paper is best folded using a ruler. This will all make up the inside of your product.
And to the outer, patterned base, you need to glue two 15-20 cm ribbons on both sides, and stick a cut-out square with the inscription “Invitation” on top. Insert the ribbons into the beads and tie them in a beautiful bow. Your card is ready.
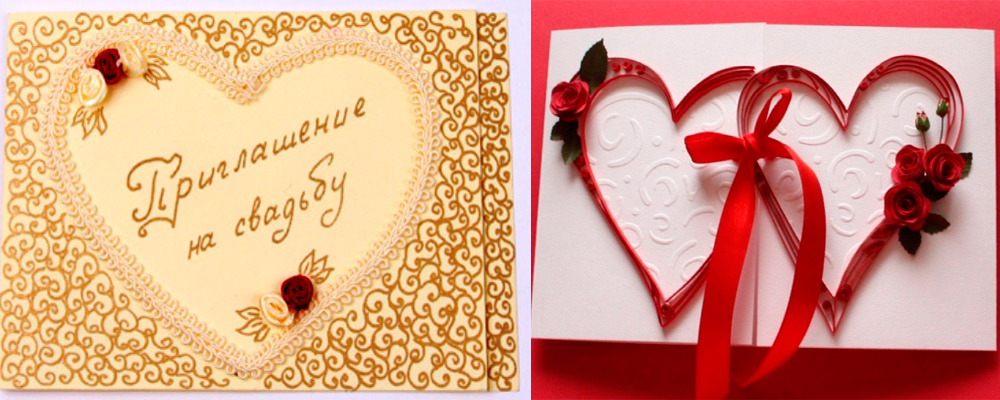
Card with heart
Again you will need colored paper, quite thick. In addition, you need sequins, braid and nylon roses for decoration and a gold or silver marker.
For the postcard, you can choose a round, square or rectangular shape, even as complex as you wish. The one thing they have in common is that you draw, glue, and print a “heart” on the front side. You can easily draw its contours with a simple pencil. And then glue roses, braid or sequins along the contour according to your own taste. Other available materials are also suitable for decorating the heart: cords, decorative lace, twine, and something else.
And in the center will be the word “Invitation”. You can decorate the rest of the card to your liking, draw patterns and curls on it, even use stencils. It all depends on your imagination.
Write the invitation text inside the card.
Invitation using quilling technique.
It is believed that paper rolling or quilling is not the easiest technique, but with some effort, you will get unusually beautiful cards.
To get started, stock up on thin strips of paper three millimeters wide and up to 30 cm long. In addition, you will need thick paper, it is better if it is in delicate colors - pink, beige, light lilac, the silhouette of the bride in the picture, a knitting needle and a stationery awl.
On a white sheet of paper measuring 12x16 cm, print (or write by hand) the text.
On thick cardboard (12x32) on the right, draw the silhouette of the bride (you can use a stencil). You need to measure the middle using a ruler and carefully bend the card in half.
Now comes the hard part. The upper part of the dress needs to be cut out of white thick paper (it is possible to make a template from tracing paper for this purpose) and pasted onto the dress of the drawn bride. And the strips for quilling must be carefully wound onto an awl (on a knitting needle). It is better to fix the blanks with glue so that they do not unwind, and methodically glue them over the bride’s dress until it is completely closed. In order for the applique to stick well, you should drop a drop of glue onto the drawing in the right place, press each circle against a drop of glue and hold for several seconds.
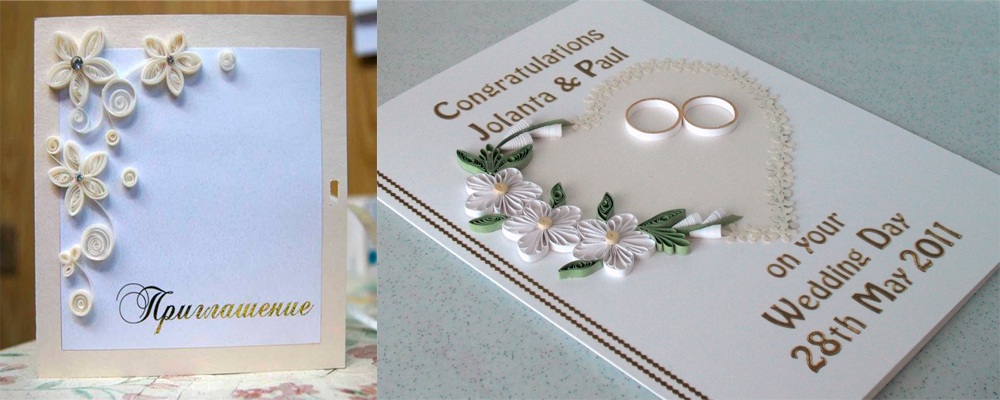
All that remains is to draw a spiral on colored paper, cut it out and glue it onto the card, right into the hands of the bride. You will get a beautiful three-dimensional rose flower. All that remains is to format the word “Invitation” and attach the text written earlier. Ready!
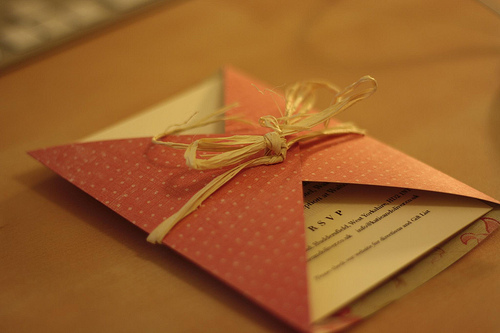
Envelope with a secret
First you need to make an envelope. To do this, cut a thick sheet of paper in half, and fold three edges of one half towards the center. You can cut off the top corners, even make patterns with scissors.
Then cut out a rectangle of paper of any color, approximately 7x10 cm in size, and write an invitation on it. Once you have it in the envelope, use a hole punch to make holes around the edges of the envelope. All that remains is to thread the ribbon through the holes and tie a beautiful bow. The envelope itself, if you want, can be decorated with drawings or lacing on it. This will only decorate it.

Romantic invitation
You will have to make an envelope again. But first, prepare and print the text of the invitation (if you are writing it by hand), and use curly scissors to cut it into the shape of a card of the required size. And make a hole in the top center. A hole punch is useful for this.
Now you can start decorating the envelopes. Mark rectangles on the cardboard with allowances of up to half a centimeter from each side of the template and add the same amount for the folds and fastenings. Do the same for the other half of the envelope. Trace the templates with a simple pencil and cut out.
From the wrong side, you can draw a metal ruler along the fold lines. Now all that remains is to make a cutout on the front part of the envelope in the shape of a semicircle or triangle, on the other part - punch a hole at the top, as in the card, and bend all the parts. Glue the envelopes along the fold lines and front side decorate with lace.
Once the card is placed in the envelope and the holes are aligned, tie a thin satin ribbon, threaded through both the card and the envelope, into a knot. A bow made from a wide ribbon attached to a narrow one will be a real decoration.
Posters and newspapers
You can easily make such an invitation on your computer using some interesting font. They will need to combine an invitation and funny (or maybe serious) photographs of the newlyweds. You put the printed cards in an envelope, and the job is done.
It is no less interesting to design a newspaper invitation in black and white. There will be an announcement here upcoming wedding with photographs of young people, and interesting stories or funny stories accompanied by interesting photographs. You will definitely find in your circle of friends someone who is familiar with the features of layout and knows how to use a computer. Such invitations turn out to be very stylish.

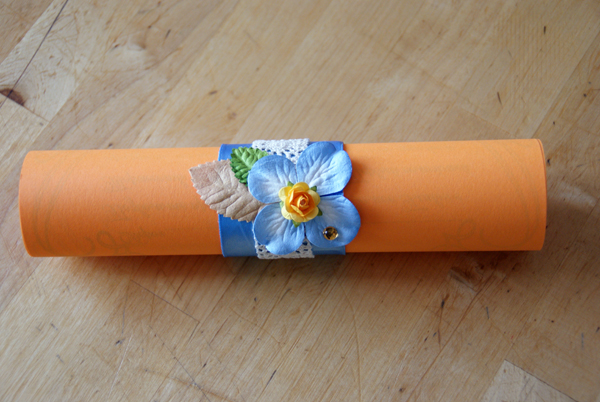
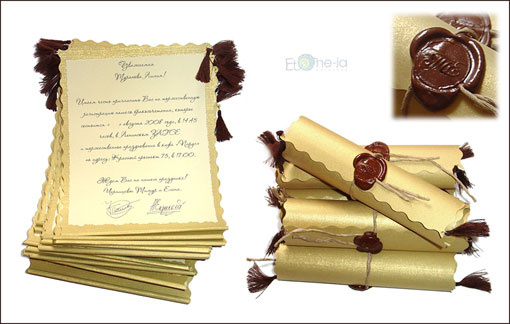
Scrolls
In this case, paper with text printed on it must be artificially “aged” by soaking it in a solution of coffee or strong tea, then lightly scorching the edges with a candle or a simple lighter, which will give the paper the appropriate texture. And with hieroglyphs or other strange symbols it will look even more interesting.
On separate small pieces of paper, processed in the same way as the main scroll, write the names of the guests for whom the invitation is intended, and punch a hole from the edge with a hole punch.
Now the scroll remains to be rolled up, tied with twine, ribbon or regular rope, threaded through the hole near the label and secured with melted paraffin with a stylized seal, which can be bought at any stationery store.
The result will be an unusual and very interesting product that will be a pleasure to give to any guest.
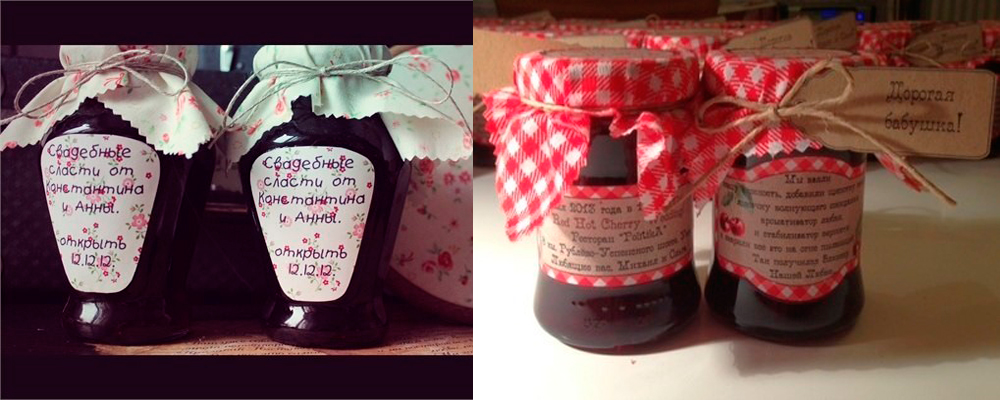
Jar
Any jam jar will make a very original invitation. Cover the lid of the jar with a piece of paper and secure it with a rubber band (the kind you can buy in office supply stores). Tie the neck of the jar with twine so that the elastic band is not visible.
You will need a printer to print the invitation labels. It's better if you choose self-adhesive paper. If not, you can use glue or double-sided tape to secure the label to the jar.
You can easily make wedding logos, preferably round ones. For them, you can use the initials of the young people or their names. Once they are printed and cut out, all that remains is to glue them onto the fabric on the lid of the jar.
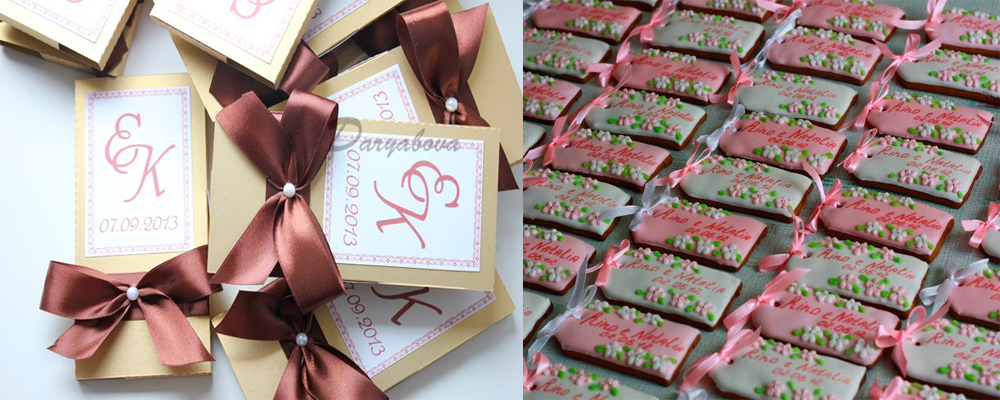
Sweet tasty invitations
It is possible that children will be among your guests. different ages. This means that the invitation must be of interest to everyone.
Make them in the shape of a chocolate bar or candy. The text in this case can be formatted as a regular note.
It’s easy to make a chocolate wrapper yourself using photographs of the newlyweds, computer program and a color printer.
And for sweets, you can easily sew small bags from organza into which a rolled-up invitation will fit. The bag can easily be replaced with candy wrappers made from wrapping paper with the invitation text inside.
And most importantly, don’t forget to include real sweets for those with a sweet tooth. It's tasty and interesting.
Hat and handbag
You can make an original invitation. You need to get velvet paper, black, white and gold. Cut out a bowler hat from the first one, and a handbag from the second one. White and black, pasted on gold (it is important to find gold thick paper) looks simply gorgeous. And on the back is handwritten text. And you're done!
Airplane
Anyone can make such an invitation. Select a piece of paper Any will do a color pleasing to the eye. Write text on it. We have been able to fold airplanes since childhood. Tie a beautiful ribbon on the tail with a card - a ticket at the end with the name of the guest.
Envelope with wedding date
You can easily make a regular envelope from paper of any color. You can cut out numbers (wedding date) from the same exact paper. You will need to attach the ribbon to the envelope, and put the numbers on it and hide it in the envelope. And all that remains to be included in this unusual product is a printed or handwritten invitation.

And do not forget to indicate in your invitations the names of the newlyweds, the time and place of the celebration, but most importantly, the names of the guests.
Have you already realized that everything depends on your imagination? In addition, your wedding invitations can be of several types: classic for the older generation, creative for the youth, sweet for the children!
Please enable JavaScript to view theThe second part of the master class, in which we will make invitations with a bow, as well as popular invitations - scrolls.
All templates are designed for A4 format.
1 option
We will need:
Designer cardboard;
Thick colored and white paper;
Scrapbooking paper;
Satin ribbon 1.3 cm wide;
Decorations (flowers, semi-pearls);
Double-sided tape.

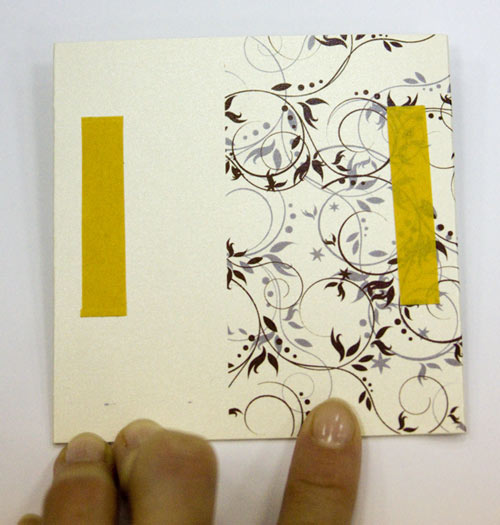
Using templates, we print the front part of the invitation on thick colored paper, and the text of the invitation on white paper.
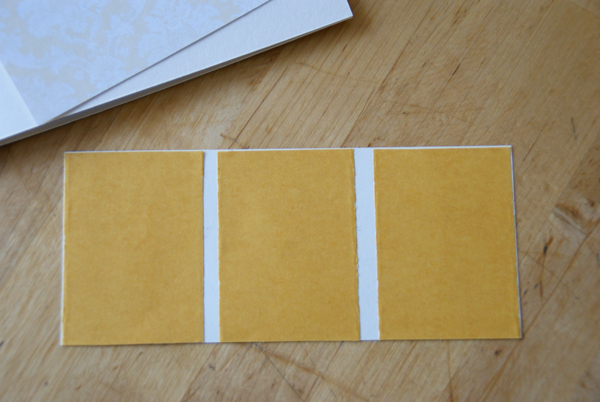
From scrapbooking paper, cut out a rectangle equal to the size of the top rectangle with the text.

Glue double-sided tape onto scrapbooking paper in this way.
Cut the tape so that it remains small stocks on the sides and glue it with tape.
WITH reverse side paper, glue small pieces of tape and secure the ends of the tapes to them.
Cut off some tape.
Glue a piece of tape to the edge of the tape.
Glue the tape into a ring.
Glue a small piece of tape inside the ring at the gluing site.
Glue it top part on tape, you get a bow.
Glue a piece of tape to the back of the bow.
And glue the bow to the middle of the ribbon; for accuracy, you can use a ruler.

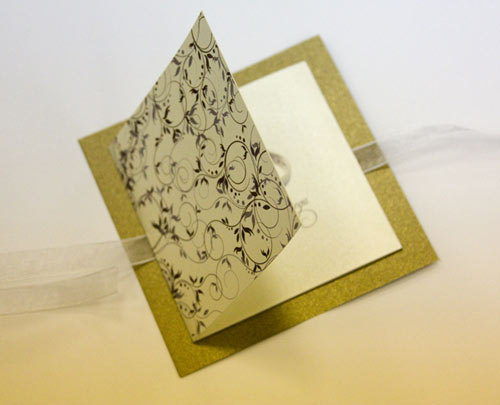
We cut out a blank for the invitation from designer cardboard. The size of the rectangle is 33 cm by 14.3 cm. Bend the workpiece in half.
Paste the invitation text.
Place tape on the front of the invitation with the text.
Glue to the invitation base. Place tape on the bottom.
We glue it onto the workpiece. So that the joint between the rectangles is not visible, we make a small overlap, literally 1 mm.
Decorate the invitation with half pearls and a flower.
![]()
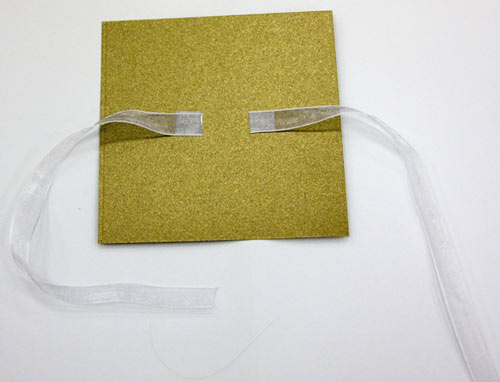
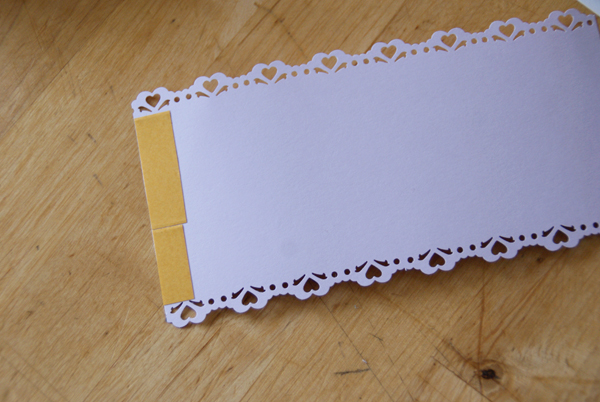
Option 2
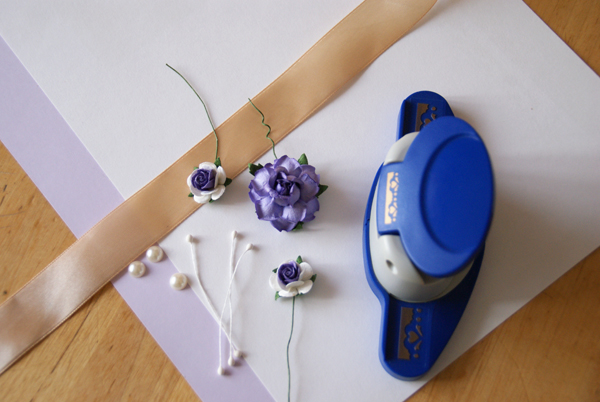
Invitations - scrolls have gained well-deserved popularity, they look quite unusual, and the rings themselves can be decorated in a variety of ways; two ways of decoration are presented below.
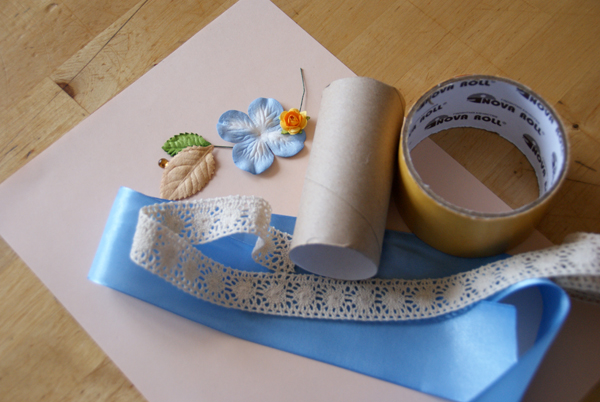
We will need:
Thick colored paper;
Roll from toilet paper or cardboard;
Satin ribbon 5 cm wide;
Knitted lace;
Decorations (flowers, leaves, semi-pearls or rhinestones);
Double-sided tape.
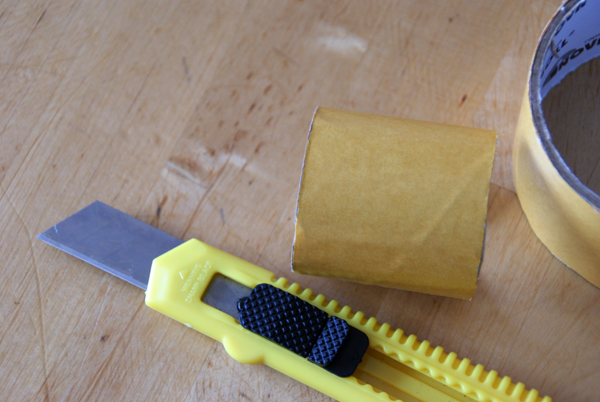
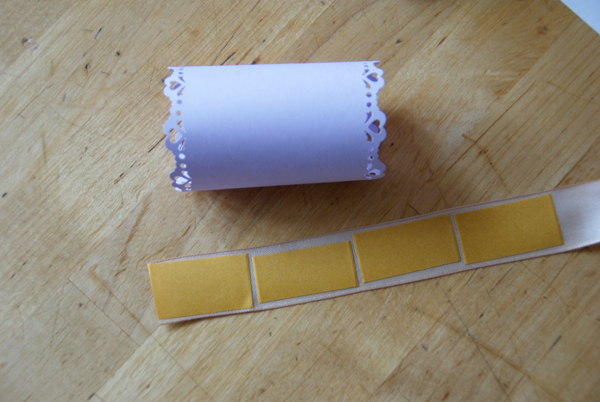
Carefully cover the roll with tape.

Using sharp scissors or a breadboard knife, cut off this part.
Remove the protective film and cover the roll with satin ribbon. To prevent the edges of the tape from fraying, you can singe them. Glue it slightly overlapping, leaving the top part unglued.

We tuck the lace into this “pocket”.

And glue the lace onto the ribbon with glue. You can use Moment Crystal glue, or thick PVA. We also leave the top part of the lace unglued.
![]()
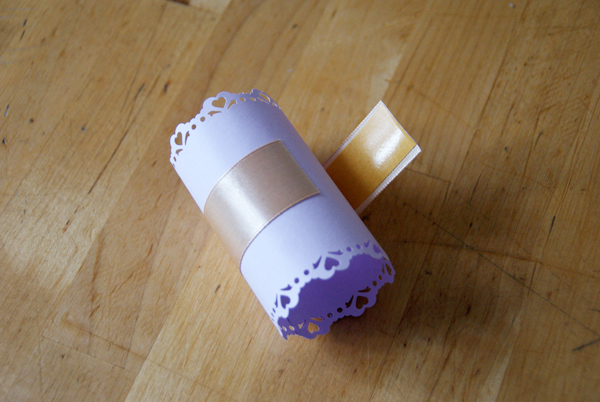
Using a heat gun, glue the edges. Don't worry that the glue is visible, we will cover it with decor.

Glue on the leaves.
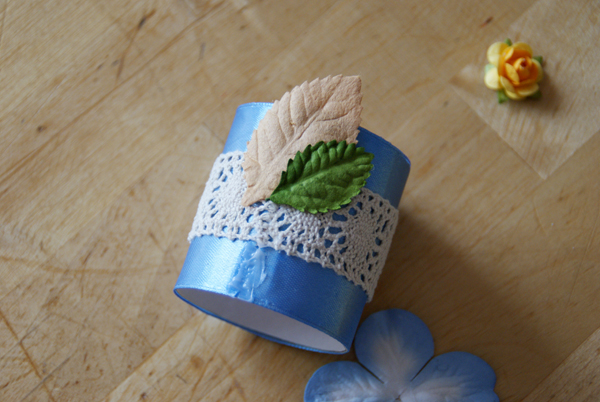
And then the rest of the decor.
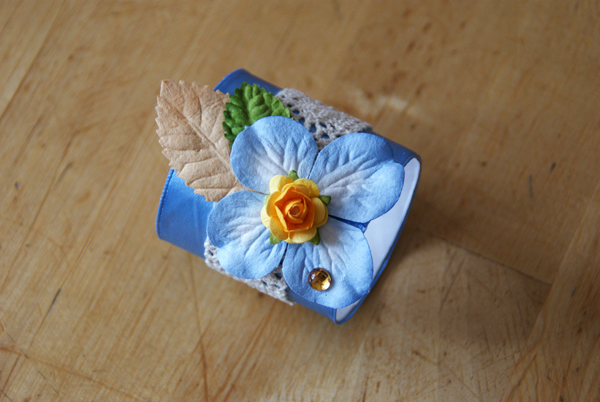
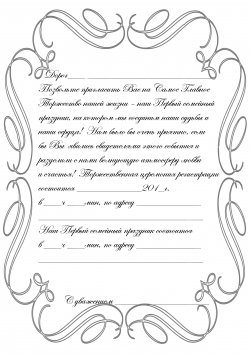
Print one of the templates below on colored paper.
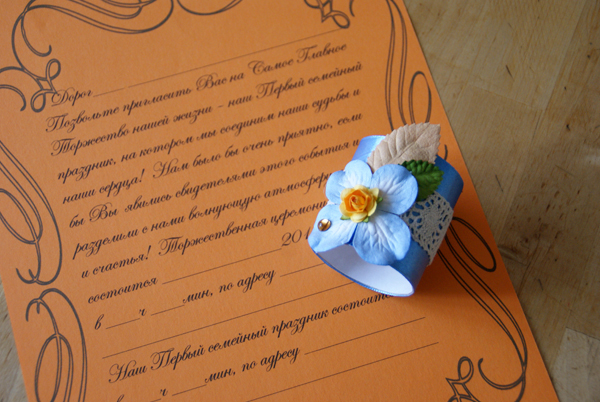
We twist the paper and insert it into the ring, the invitation is ready!
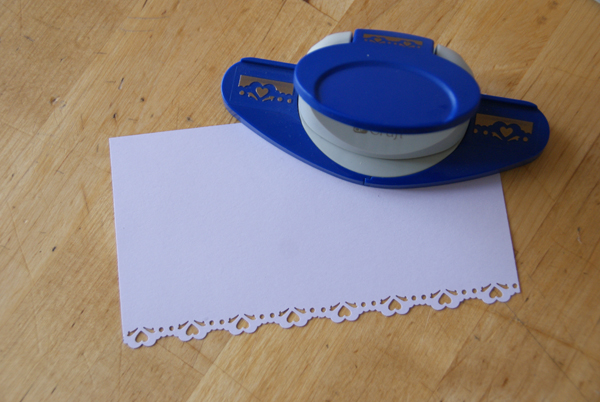
For the second scroll invitation we will need:
Thick white and colored paper;
Satin ribbon 2 cm wide;
Edge puncher;
Decorations (flowers, stamens, semi-pearls);
Double-sided tape.
We cut out a rectangle of 10 cm by 15.5 cm from colored paper. We process the larger side with a hole punch at the edges.
We do this on both sides. We glue double-sided tape to the edge.
We glue a roll of paper. Glue the tape onto the satin ribbon.
Glue the tape in the center of the roll. It is important that the joint of the paper roll does not coincide with the joint of the tape, but is underneath it.
Glue the tape with Moment glue or a heat gun.

We begin to decorate the roll so as to cover the joint of the tape; the paper joint will be on the back side and will not be visible.
Very beautiful and aesthetically pleasing. I took note for invitations to a hero’s birthday
Currently, future newlyweds are presented with a huge selection of wedding invitations: from options for standard invitation cards in stationery stores to individual designer designs.
Where to stop? What to pay attention to and on what basis to choose wedding invitations?
Dear my readers!
The site provides only informational information for creating an original and beautiful wedding celebration. I'm not selling anything ;)
Where to buy? You can find and purchase the celebration accessories described in the articles at Special online stores where is delivery throughout Russia
Order invitations from this article
Where to begin?
Before you go looking for invitations, you need to:01. Think through all the details of your wedding:
- wedding venue;
- the time of all the main events (bride ransom, painting in the registry office, wedding walk, banquet);
- wedding theme (for a themed wedding);
- wedding style (color design, floral design, accents on certain accessories);
- outfits of the newlyweds (many brides design in the colors of their wedding dress, bridesmaid dresses or wedding bouquets).
02. Decide what to emphasize in the design of the invitations (for example, if the wedding is themed, small details of the wedding should definitely be reflected in your invitations).
What should wedding invitations contain?
A wedding invitation should be a kind of action plan for the guest at the celebration. Having seen and read it, the guest should have an idea of the format of the wedding, the total time for the celebrations and location.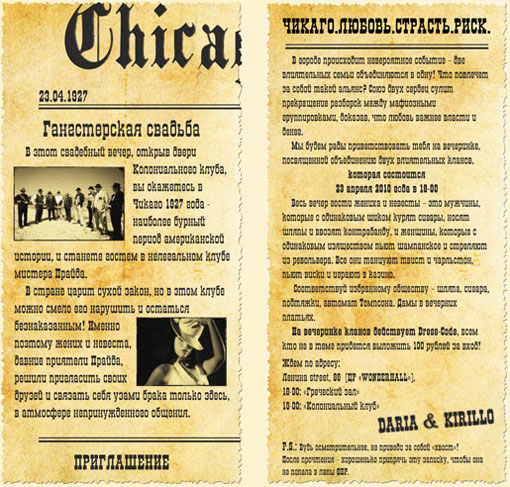
If the ceremony and feast will be held in different places, be sure to indicate this, making sure to write when (exact time) and where (location) each event will take place.
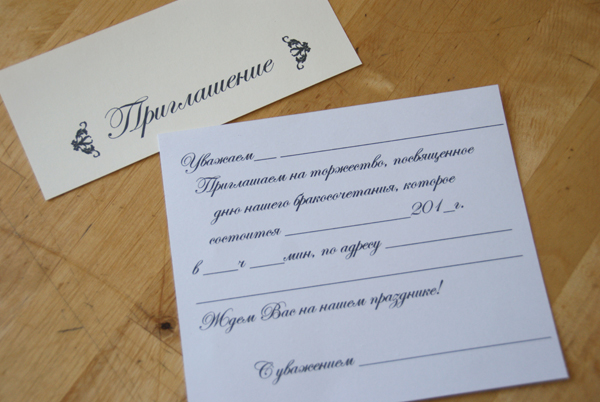
Examples of text for wedding invitations for relatives, guests of honor, as well as original wedding invitations:
Universal texts of wedding invitations in verse and prose:
How to make your own wedding invitations:
If you're hosting a small, intimate celebration in a small restaurant or at home, a simple personal invitation is all it takes.
The most important! Your wedding invitation should give your guests a taste of your upcoming nuptials, and it should also reflect your couple's style.
![]()
When should I give/send wedding invitations to guests?
Invitations should be sent to all guests, even if you have already invited someone verbally at a meeting or by phone.They should be sent out in advance so that your guests can plan their time and give you a timely response. The further away the guest is, the sooner it is necessary to warn him about the upcoming event.
If necessary, place a postcard with a stamp and your return address in the invitation envelope so that the invitee can reply to you. This can be useful for creating your final guest list.
Invitations should be sent out one and a half months before the wedding day, but preferably no later than 3 weeks. All guests should be notified in writing, even those who have long been invited orally.
A wedding invitation has always been, is and will be one of the most important attributes. After all, the festive atmosphere for guests begins with an invitation.
Wedding Invitation Ideas
If you want your invitations to be special and original, do not buy ready-made cards.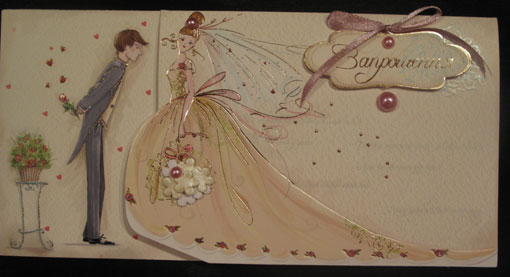
If you don’t have time to make invitations, use the services of a professional designer.

For creative couples, we will offer several ideas on how to make wedding invitations with your own hands. Don't be afraid to show your imagination and decorate them colorfully.
Example No. 1. DIY wedding invitations.
Cut a strip of the required size from a sheet of thick paper. Fold it in half so that the bottom part is 4 cm longer. Decorate the remaining ledge: write the date, hour and location of the wedding event.
The invitation design should be simple, but at the same time original.
You can draw flowers: roses (as a symbol of love), daisies, lilies, apple blossom or any others that you like or suit the wedding theme.

Alternatively, you can draw intertwined rings against the background of a wreath of flowers and apple tree leaves.
Intertwined is a symbol of marriage.
You can surround the golden rings with colored ribbons, a wreath or flowers, which will indicate the imminent appearance of a young family.
You can also decorate your invitations hearts, swans, profiles of lovers and kissing doves.
For example, if your wedding falls on Valentine's Day, you can include hearts and angels in your invitations.

Think about not only the design of the postcard, but also the form of the invitation itself. Here you can also fantasize and choose any shape, for example, a heart shape is perfect for a wedding invitation.

If you cover the invitation clear varnish, then it can be called a work of art.
Example No. 2. DIY wedding invitations.
A strip of paper is cut out and divided into 3 parts so that the middle part is exactly 2 times larger than the third part. It is necessary to bend the first and third parts onto the middle one so that the folded invitation looks like window sashes.
The main text is placed in the middle part, and on the side ones you can draw doves, whose beaks touch when the invitation is closed.
![]()
You can also use it to design wedding invitations. appliqués. An applique will look very nice if there is some part left loose, which will protrude above the surface of the invitation.
![]()
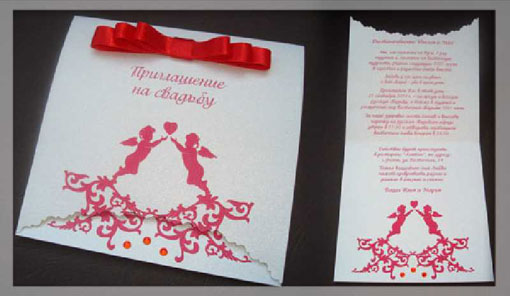
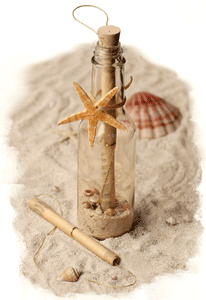
Example No. 3. Wedding invitations in a bottle.
If you are planning a celebration open air by the sea, use marine motifs.For wedding invitations in a nautical style, bottles that are supposedly caught from the sea are perfect for decoration.

In the middle of the bottle you can place a map of where the bride and groom are on their wedding day, sea pebbles, sand, shells, pearls and other sea treasures.

Example No. 4. Wedding invitations on parchment/papyrus.
If your wedding will take place in an antique or ancient world, use invitations on parchment.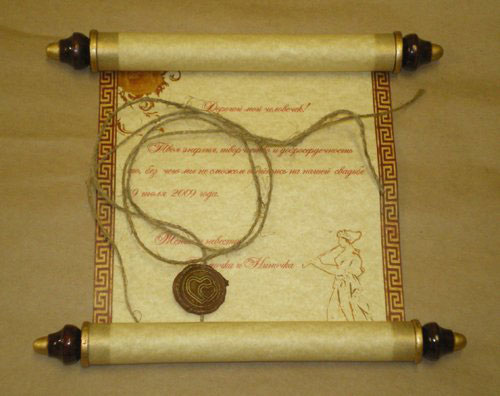
You can make parchment/papyrus yourself: take a white sheet of paper, soak it in tea, dry it, print the necessary text and scorch the ends of the invitation with fire.
You can use gray wrapping paper. Print text on it and burn the ends with fire.
After making the parchment, roll it into a tube, take a thick silk ribbon and tie it.


