How to set up wired Internet on Android. Methods for connecting and setting up the Internet on a smartphone
Many users can no longer imagine life without modern methods communications. Messengers, YouTube, calling applications and fast access access to any information - this is only a small part of what a simple Internet connection offers. Technology allows you to satisfy your needs 100%. But often users do not understand how to set up the Internet on their phone, or they do everything correctly, but errors occur.
We'll give you simple instructions, which will help you set up the Internet on any phone, no matter what mobile operator you use. However, first proceed with the recommendations only if the standard configurations do not work for you.
How to set up Wi-Fi?
Usually everyone tries to connect to the Internet via Wi-Fi. It's free, you get unlimited traffic and excellent speed of sending and receiving data. With home networks everything is simple, since you know the password to them, but with others it is not so easy. Public networks (that do not require an access code) are not available everywhere, and for others you need to know the password. If you are sitting in an establishment and there is a closed network there, find out the connection combination from the employees.
To activate Wi-Fi, do the following.
Attention! Some networks require you to sign in. Follow the instructions on the screen and you will succeed.
Remember that you should not make online purchases through public networks that do not have a password or log into accounts on various sites. Your signal can easily be intercepted and your login details or bank card information stolen.
If after these simple manipulations you have problems, then read ours on how to solve them and make the device connect to the access point.
How to start using mobile data?
You can configure mobile Internet through the “Settings” tab. However, this is not usually necessary. Almost always the operator sends them automatically. Immediately after installing the card and the first launch, you will only need to activate the mobile Internet in the quick settings panel in the curtain. Next, the smartphone will do everything itself and let you into the network.
If you were unable to connect automatically, you can set up the Internet on Android yourself.
Attention! If your SIM card is out of date for the 4G network, then the communication store will replace it for you free of charge or at a low cost.
Also, in order to manually set up the Internet on a new phone, you need to select a suitable tariff plan that would provide you with traffic under favorable conditions. You can order it by calling the operator or at any communication store. And don’t forget to top up your account regularly, otherwise you will no longer receive traffic.
Setting up APN on Android
Unfortunately, it is not always possible to quickly establish an Internet connection on a smartphone. First you need to study the conditions of your tariff plan. You can view it on the Internet or by calling your telecom operator. Also, to make changes, you need to know a number of parameters that we have collected for you in the tables below.


Now you need to fill in the required fields correctly. We have indicated all the data that needs to be entered below, copy the information to the new APN, and then save the access point.

Make sure the checkbox is opposite the desired item. The type of Internet connection: LTE or 3G is regulated in the previous menu, and also depends on what options are provided by the telecom operator.
For Russia
|
APN access point |
Username |
|||
|
internet.mts.ru |
||||
|
Beeline Internet |
internet.beeline.ru |
|||
|
internet |
||||
|
internet.yota |
||||
|
internet.tele2.ru |
Tele2 Internet |
For Ukraine
|
APN access point |
Username |
|||
|
internet |
||||
|
Kyivstar |
www.ab.kyivstar.net (for contract workers: www.kyivstar.net) |
|||
|
3g.utel.ua |
||||
|
MTS-internet |
internet |
any |
Deleting configurations
If you no longer need to connect to a certain point, you can quickly delete it or reset the parameters.
- Open the Internet configuration menu as described in the second paragraph of the instructions above.
- To remove an APN, open it, click on the three dots and tap on the “Delete APN” item.
- To reset settings, go to the “Access Points” section, click on the same three dots and select “Reset settings”.
Using these methods, you can configure the Internet to work Chinese phone or any other. But remember that before moving on to manual settings, try to start using automatic ones, which almost always work correctly on all devices.
A modern smartphone can theoretically be used without an Internet connection. But in this case, in terms of functionality, it will not be far from the simplest push-button mobile phone. Therefore, we recommend that you connect to the Internet using our guide. And you don't have to deposit money into your account - in the article you will find instructions on connecting to public Wi-Fi networks.
If you are just going to buy a smartphone, be sure to pay attention to its characteristics. The fact is that different models have at different speeds data transmission. It is rarely written in numbers - instead, the supported communication standards are indicated in the characteristics. Here is a list of them in order of increasing speed:
- GPRS;
- EDGE;
- 3G;
- 4G (LTE);
- LTE Advance.
Focus on this point in the specifications if access to the Internet is very important for you. Also remember that not all operators have 4G equipment in absolutely every big city our country. And there’s nothing to say about towns and villages - a 3G smartphone will do just fine in them.
You can also pay attention to the supported Wi-Fi standard. In the vast majority of cases, we transfer data via WiFi 802.11n. But in Lately Routers that support the standard are becoming increasingly popular 802.11ac, providing a very high speed of receiving and transmitting information. If you plan to install such a router in the near future, then it is advisable to purchase a device that is capable of working with the above-mentioned Wi-Fi standard. However, this is not at all necessary.
Setting up a Wi-Fi network
But enough talk about theory. It's time to talk about how to set up the Internet on Android. You should start by setting up Wi-Fi. This is usually where novice users have problems, since this process almost not automated. Note that the easiest way is to connect to your own router. It’s a little more difficult to do this with friends, at work, or somewhere else. So, you should do the following:
Step 1. Go to " Settings" If the corresponding icon is not in the notification panel, then find it in the menu.
Step 2. Go to the section " WiFi" On some devices there is a switch next to it. It needs to be switched to the on position.

Step 3. If there is a checkbox in this section, then activate it.

Step 4. Now click on the name of the one Wi-Fi networks, with which you want to turn on the Internet on Android.

Step 5. If the network is protected, then enter the password for it. For greater convenience, you can check the box next to “ Show password" When you are finished entering your password, click on the “ To plug».

That's all. Now your smartphone has remembered this network and will connect to it automatically. It’s the same with public networks - if you’ve already connected to one once, then in the future in this place your device will connect to it independently. Although there are exceptions.
Using WPS
You can connect to your friends' Wi-Fi using another method. It consists of pressing the WPS button on the router. This allows you not to enter a password and network name. But first, you also need to press the WPS button on your smartphone or tablet - in in this case not physical, but virtual. This is done as follows:
Step 1. Go to " Settings».
Step 2. Go to the section we have already mentioned “ WiFi».

Step 3. Activate the switch if necessary. Then click on the button Options" On many devices it is made in the form of a vertical ellipsis and is located in the upper right corner.

Step 4. Click on the item " Additional functions" On some gadgets this step is skipped, since the item “ WPS» is located directly in the context menu.

Step 5. Click on the item " WPS button».


After this, the smartphone will connect to the network distributed by the router, as a result of which you will be able to access the Internet.
Setting up GPRS, EDGE, 3G and 4G
Setting up mobile Internet makes everything easier and more difficult at the same time. Usually, the user does not need to delve into the settings at all - telecom operators send a special file that automatically enters all the parameters. This does not happen only in the most extreme cases - when your model of smartphone or tablet is not in the operator’s database. But believe me, these databases are so extensive that all sorts of Chinese nonnames can’t be found there. If you are unlucky, you will have to configure Internet access manually. This is done on Android as follows:
Step 1. Go to " Settings", as you did earlier.
Step 2. Go to the section " Other networks" On some smartphones and tablets it may be called " Other networks" or " More“- it all depends on the translation.

Step 3. Here you need to click on the item “ Mobile networks ».

Step 4. Then everything depends on the specific implementation. software. On some devices you will be taken to a menu like the one shown in the screenshot below. In this case, you need to open the item “ Access Points (APN)" In other models, the corresponding settings may immediately open.

Step 5. Be that as it may, you need to add your operator's access point if these parameters did not arrive after you inserted the SIM card. In our case, this is done by pressing the button with a plus sign.

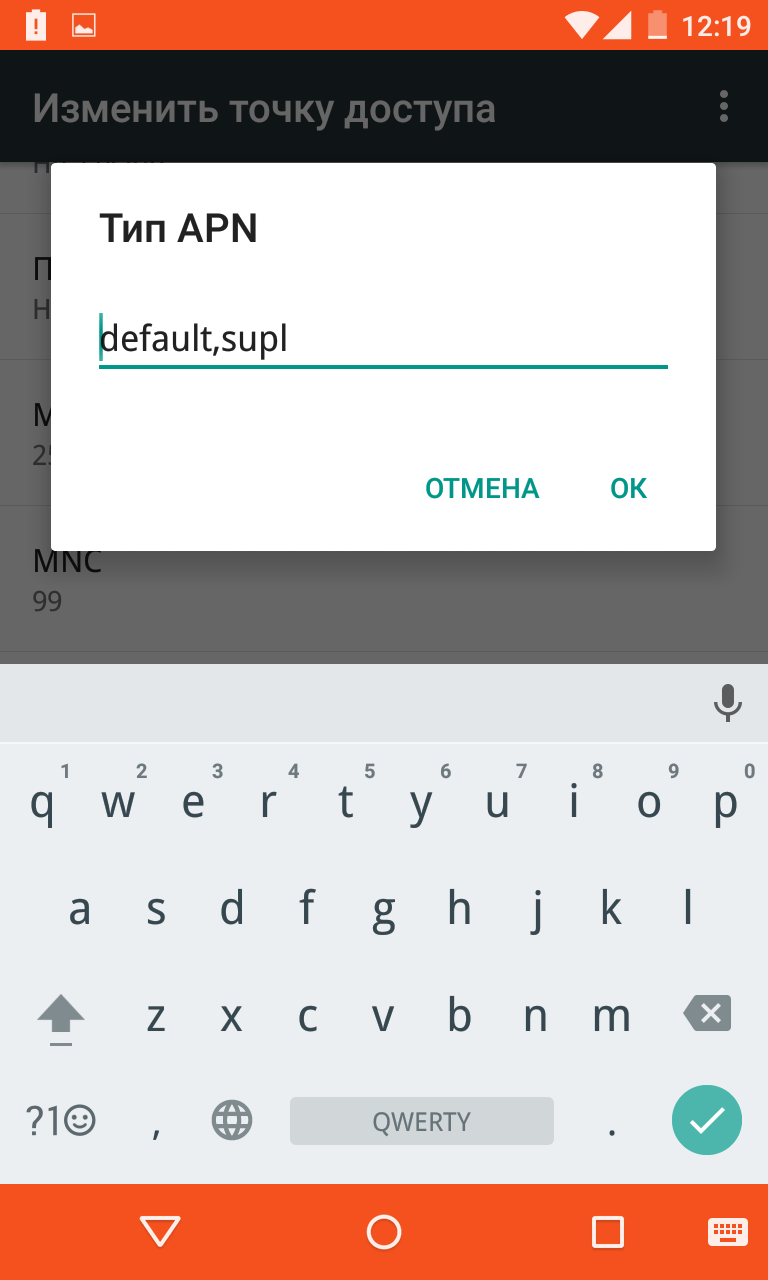
Step 6. After clicking the corresponding button, you will see many fields. First of all, pay attention to the points “ Authentication type" (may also be called " authentication type") And " APN type"(on older devices it is called " Access point type»).

Step 7 In the first paragraph, you must select “PAP”. This type of authentication is used by the vast majority of cellular operators around the world.

Step 8 In the second field we enter manually “ default,supl" - without quotes and spaces, as in the following screenshot. Click the button OK».

Step 10 Finally, click on the item " APN" or " Access point" Enter your operator's specific Internet address here:
- MTS - internet.mts.ru
- MegaFon - internet
- Beeline - internet.beeline.ru
- TELE2 - internet.tele2.ru

- MTS - mts and mts
- MegaFon - gdata and gdata
- Beeline - beeline and beeline
- TELE2 - both fields are empty

If you use the services of some smaller telecom operator, then you can find out its settings by visiting the official website. You can also call the call center - they will definitely dictate your APN, username, and password.
Summarizing
As you understand, you can set up mobile Internet without any difficulty. This is done almost easier than on old push-button phones. Fortunately, with current technologies you need to bother with this in very rare cases.
Mobile Internet is an integral part of an Android smartphone. Anywhere and anytime it allows you to visit websites, social network, watch videos on YouTube and much more.
We all know about mobile Internet and its benefits, but some people still wonder how to enable mobile Internet on Android. Very simple! Follow a few simple steps below and you will have access to mobile internet.
Instructions
Go to the Settings menu and at the top you will see a section called Data Transfer. Click on it and you will see the Mobile Data option. It is possible that on your smartphone this option is located in the “SIM card and network settings” section, as in my case.


Here you can see the data used, that is, the number of megabytes spent via the mobile Internet.
After you have turned on mobile Internet on Android, a new icon (H, 3G, 4G or others) will appear in the notification panel, which indicates that you are connected to the Internet.
By the way, a faster and more convenient way to turn on mobile Internet on Android is to lower the quick notifications curtain and press the connection icon. Next you will see the “Data transfer” switch. It allows you to turn on or off mobile Internet on Android.


In the same section, you can see an option to switch the network type: 2G, 3G or 4G. You can choose automatically, or a specific network type if you know which network is used by your mobile operator.

If you are in a place where the 3G or 4G signal is quite weak, then it is better to switch to the 2G network type. This way, you will save battery power longer than during automatic switching.
Problems when turning on mobile Internet on Android
If there is still no internet on your Android smartphone even though you have enabled the Mobile Data feature, the problem is probably related to APN settings. In this case, you need to create an APN access point yourself and enter the details of your mobile operator.
If you don't know how to do this, read our article. You can also contact your operator's support team, they will send a message with detailed settings mobile internet.
If you can’t turn on mobile internet on Android, write in the comments below. We will try to help you.
Smartphone users often have problems setting up the Internet on their phone correctly. If you are an advanced user, you can connect manually by filling out the appropriate form with data in the operating system. For all other users, automatic configuration is available via SMS message from the operator.
How to connect mobile internet
You can connect mobile data manually on your phone. Step-by-step instruction, which is used to configure the Internet on Android:
- Open the settings menu on your phone.
- Select “Connection”, “Mobile networks”, “Other networks”, “More” depending on the device model.
- Then select “Access Points”.
- Click the “Add” button; if it is not displayed separately, then find it in the context menu.
- A new profile will open, which must be filled out in accordance with the settings of the specific operator.
- Save your data, go back up one level and select the profile you just created.
- Turn on Mobile Data and restart your phone.
The table shows the settings of three popular providers, entering which will allow you to connect the Internet to cell phone. If, when filling out your profile, you encounter additional items, you should skip them and leave the default values:
Automatic setup
If for some reason you were unable to connect your mobile Internet manually, you can always use automatic setup. To do this you need to do the following:
- “Ask” your cellular network operator to send a special message with settings (this SMS is often marked with an envelope icon with a gear).
- Open the received SMS message.
- Select the item labeled “Application: Internet.”
- Click the "Install" button.
- If a PIN code is required, enter “0000” or “1234”.
- If the code does not work, contact your cellular network operator to find out the correct PIN.
- Confirm your choice by pressing the “Yes” button and turn on mobile data in the phone curtain, restart the device to activate the changes.
- On some phone models, the above steps are not required; you just need to order a message from your operator to connect to the Internet.
Connect via Wi-Fi
You can access the Internet on your phone not through mobile data, but through Wi-Fi. To connect worldwide network in this way on the Android operating system, use the following instructions.
- Unlock your device, go to the main menu.
- In the list of icons or in the curtain of the operating system, find “Settings” (often this item is indicated by a gear symbol), and make the transition.
- A list of customizable items will appear in front of you, find the “Wi-Fi” line and go to the submenu.
- In older versions of the Android operating network, you first need to go to “ Wireless network", and then select the item " Wi-Fi setup».
- If Wi-Fi router is enabled, all available connections will be immediately displayed.
- If the adapter is turned off, the system will prompt you to turn on the Wi-Fi module to view available networks.
- Select the desired network from the list.
- In the dialog box that appears, enter the access password.
- If you accidentally entered incorrect data, click on the network name again, select “Forget” and re-enter the authentication parameters to connect to the Internet.
Every year the mobile Internet becomes better and faster. However, the technology is becoming more complex, as a result of which the likelihood of failures and malfunctions is growing. Therefore, we want to tell you what to do if the mobile Internet does not work on your Android device.
There are many reasons why your phone cannot connect to the Internet on the operator’s network: it may simply not be configured, or you may have encountered a hardware malfunction of the network module. Let's look at the causes and methods of eliminating the problem in order.
Reason 1: Insufficient funds in the account
The most common reason inoperability cellular internet— there is simply not enough money in the account. Perhaps you simply didn’t pay attention to it and didn’t replenish it on time. Check the amount of funds with a USSD request from your operator:
- Russian Federation: MTS, Megafon - *100#; Beeline - *102#; Tele2 - *105#;
- Ukraine: Kyivstar, Lifecell - *111#; MTS, Vodafone - *101#;
- Republic of Belarus: Velcom, MTS, life;) — *100#;
- The Republic of Kazakhstan: Kcell - *100#; Beeline - *102# or *111#; Tele2 - *111#.
If you find that there is not enough money in your account, simply top up your balance using any available method.
Reason 2: No coverage or device is not registered on the network
The second reason for the lack of Internet is that you are outside the network coverage area. You can check this by looking at the indicator in the status bar: if you see a cross icon on the indicator, then you most likely will not be able to connect to the Internet, or make calls.

The solution to this problem is obvious - go to a place where the network catches better. If you are at a point with reliable reception, but the no network icon does not disappear, most likely your device is not recognized cell tower. This is usually a random single failure that can be easily fixed by rebooting the device.
There may also be problems with the SIM card, the main problems of which and how to resolve them are described in the article below.
Reason 3: Airplane mode is on
Almost from the moment it appeared mobile phones they have a special mode designed for use on airplanes. When this mode is activated, all types of data transmission (Wi-Fi, Bluetooth, communication with a cellular network) are disabled. It's very easy to check - look at the status bar. If you see an airplane icon instead of the network indicator, then offline mode is active on your device. It turns off very easily.


After completing these steps, check if the mobile Internet is working. Most likely, it should turn on and function normally.
Reason 4: Data transfer disabled
Another very simple reason lack of mobile internet connection. You can check this as follows.


You can also turn on mobile data with a switch in the status bar, if it is present on your phone.

We also note that in some cases, data transmission may be disrupted by malware. If you can’t turn on the Internet using the method described above, then it makes sense to install it on your phone and check the device for infection.
Reason 5: Incorrect access point settings
As a rule, when you turn on your smartphone for the first time with a SIM card inserted, you receive a configuration message with settings for the mobile Internet access point. However, in some cases this may not happen, especially if you are using a rare or uncertified device for your country.