How to use a construction gun correctly. How to insert sealant into a gun, what kind of device it is and what it looks like
If during the repair you need to seal several cracks or joints, you can carry out these actions yourself using sealant. As everyone knows, sealant is mostly sold in packages with a long spout, but it is impossible to get the mass out of there without a special construction gun.
Seeing such a gun for the first time, not everyone will understand how to use it. But this article will tell you in detail and show that this unit is not so difficult to use, but it simplifies the repair process much.
Types of sealant guns
A construction gun is a device for effectively squeezing out sealant and has a not particularly complex design. But it would seem that such a simple thing is divided into types in accordance with the type of compartments for sealant, the structural features and supply of the composition.
According to the first criterion, devices are divided into sheet and frame. The second type is more common, as it has better and more reliable retention of the cartridge. Based on the method of supplying sealant, battery-powered, electric and mechanical units can be distinguished. Each type has pros and cons, so we can’t help but say:
Based on their design, devices can be divided into skeletal, tubular and semi-hulled. The first type is designed to work with 310 ml cartridges. Half-body versions of pistols are not very durable and are inconvenient to use. They also use 310 ml cartridges. The tubular type gun is suitable for professional work. It needs to be refilled less often, since absolutely any cartridge options are suitable for it.
Working with a pistol
Using a caulking gun is not difficult. Having familiarized yourself with the main nuances, you can safely get to work and be confident in a clear result.
The operating principle of such a device is not at all complicated. The gun works by applying pressure to a tube of sealant. As a result of this effect, a strip of material comes out of the container, which is mechanically aligned and placed in the right place. The pressure comes from a rod that is driven by a trigger. The main problems occur before the sealant is inserted into the gun.
Important! A pneumatic tool uses air instead of a rod.
Algorithm for using the tool
- Remove the restraints. When working with a skeleton or half-body caulking gun, there will be no problems with removing the stops. In addition to removing the limiting elements on the tool itself, you need to remove them on the container itself with the composition, if there are any on it.
- Pull out the rod. To move the rod, you need to press the lever all the way and pull out the rod. This frees up space into which a container with sealant is installed. Afterwards you need to press the trigger a few more times so that the tube is firmly secured.
- Release the sealant. We cut a hole in the cartridge itself that will allow the composition to pass to the nozzle. Usually the nozzles come in one piece, so it is also necessary to cut off the top part to create a hole of the same diameter as the thickness of the seam needed.
If a tubular or syringe type gun is used, the filling algorithm is slightly different. First of all, in this case, a hole is made in the container with the compound and its cut side is laid towards the hole through which the sealant will come out.
Important! Before inserting the container with sealant, the rod is removed. This is done in the same way as in the previous case.
As a rule, a set of tips is included with the gun. If the selected nozzle does not have a hole for the sealant to exit, you can make one by cutting off a small part of the tip. This should be done at an angle of 45 degrees.
Each individual caulk gun can be equipped with additional functions and certain elements that help during operation. That is why it is a good idea to study the instructions that come with the purchased pistol model.
Conclusion
Sealant is a substance that is used everywhere and not only for major repairs, but also for small finishing works. Therefore, knowledge of the algorithm for using a gun to supply the composition is very important, since the final result and appearance of the seam depend on the correct actions.
Don't call a professional if you need to seal several cracks! It’s easier and cheaper to buy a completely “peaceful” gun, sealant and process everything yourself. And we’ll tell you how to use a sealant gun!
Features and types
Such a gun cannot be called a complex device - in fact, it is a design for squeezing a sealing compound out of the container in which it is located. However, there are nuances in any matter, even in such a seemingly simple one. And based on these nuances, manufacturers offer tools for every wallet and for any purpose. Sealant guns can be divided into several categories according to the type of cartridge compartments, the features of the device and the method of supplying the sealant.
So, according to the type of compartments for cartridges (containers with sealant), these “peaceful” pistols can be divided into frame and sheet. The first ones are very popular among consumers because they hold the cartridge more tightly. Depending on the extrusion method, you will find cordless, pneumatic, electric and mechanical tools in stores. Each of them has its own advantages and disadvantages, so you need to choose depending on your goals.
What's good about cordless pistols is their autonomy– from the name it is clear that they operate from a battery pack, most often a lithium-ion one. Using a sensitive handle, the material is extruded, while the extrusion speed and feed accuracy can be adjusted using the same handle - the stronger the pressure, the more intense the work.
An electric gun differs from its battery-powered counterpart by and large only in the absence of a battery - the device runs on mains power. They apply sealant quickly and accurately, with a high degree of economy. Most often, these guns are used by construction professionals, because, in addition to convenience and autonomy, such pistols work with different types of cartridges. It is clear that such pleasure is not cheap, and for ordinary home use, for example, small, it is simply not advisable to buy this type.
Due to air pressure, a pneumatic type gun extrudes the material by pressing the handle. The design of such tools is often very ergonomic; manufacturers equip the tools with various stops and regulators, thanks to which you can obtain an even strip of sealant of the desired thickness. Another good thing about the tool is the ability to work with different containers. It is advisable to use this type in medium and small construction, when the speed of work is not so important.
The most affordable and short-lived type of sealant guns is mechanical or manual. If we talk about everyday use, when you need to squeeze out 1-2 cartridges of material, this option is the most practical. But it will be difficult to work on large objects with such a tool, since squeezing out the mass is possible due to the physical effort of the hands, which reduces the accuracy and speed of work.
According to their design, pistols are divided into skeletal, semi-body and tubular. Skeletal ones are adapted for 310 ml cartridges. Semi-body instruments also work only with this volume, but have a simpler mechanism. Do not expect a long service life for such a tool - it is enough for 2-3 cartridges. And it will be quite uncomfortable to work with it - the rod squeezing out the mixture is quite tight, and besides, the tool tends to slip out of your hands every now and then.
It’s better to buy skeleton pistols - they are not much more expensive, but much more durable. The tubular type is capable of working with completely different cartridges, volumes from 600 to 1600 ml. Undoubtedly, such a tool will have to be refueled much less often.
Construction gun for sealant - selection instructions
Of course, the main factor in choosing a tool should be the amount of work to be done. Let's say, if all you need to do is process only a couple of joints at , then a skeleton tool will be enough. If the task is more complex, for example, to carry out repairs in an entire apartment or house, then it is better to purchase a tubular pneumatic gun.
When time and precision of work are valued, it is necessary to provide yourself with an electric or battery-powered tool. When purchasing, pay attention to how comfortable such a device is for you, how it feels in your hand, and whether its elements interfere with operation. Pay special attention to the trigger, how tightly it is held and what material it is made of. It would be better if it was aluminum. As for brands, of course, it is better to pay attention first of all to trusted manufacturers who have earned the trust of consumers.
How to operate a pistol - simple steps
How to work with a pistol - this question is relevant not only for novice craftsmen, but also for any person who first encountered this tool. In fact, there are no difficulties - just a few nuances, after studying which all questions will disappear.
So, the principle of operation of sealant guns is quite simple - due to mechanical pressure on a container with sealant (or other material, for example, liquid nails), the material is extruded in the form of a strip, by directing which we achieve the desired effect. The pressure is provided by the rod, which is set in motion by pressing the trigger - apparently, this is why the tool got such a militant name. In pneumatic tools, instead of a rod, the pressure is exerted by air. Basically, difficulties arise when you need to equip the tool with the material itself, the same sealant. Fortunately, manufacturers try to adhere to the same standards, which makes our task much easier.
How to work with a pistol - step-by-step diagram
Step 1: Remove the limiters
If we are dealing with a skeletal or semi-corpus instrument, the procedure will not take much time. First of all, you need to check whether the tube with the material is equipped with a special restrictive bottom. If it is present, it must be removed.
Step 2: Pull out the stem
In the gun we need to pull out the rod, for which we press the lever all the way and remove the part. We insert the cartridge into the vacant space and lightly press the trigger several times to strengthen the cartridge.
Step 3: Release the sealant
We make a hole in the cartridge through which the sealant will flow to the cone, giving us an even line of equal thickness. Cones often come sealed, that is, we need to cut off the tip of the cone to get the required diameter of the sealant seam, but the cut should be slightly smaller than the diameter we need.
If you decide to use a “syringe” or tubular gun, then the principle of filling it is somewhat different. To begin, make a hole in the cartridge with the material, or, if it is sealant or “sausage” packaged in bags, carefully cut off one corner or end so that the sealant can freely come out of the bag. You need to place the prepared container into the “syringe” itself in such a way that the cut end of the container is directed towards the tip through which the strip of sealant will come out. Of course, before inserting, remove the rod - this is done in the same way as in the case of the skeletal apparatus.
Usually the gun comes with several nozzles with tips, one of which we use to tighten the cylinder. If there is no hole in the tip, cut a small piece with a regular utility knife at a 45° angle. Of course, try to guess the diameter of the resulting hole. In any case, if there is a construction gun for sealant, there should also be instructions from the manufacturer. It’s not a sin to study it, because manufacturers can supply pistols with their own special developments and innovations that are not provided in standard versions.
How to use a sealant gun - instructions for a beginner
Actually, you shouldn’t have any difficulties with a properly equipped pistol. If you followed the cartridge installation instructions above, you've already done everything you need to get started. So all that remains is to gently pull the trigger and move the sealant along the seam. If you use a skeletal or semi-body instrument, there may be several first presses to squeeze out the required amount of sealant to fill the void in the cap itself, then the presses should be done smoothly and unhurriedly.
With electric or cordless tools, pulling the trigger controls the rate at which the caulk is applied, so if this is your first time using such a tool, start in inconspicuous areas, such as caulking a seam in the far corner of a room. Once you get the hang of it, start working on prominent places. If you need to trim or press caulk into a gap, wet your fingers with water and run it across the surface in one smooth motion. There is no additional need to dry the material - in the open air it acquires the desired hardness within a few hours.
Sealant is a universal and simply irreplaceable tool in everyday life, which can be used to insulate seams and joints, provide water, moisture, heat and even sound resistance. In order for the sealant from the container to be distributed evenly and applied accurately, it is necessary to use a special gun. If you know how to use a sealant gun correctly, you can even ensure economical use of the substance. Therefore, it is necessary to familiarize yourself with all stages of instrument operation in more detail.
Both novice craftsmen and professionals have to work with a sealant gun. Therefore, the features of using this tool are always a pressing question for those who carry out repairs. There should be no difficulties during operation. You just need to familiarize yourself in advance with the main nuances and varieties of existing pistols. There are household models equipped with manual mechanisms, as well as professional sealant guns, divided into pneumatic and battery-powered.

In mechanical pistols, the principle of operation is quite simple. To obtain a substance from a tube, it is necessary to provide pressure on the container mechanically. These guns can be used not only with sealants, but also with other substances that are supplied in special containers and have a thick consistency. The material is extruded in the form of a strip, which is convenient to place in the prepared seam. The pressure is provided by the rod part. It starts to move by pressing the trigger.

If we consider pneumatic tools, the rod in them replaces the air supplied under pressure. Craftsmen, in general, may encounter difficulties in installing a container with material into a tool. But manufacturers make this task easier because they adhere to uniform production standards. Therefore, the principle of using all pistols will be the same.
How to work with a pistol: step-by-step diagram

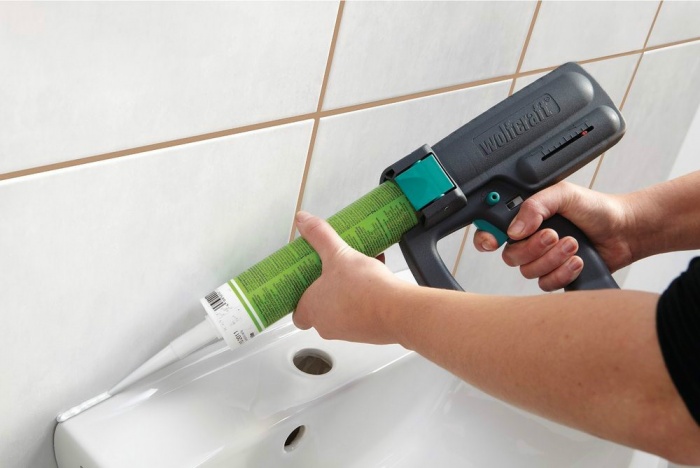
To start working with a special sealant gun, you need to make sure that the bottle is inserted into it. The tube must be inserted into the gun and secured tightly. To carry out work at home and carry out repairs at home, it is worth choosing tubular and syringe types of guns. Before work, you need to make sure that the packaging is tightly sealed. In the process, you need to perform three main steps:
- Remove limiters. The tube design has a special cone, which is usually sold sealed. The seal must be removed from the tip of the spout. It is necessary to make such a cut that it is slightly smaller than the width of the seam. It is convenient to carry out this procedure with a stationery knife. To make a correct and even cut, you need to make it at an angle of 45°. After this, the sealant container is placed in the gun, the cut part is placed in the tip.
- Removing the rod. This stage is performed by simply pressing on the lever. A pre-prepared cartridge must be installed in the space that has become free. To get the container into place, you need to apply a few pressures on the lever. After these simple manipulations, the gun will be ready for use.
- Release of sealant. You need to gently press the lever to ensure the supply of sealant. The master can only adjust the pressure to control the release of the substance.
After completing the work, the empty container of sealant is pulled out of the gun, and the tool itself is thoroughly washed to remove any remaining substance. According to the instructions, it is enough to use ordinary warm water to clean the instrument.
When using a battery-powered pistol, the diagram will look a little different. To do this, the cylinder is charged with assembly adhesive, and the feed is also regulated by the trigger.
If after completion of the work there is still some part of the sealant in the tube, it can be used in the future. To do this, you need to put the tip on the cone and close it tightly, place the structure in a vertical position with the tip up.
How to use a sealant gun: instructions for a beginner

Beginners and craftsmen who picked up a sealant gun for the first time, following the instructions described above, can easily prepare the tool to begin work. You need to purchase a complete gun and, according to the recommendations, install a tube in them. Otherwise, you need to learn to control your hand so that the pressing occurs smoothly and the material yields evenly and in doses.
When using half-body and skeleton pistols, you need to perform several presses at the beginning so that the substance from the inside enters the cap. Then ensure smooth pressing when the sealant is already coming out.
When using cordless and electric pistols, pressing the trigger regulates the flow rate of the composition. Beginning craftsmen need to choose places that are invisible to the eye for their first work: in the far corner, behind furniture, under plumbing fixtures, and so on. After your hands get used to working with such a tool, you can move on to visible places.
If the sealant does not fit well into the seams or it needs to be leveled, you need to wet your fingers in water and smoothly remove the imperfections. The substance has a sticky consistency and can remain on the hands and stick to the fingers. The material does not need additional drying; if you provide fresh air, it will have time to harden in a few hours.
On video: Rules for using a sealant gun
Experienced craftsmen adhere to a certain strategy in their work. But they, just like beginners, will find some tips useful:
- For one-time work, you can choose more affordable types of pistols, such as half-body and skeleton-shaped.

- You need to know that high-quality and reliable tools are heavier. Since it is not possible to check the functionality of the tool in advance, it is necessary to pay attention to this aspect.
- Universal options are considered to be case models, which are also well suited for permanent use.

- Guns can be used to fix sealants purchased in soft packaging. You need to remove the fixing nut from them and remove the upper spout, then place them in the device body, trim the upper part with a knife, and then return the removed parts to their place.

- Usually, the manufacturer who produces sealants in tubes marks the optimal place for cutting on the spout; you can use the instructions provided.

To reduce substance consumption, you must follow these recommendations:
- Pre-prepare the seam to be processed, clean it of dirt, moisture and degrease.

- The remaining areas of the surface that do not need to be treated can be isolated with construction tape.

- You must try to squeeze out the substance in such a way that the seam line on the surface is not interrupted.

- You need to wait until the substance has completely hardened, and only then remove the auxiliary stickers in the form of adhesive tape or masking tape.
The gun is an indispensable attribute for applying sealant during repair and construction work. It provides convenience, and sometimes ease, uniformity, and economy of application of the substance. Therefore, it is very important to understand the algorithm for working with a sealant gun before starting work.
Sealant gun, how to use it correctly (2 videos)
Types of sealant guns (15 photos)


Sealant is very often used in construction, everyday life, car repairs and other areas. But it itself is sold in inconvenient cardboard cases or plastic packaging. You can get sealant from there, but it’s not easy to apply it nicely. The sealant gun allows you to simply and accurately apply this substance even to the most difficult to reach places. This article describes what kind of pistols these are, what types exist and how to use them in general.
Construction sealant gun
The sealant gun has such components as a guide, a trigger device connected to a piston system, and a handle. This mechanism itself is empty and is of no practical use without sealant. The latter is purchased separately and inserted into the gun. Only then is it used for its intended purpose.
Using a caulking gun is simple and profitable. The composition is consumed less and more efficiently, it is easier to lay and pour into cracks, so in construction and in many other areas you cannot do without this mechanism. The sealant, depending on the type of device, can be used in both hard and soft tubes. And some designs also allow you to fill mixtures you prepare yourself.
Photos of construction guns for sealant
Types of pistols
Also check out these articles

There are many types of caulking guns available on the market. Their operating principle is approximately the same - the sealant is squeezed out due to the applied force, pressure from the rod part or under the influence of air.
By type of design, pistols are divided into:
- closed (cased);
- semi-hull;
- skeletal.
In addition, they are often distinguished by the method of supplying the sealing mixture. Exist:
- mechanical (manual);
- electrical;
- pneumatic;
- battery pistols.
Despite the fact that sealant guns are special mechanisms for construction, both professional lines and types for amateurs (home use) are manufactured. Their main difference is cost and reliability. Household varieties break much faster, but they are cheaper. And those that are produced for professional use are always focused on durability.

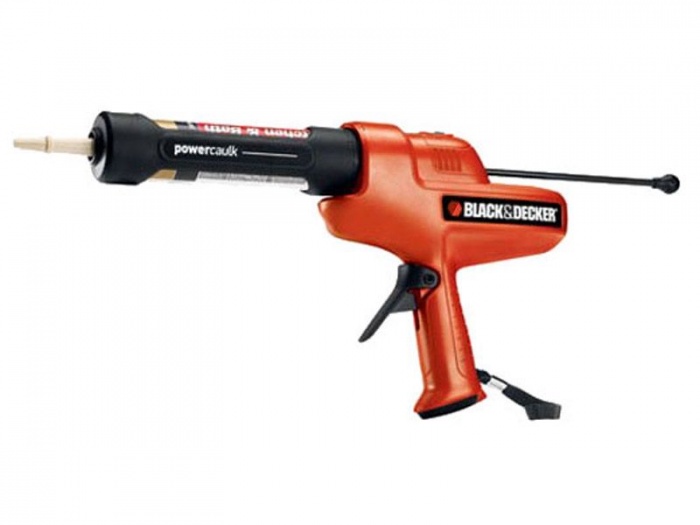
Skeleton type pistol
The most basic and cheapest type of dispenser is the skeletal one. Such pistols are always manual (mechanical) and easy to use, but their use requires some physical effort. Intended exclusively for sealants in solid tubes with a movable bottom. The movement of the sealant occurs through the pressure of the advancing rod.
A skeleton pistol is made from steel. This indicates its reliability and long service life. There are simple and reinforced skeletal structures. In terms of components they are identical. The only difference is that in the reinforced model the parts have a significant thickness of steel, which means they are less likely to break.
Important! The heavy-duty skeleton caulking gun requires more grip in the palm of your hand when operating, so it may not be suitable for everyone. You should try it in the store before purchasing!

Working with a skeleton caulk gun
Half body sealant gun
Cylindrical or half-body caulk guns have a solid bottom (where the tube is inserted). Thus, the tube with the mixture is positioned more securely, does not warp even during operation, and the rod never jams when the piston moves.
This device is recommended for household use. It is simple, rarely breaks, and much easier to use than a skeletal one. It's more comfortable to hold and easier to pull the trigger. And if you purchase a good quality model, the service life will be unlimited.

Photos of half-body sealant guns
Closed caulk gun
If the composition for the job is made independently, and not purchased separately in tubes, then a closed sealant gun is used. Such mechanisms can be professional or semi-professional. They are equipped with a special pipe into which the prepared mixture is poured. Then the pipe is closed and used for its intended purpose.
Air sealant gun
On sale, it is the pneumatic sealant gun that is in greatest demand. The main advantage is ease of use. To use this pistol you do not need to exert much physical effort.
Important! A pneumatic sealant gun can have a housing. These types are made for refilling formulations diluted independently.
The case of this design is usually metal, which ensures reliability. A tube with a sealing mixture is inserted into it, and both plastic and soft tubes can be inserted into this type of gun - the functionality does not change.
The operating principle is based on the displacement of compressed air. And thanks to the pressure and flow regulator, you can control the amount of mixture squeezed out during operation.
Battery gun
The cordless sealant gun is intended more for professional use. It is rarely used in everyday life due to its high price and some operational features. The fact is that in such models it is possible to configure operating parameters (quantity, speed of the supplied mixture) in order to make it easier to use the device. However, in everyday life this is not particularly necessary and only raises additional questions and delays work, but for construction, on the contrary, it expands possibilities.
This gun runs on a battery that can be recharged. The design has a comfortable handle and trigger mechanism. The base is iron, but the handle, for example, may have a plastic body. The cordless gun is suitable for sealant in hard and soft tubes or for filling a diluted mixture yourself. The kit may come with several attachments (if not, you can buy them separately), there is also a battery, a charging device, and instructions.
Professional devices
Electric sealant guns are professional devices that are not so easy to find on sale. They are purchased by builders for long-term use for their intended purpose. It can be immediately noted that in terms of reliability they have no equal. They operate on electricity, but otherwise are similar to the battery type.
How to insert sealant into the gun?
Before using a construction sealant gun for its intended purpose, it is necessary to put the sealant into this simple structure. So how do you insert caulk into the gun? Full instructions are described point by point below.
- Preparing the sealant.
Use a knife to cut off the top of the safety valve (with thread) at the front of the cylinder. Then the applicator is screwed onto the thread (it is always included with the sealant package).
In each individual case, it may be necessary for the sealant to come out in a thin or thick strip. This point is easy to adjust. The tip of the tube tip is simply cut off higher (where the thin part is) or lower (where the tube flares out). Always cut it at an angle of 45 degrees!
- Preparing the pistol.
In order for the sealant to fit into the gun, you need to make room for it. The rod with the piston is simply pulled up, pressing on the fuse (spring plate).
- Installation of sealant.
When the gun is prepared, then the sealant is installed in it. For many, this causes difficulties the first time, because the pipe with sealant is larger (if you take into account the tip) than the space allocated for it in the gun. But there is one trick here - the sealant is always installed with the spout facing forward. In other words, the plastic packaging is directed into the hole in the end of the gun body. This way, the entire barrel fits completely into the gun without much effort.

If a casing gun is used, then the package of sealant is simply placed inside and secured with a threaded tip. Soft-pack sealant is used in much the same way. One of the wire plugs is cut and placed in the body gun. Then screw on the applicator and use it for its intended purpose. If you make the composition yourself, then you need to pour it into the body of a closed sealant gun and screw on the spout.
How to use a caulk gun?
To use a professional caulk gun or a simple one, you must first press the safety catch to move the stem until the valve stops in the movable bottom of the caulk. By pressing the trigger of the gun a couple of times, you can notice that the working composition is moving and compacting in the barrel.
Now you need to direct the sealant nozzle to where you want to lay the compound. The amount of sealant that will come out of the spout is regulated by the force of pressure on the trigger.
Interesting! Beginners who have not used such devices before should first experiment on any surface.
To understand how much pressure and speed is needed to make a thin or thick straight line of sealant, and how much is needed to fill certain cracks, you need to practice. In addition, you need to adapt to different types of pistols. Depending on the type, more or less effort is required to use the mechanism, so practice will never be superfluous.
Brands and cost
A construction sealant gun can have different prices. It depends on the type, brand, country of manufacture, so there are many options.
- « Makita "- Japanese brand. A semi-professional battery-powered, closed-type version will cost $350-365. Its weight is approximately 2.3 kg, the volume of mixtures is 600 ml.
- « Soudal “- a professional closed-type pistol will cost 150-167 dollars. It is also designed to hold up to 600 ml.
- « PC-COX " - English brand. Her pistol, called the Powerflow Comb, has a 600ml capacity and a clear body for convenience, and is priced at $45-$55. However, all attachments for it and some other components must be purchased separately. If you add up these details, the total price will reach 150-160 dollars.
But these are all professional and semi-professional models. For household needs, you can purchase budget, simple options.
- « SPARTA » used for tubes up to 310 ml. Price 1.2-1.5 dollars.
- « Hilti » is a company from Liechtenstein. Makes professional, semi-professional and household models. A half-body DSC for the CP 620 costs up to $100. HDM line from $35 to $100. And case-based CFS-DISPs cost about $50.
- « Bison » is a simple but well-known brand that produces good 310 ml half-body caulk guns priced up to $3.
- « BIBER » – a skeleton option priced at about $3.5. A semi-hulled model will cost $5.5.
- « WolfCraft " is a German brand. There are many options for their products, but for example, a semi-body, mechanical pistol with a volume of 310 ml will cost up to $15.
The KRAFTOOL, HAMMER and STAYER trademarks are expensive sealant guns used for household needs. Their main advantage is the strength and durability of the structure. But such a tool will cost 10-20 dollars.
The sealing gun is an excellent assistant in construction and repair work. It is required in various construction works, both internal and external. The name of this instrument comes from the characteristic feature of its action. In this case, the sealant comes out of the gun after a person presses the trigger, which determines its resemblance to a weapon. However, it should be understood that such a comparison is not entirely correct. After pressing the trigger, the piston begins to move and squeezes out the sealant.


Types of sealant guns
Sealing mechanisms can be classified depending on their design features.
In this situation, several types can be distinguished.
- Tubular. The presented models were made to seal joints using viscous silicone or acrylic mass. Such a device is equipped with a rod and a cylinder with a void inside. This is where the sealant is poured. As a certain advantage of this mechanism, it is worth highlighting the lack of need for frequent refills.


- Skeletal models, the designs of which are focused on working with sealant in a standard cartridge. This mechanism is equipped with a rod and stiffeners. The advantage of this product is the ability to use the sealant only partially. There is no need to use the entire cartridge at once, but only a small amount can be used.


- Half-hull, which involve installing cartridges with a volume of less than 310 milliliters. Their design is very similar to the previous version, but the difference is the absence of a solid frame. It is replaced by a stand for installing the cartridge. This mechanism is very convenient to use, since the composition does not leak out during operation.


Sealant guns can also be classified according to other criteria. If we consider these mechanisms according to the principle of supplying the substance, we can distinguish several types of pistols.
- Mechanical. These are devices that have a universal design. This mechanism can be used by both professionals and beginners for domestic use. To squeeze the compound out of the gun, you need to press the rod with a certain force.


- Pneumatic option. It is usually used when the job does not require a large volume of sealing agent. In this situation, the composition is supplied automatically after lowering the handle.


- Rechargeable, which are commonly used by professional workers. Such models are used in cases where a large amount of work is expected. The pistol functions similarly to the previous version. The difference is the use of a battery in operation.


Principle of operation
Even a beginner can use a sealant gun. First you need to decide how the device in question works and how to open it. The sealant is extruded into a strip after pressure is applied to it. By controlling his strength, a person can control the amount of mixture squeezed out. The pressure is generated by a rod that begins to move after you pull the trigger.
It should be noted that in pneumatic pistols, air acts as a rod. Compositions for a pistol can be either in tubes or cylinders. This mounting device must be used with extreme caution.


Instructions for use
This tool is characterized by ease of use.
Beginners should read the step-by-step instructions before using this mechanism.
- First of all, you need to take care of protective measures. You need to wear gloves and cover objects and surfaces near the work area with film or cloth. This will protect them from getting sealant.
- In the future, you need to prepare everything in order to apply the composition. In this situation, you must be guided by what is written on the back of the cartridge. The only thing is that you first need to remove the previous coating from the surface, and this can be done with a sharp knife. To remove crumbs, you can use a brush or vacuum cleaner, but the surface must be degreased.
- It is then important to remove the limiters.
- Then you need to remove the rod from the device. To do this, you need to press the lever and remove the part. You need to install the cartridge in the free space and apply a few small pressures on the hook. This will allow the container to fit tightly into the gun. It is important to note that these instructions are provided for a skeletal view. Other ways of using this device differ only in the method of inserting the cartridge.
- Then you need to make a small hole in the container through which a straight line of sealant will come out. To do this, you need to make an incision into the existing cone.
Please note that the cut should be slightly smaller than what you need to do the job.


The method of using a tube-type gun should be separately considered.
- Initially, you need to create a hole in the pipe with sealant. If you choose a material that is packaged in bags, then one corner must be cut off as carefully as possible. Otherwise, the mixture will probably leak out.
- You need to squeeze the sealant into the tool itself, but before that you will need to remove the rod in the same way as described in the previous version.
- Typically, such pistols come with several different attachments, which are characterized by the presence of tips of different types. You should choose the appropriate option for the job and tighten the cylinder with it. If there is no hole on the tip, you can make it yourself. To do this, take a sharp knife and make a cut at an angle of 45 degrees. Please note that it is necessary to predict the size of the future hole. This is necessary so that the resulting seam has the required diameter. This will make it easier to apply the mixture.
Despite the instructions provided, manufacturers of such pistols indicate on the product how to use it and how to correctly insert a new one and remove the old one. It is worth familiarizing yourself with what information the manufacturer provides, since each type has its own specific characteristics and the device must be inserted with extreme caution.


If the tool in question was properly equipped, then there should be no difficulties in using it. If you manage to insert the cartridge into the device, then halfway has already been completed. All that remains to be done is to slowly press the “trigger” and squeeze the mixture onto the desired surface.
You should use a few tips to ensure the job goes as smoothly as possible.
- If you select a skeleton or half-body gun, it may take several presses for the sealant to begin to come out of the hole. Remember that the pressure should be smooth to ensure uniform squeezing of the product.
- If you are using a model powered by electricity or a battery, then by pressing the trigger you can control the intensity of the mixture.


- When working with this device for the first time, it is recommended to practice in inconspicuous places or on individual objects. To get the job done efficiently, you need to learn a little how to use the tool.
- If during work you need to trim any area or apply sealant into a narrow gap, you can do this with your fingers. The only thing is that you definitely need to wet them with soapy water. It will help the sealant not stick to your hands.


- Please note that the sealant does not require additional drying. If it is left in the fresh air, it will gain the necessary strength within a few hours.
- As soon as you finish working with the sealant gun, be sure to rinse the mechanism thoroughly under warm soapy water.


- To get a beautiful seam, it is best to use masking tape. They need to cover the surface on both sides, leaving free only the area that should be covered with sealant. It will need to be removed immediately after applying the layer.
- To get a beautiful corner seam of excellent quality, you must first wet the sides with soapy water. You should find a stick made of plastic or wood in advance. On one side it must be cut so that it can be used to set the shape of the seam. This is a very simple and convenient technique, thanks to which you can get a beautiful seam. There is no need to look for special attachments for this, since a regular stick will save the situation.


