Cut a seamless long vest. Vest pattern: male and female version, as well as for girls and boys.
Vests are always relevant. This is the most versatile type of clothing. They can be used in conjunction with, or separately on their own. Vests are suitable for all ages and sizes. They can have a wide variety of styles and silhouette shapes, they can be straight and fitted, long, short and asymmetrical. A wide variety of fabrics are used for vests, which makes it easy to combine them with items already in your wardrobe as a decorative addition to modern women’s clothing. Look fashion models vests you can here.
The shape, lines and proportions of the vest are inextricably linked with a woman’s figure. Yes, on full figure a long straight or slightly fitted vest with vertical reliefs will look more advantageous, which will make the figure visually slimmer. And the young girl with perfect figure And thin waist You can also make a short vest that emphasizes your slim figure.
Constructing a vest pattern
Vest pattern can be obtained by using up to the hip line.

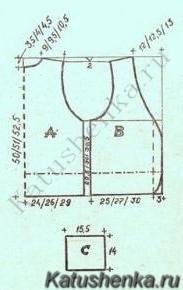
1. To determine the length of the product along the line of the middle of the back, set aside 41.6 cm from the point that determines the level of the seventh cervical vertebra.
2. Draw the relief of the back, measuring 12 cm from the armhole upwards, while measuring the opening of the dart and converting it into relief as shown in Fig. 1.
3. Increase the neckline along the shoulder section of both parts of the vest by 2 cm.
4. Along the line of the middle of the back, deepen the neck by 0.5 cm, draw a new back neck.
5. Draw a model line for the neckline of the vest front in accordance with Fig. 1.
6. I will deepen the armholes of the shelves and backs by 1.5 cm. The length of the shoulder cut line is 7cm (set aside from the top of the new neckline and the back of the vest).
7. Parallel to the middle of the shelf at a distance of 2 cm from it, draw a line for the edge of the side.
8. Draw the bevel of the side and the bottom line of the waistcoat front.
9. From the top of the new neckline, set the front 5cm down and draw a cut line to transfer the dart to the bulge of the chest.
10. Cut out all the cut details (Fig. 2).
11. To transfer the bust dart, make a cut and connect the sides of the dart.
12. Indicate the direction of the warp thread.

Cutting out the vest and lining
Cut out the details of the vest from the main and lining fabrics with seam allowances of the same width along all cuts.
Reinforce the sides, necklines and armholes of parts made from the main fabric with non-woven fabric.
If the waistcoat pattern includes a selvedge, then cut out a shelf from the lining fabric minus the width of the selvedge. Cut out two trim pieces with seam allowances along all edges. Reinforce the hems with non-woven fabric and stitch them to the lining panels.
How to sew a lining to a vest

The vest is lined on all sides. It's not as difficult as it seems at first glance. The condition for success is the exact matching of the details of the vest from the main and lining fabrics.
Sew all the seams of the vest and lining, except for the shoulder seams, leaving an opening in the middle back seam (Fig. 3) or in one of the side seams for turning out, approx. 15 cm. Press seam allowances.
Pin the lining to the vest with the right side facing front side, aligning the seams and seam lines, and stitch along the lower edges of the front and back, side edges, neckline and armholes, starting/ending the lines, not reaching approx. 3 cm to the shoulder seam lines.

Cut the seam allowances close to the lines, notch in the rounded areas, and cut diagonally at the corners (Fig. 3).
Turn the vest through open area in the seam on the lining (middle back seam or side seam). Brush and iron the edges.
Fold the fronts and back of the vest right sides together and sew the shoulder seams without catching the lining (1). Reach into the open area of the lining seam and grab and pull one of the shoulder seams to the right side. Pin the shoulder sections of the lining. Stitch (2). Press the shoulder seam allowances.
Stitch the remaining open edges of the neckline and armholes (3). Move the edge of the shoulder back through the open area.
Sew the second shoulder seam in exactly the same way.
Finally, sew up the open area in the middle back/side seam by hand.
I used the second pattern to sew a red-checkered plaid vest, it turned out wonderful with white men's shirt and she looked super cool with jeans. Now you can sew a school vest from pure wool, otherwise it’s all polyester... But according to the first one, it seems to me that you can sew a winter sundress, even. By lengthening the bottom line and inserting wedges. And in general, there are not enough vest patterns, let it be for the collection. This is a classic - like the “MChP” (little black dress)
Model 1 - for adult women who prefer a classic style in clothing. The silhouette is close-fitting, elongated, with reliefs along the front and back. U-shaped neckline. Front button fastening, single breasted. The vest is decorated with a chest welt pocket with a leaf (it is located on the left side) and flaps on the sides - false, so as not to complicate your work. If you want to work hard, make real pockets.
We provide a vest pattern for size 54, height III (top drawing).
The dotted line in the drawings indicates a variant of this model on the same design basis: a shortened vest with a double-breasted fastener and a figured hem. Finishing - raised seams on the front and back, as well as a chest pocket with a leaf.
Have you chosen a style? Have you cut out the details? Let's start work.
We connect the two parts of the shelf, placing the front on the side with the front side inward. We iron the seams (width 1.5 cm) to the middle of the front and add a finishing stitch, ironing. We also place raised seams along the back.
Let's move on to the complex operation: processing of a welt pocket with a leaf. Necessary parts: leaf made from the main material - 1, burlap made from the main material - 1, burlap made from cotton fabric - 1.
We cut out a leaf with the ends stitched inward together with burlap, which can be solid or consist of two parts.
On a solid burlap, first of all, we mark the middle line on the front side, from it we put up the double width of the finished leaf and mark the second line. We bend the burlap and fold it inside out in the middle between the two marked lines (if the fabric “stretches”, you will have to place a spacer cut along the grain thread into the fold, equal in width to the finished leaf).
Now we clarify the location of the pocket with three lines: one lobar (also the line for stitching the leaf) and two transverse ones, which determine the size of the pocket. We place the prepared burlap on the front side of the main part with the fold down, the smaller part up, aligning the marked lines on the burlap (second line) and on the main part so that the fold of the burlap is below the line marked on the main part by the width of the finished leaf. We sew along the burlap, ending the lines strictly at the transverse lines that determine the size of the pocket.
We bend the upper part of the burlap down and lay a second line at a distance of 1.5-2 cm from the first line.
We cut the main part in the middle between the lines, ending the cut at the ends with corners, the same as when processing a pocket with a leaf, and cut the burlap on the front side in the middle between the lines to the edges of the part in a straight line, then turn it inside out, straighten the leaf, and tighten its ends like this so that the top edge of the leaf coincides with the stitching seam of the burlap.
We bend the main part at the ends of the pocket and secure the ends with reverse machine stitching along the base of the corners, while simultaneously grinding down the burlap, rounding off the stitching in the corners. The seam width is 1.5 cm. Iron the finished pocket. Is the work too difficult for you? Then do without the chest pocket. Although the model will lose its elegance... So it's better to work hard.
Let's take the valves. We connect the parts of each and at the same time strengthen them with a gasket. We cut out the seams in the corners, turn them inside out, and sweep them out. We lay the finishing stitch. We process the cut with a zigzag seam, grind it to the intended line, turn it over and iron it.
Now we fold the shelves with the back with the right sides inward, align the cuts of the shoulder seams and sew them down (1.5 cm seam), iron the seam.
We process the side seams in the same way.
Let's take the sides. We connect the edging together with the lining to the back facing, grind the sides from the side of the shelves, making a fit from the side of the edgings, turn the edging inside out, sweep it out, simultaneously folding the bottom of the vest, and lay a finishing stitch along the front side. We sew on the valves.
Since we don’t need to sew in the sleeves, we’ll finish the armholes with single facings together with the interfacing, sew out the seam, and add a finishing stitch.
Model 2 is intended for young people, so we advise you to sew this small vest from some unusual fabric, for example, tapestry, or combine it from different fabrics: leather, suede, etc.
We offer a size 44 pattern III (bottom drawing). You can sew a thing to your liking on the proposed design basis.
The silhouette of the vest is close-fitting, the shoulder line is slightly high, along the front there are raised seams and a pocket with a leaf, single-breasted button closure, the neckline is also Y-shaped, the back is one-piece, decorated with two ties (or a tab at the back). The bottom of the vest is triangular in front and straight in the back.
Source: magazine "Peasant Woman"
A women's vest is the same integral part of a woman's wardrobe as a blouse. It very harmoniously complements many clothing ensembles.
The fact is that range women's vests very diverse.
Different vests have different functions. Those. there is some invisible (or visible) relationship, or rather their different purposes.
A women's vest can be made from various fabrics- can be made from raincoat fabric, from suit fabric, and even from silk.
Although, if you think about it and remember it, it comes to mind very a large number of fabrics.
The styles of vests can be associated with all styles of clothing (classic, romantic, sporty).
Many people don't mind finding free vest patterns.
If you think about it like that, what are free vest patterns?
Here you need to understand this point - a free vest pattern is good, but all patterns are individual, and not all of them may suit every individual.
Or can they? Or maybe it’s better to build your own?
A free pattern can be easily downloaded on the Internet, but will it suit you - that is the question.
I found one vest pattern, which I offer to familiarize yourself with completely free of charge.
The pattern is a very simple design that even a beginner can do.
The vest pattern is given in three sizes (based on chest volume): 85, 92, 100.
(the pattern is given with seam allowances)
How to sew such a women's vest yourself?
Well, here, as always, it all depends on the choice of fabric and style (well, how can you answer unambiguously?).
The vest can be either lined or unlined, with or without pockets - the sewing technology depends on all this.
If you sew a vest without a lining, then all internal seams need to be overcast.
You can decorate in completely different ways. The choice of decor is limited only by your imagination!
The following can be used: frills, lace, wings, decorative stitches.
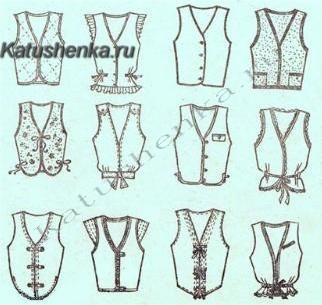
Using this pattern, you can sew any of the options below.
So, we have a vest pattern, now all that remains is to cut it out and sew it 😉
P.S. If you don’t like the fact that the vest is so wide at the waist, then you can take away the excess freedom in the darts right on the figure.
Be in style with a vest from Grasser
We offer many basic classics and more modern models vests. A vest is a basic wardrobe item; it will fit perfectly into both a business outfit and a more informal one.
To create the desired product, simply select the appropriate pattern and download it from our website. It is very easy!
Select the size and download the finished vest pattern. Models can be printed on A4 sheets and glued into a full-size pattern; some patterns can be printed on a wide-format plotter.
Sewing a vest using a pattern is easy!
We have models of women's classic vests, fitted and straight, long and short, with a turn-down collar, a V-neck or just a round neck. There are abstract, super-fashionable models and models made of dense materials.
We offer high-quality and professional patterns for low prices in PDF format. Create your own unique wardrobe item! A product sewn by your own hands will meet all your parameters and desires. Complete the model with high-quality fittings and you will definitely stand out from the crowd. Surprise your friends and colleagues with grace and style.
Hi all!
How do you feel? we have very hot. And in the morning it rained with lightning and thunder. So I thought, what should I wear in this weather? The jacket is too hot, the T-shirt is a bit cool...Conclusion? Let's put on a vest!
As you may have guessed, it’s our turn classic vest pattern!
And also girls... Notice the mistakes, don’t judge harshly, I’m sitting at the computer almost dancing 😉 I’m just in a great mood, my favorite music is on the speakers, and my beloved is the best person!!!
Classic vest pattern
I’ll immediately show you the vest model that I picked up in the online store:
Let's look at the model carefully and find the distinctive features:
- Smooth V-neckline
- Original bottom line
- button placket
- No chest dart
- Fitted silhouette
In principle, there is little new :), but the construction itself has many standard values.
Classic vest pattern produced at . But don’t rush to take the dress pattern that you made before... Since I have already repeated it more than once in this one, allowing for freedom of movement is important. After all, we wear a vest over a jacket or blouse, and this, in turn, takes away extra centimeters.
Pattern of a fitted vest is built using the Italian construction technique, and therefore we take column 3 from the table of increases (2 degrees).
Constructing a vest pattern
Constructing a vest pattern Let's start with the back half. But first, let's look at the back view of the vest: 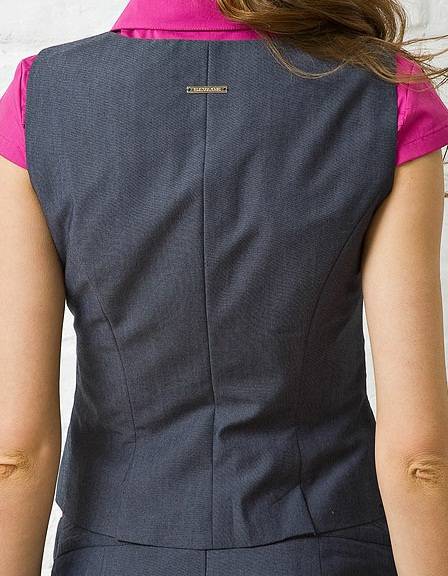
Let's look at the algorithm:
- First, let's edit the length of the product. Here you don’t need to take your own measurements, since it’s a classic vest, the length should be appropriate. From the waist line we put 8 cm down, 1 cm to the right and draw a perpendicular to the bottom line.
- Editing the back neckline. Along the line of the middle of the back, 0.5 cm down, and along the shoulder line to the right, 2 cm. Connect with a smooth line.
- New sleeve opening. Along the shoulder line up 1.5 from the extreme right point of the shoulder. From the bottom point of the armhole along the side seam down 2 cm.
- We build a relief line from the beginning of the dart on the back to the armhole of the sleeve. along it we divide the back into two parts.
Now let's continue building a vest pattern on the front half and at the same time see what you get at the end of the work.


