How to crochet a circle the easiest way. How to crochet an even circle using single crochets
Today we will look at crochet pattern in the round. This is a very commonly used knitting technique in the round. You've probably already come across circular knitting, not only on this site, but also in other places, for example, napkins, but... Knitting in the circle is not limited to them! When crocheting in the round, you get not only circles, but also other shapes, even voluminous ones. But more on that a little later! First, let's deal with a regular circle of single crochets! At the output we will get flat crochet circle.
Let's start studying the lesson Crochet circle for beginners.
This lesson is part of the free online course: " ". If you are new to crocheting, I suggest you sign up and after completing the course you will not only be able to knit, but also receive the first thing knitted by your own hands!
2. In the diagram it will look like this

3. Second display option on the diagram
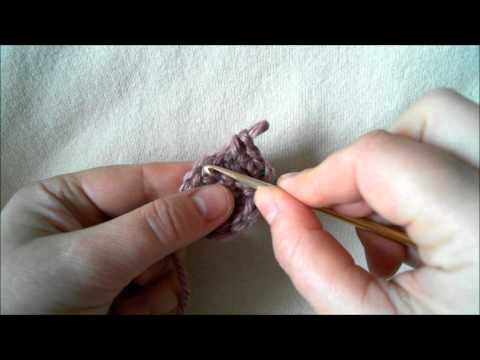
5. Threading the hook into the center of the formed circle we knit 6

20. Double crochet in next stitch. We knit in the same way to the end of the row, alternating: a single crochet in each of the next two loops and two single crochets in the next loop. There will be 24 columns in total.
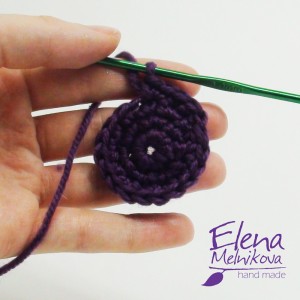
21. We knit the fourth and subsequent rows in the same way. The fourth row in the diagram will look like this

So, the rule of the circle: in each row the number of intermediate columns between additions will increase
22. This is the simplest knitting in the circle, it will look like this
This option is not suitable for large circles, because... with the addition of a row, the circle will look more and more like a hexagon. Therefore, we will consider another option, but a little later.
It's simple!
Thank you for your attention and see you in the new lesson!
Subscribe and you will be the first to receive
information about new lessons!
In one of the first lessons I showed. The circle was small, in each subsequent row one air loop was added to each arch, and thus an expansion was made.
Unfortunately (or fortunately - otherwise it wouldn’t be interesting) this method is not always suitable. Why?
- Firstly, the larger the circle, the more expansion it requires, and one additional air loop when moving from the center is not enough.
- Secondly, it is not always possible to expand by increasing the number of air loops in each arch. Sometimes a fine openwork mesh is required, and, say, 20 loops is already a large hole.
- And, most importantly, you don’t always need a circle connected only by air loops and half-columns. He's too boring, don't you agree?
Of course, you can say that there are enough beautiful people on the Internet interesting schemes with descriptions. You can simply knit according to the description. But don't you want to tie a circle of your own composition? Become your own designer, develop your own models. Tempting? You just need to understand the rule of forming a circle.
Want to learn how to knit a flat piece in the round? Then let's get to work!
Link first. This is usually 4-5 loops, unless you want a large hole in the center. Close it into a ring with a connecting post.

In a ring of 4 loops you can freely knit 8 stitches, and in a 5-loop ring you can fit up to 12 stitches. Of course, a lot depends on the thickness of the yarn, the hook and how tightly you knit. Experiment with the first row, feel the knitting, and everything will definitely work out.
Make the first row of columns into a ring (don't forget about the air loops for lifting). Main difference from regular knitting the first row is that now you do not need to insert the hook into the loops. The first row of circular knitting is knitted in the middle of the ring. While performing the first row, you need to pick up the tip of the thread, thus securing and hiding it.
Please note that I did not say which stitches need to be knitted - half stitches, single crochets, double crochets or even double crochets. I did this on purpose. It is very important that you understand that you can knit the way you like, or, more precisely, with the stitches that you need. You just need to follow some rules.
The higher the column, the more of them you need to knit in the first row. It's easy to explain. You knit a circle, the larger its diameter, the greater the circumference. Taller bars form a larger circle. And since the diameter of the circle is determined by the top of the columns, to make the circle longer, you need to knit more columns.
Try knitting the first row with half-stitches, and then with double crochets. There can be only slightly more half-columns than air loops. But you need to knit enough single crochets so that the circle does not turn into a “bowl”, pulling together along the outer edge. The tall columns lie tightly at the base, and move apart from each other closer to the edge of the circle.
There are two options for moving to the next row.
You can close the circular row by connecting to the beginning of the row. After this, make the required number of air loops for lifting and knit the second row.
Another option is spiral knitting. In this case, the circle does not close; knitting continues continuously until the desired size. This method is more suitable for half-columns or single crochets that have a small height.
In each subsequent row after the first you need to make increases. It is important to accurately calculate the required amount, otherwise the circle may turn into a “bowl” or end up with the formation of frills. The higher the stitches you knit with, the more increases you need to make.
Today I will show you how to knit a circle. Make a ring of four air loops and close it into a ring with a connecting post.
Make 2 chain stitches for lifting and knit 10 double crochets into the ring. Remember, the hook in the first row should not be inserted into the loops of the air chain, but into the inside of the ring.
Connect the last post to the first using a connecting post.
Make two chain stitches for lifting and work a double crochet stitch into the next foundation stitch. Then insert the hook into the same loop again and work another double crochet.
Repeat until you have worked two double crochets into each stitch of the first row.
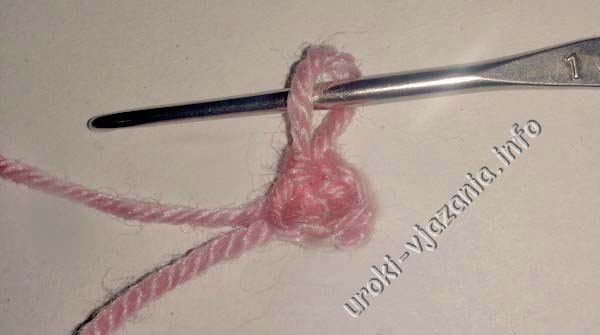
The circle begins with a ring. The ring can be made from thread, as well as from air loops.
1. Ring made of thread.
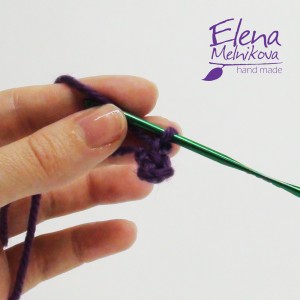
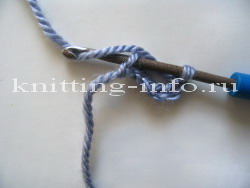
This method can be used in cases where a dense center is needed. To do this, after tying the ring with columns, you need to pull the tip of the thread, thereby tightening the central hole and the circle will be tight.1. Make a loop from the thread, insert a hook into it, grab the working thread (Fig. 1) and pull it out from under the ring. Make 1 lifting air loop.
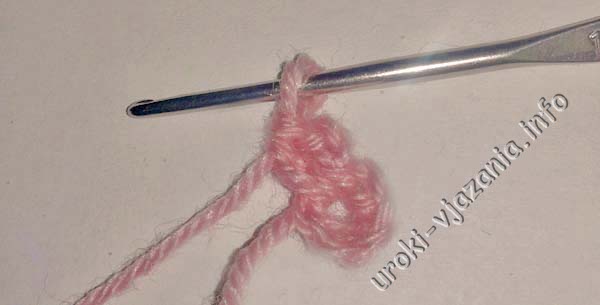
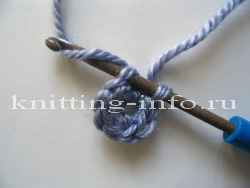
2. Holding the tip of the thread and the resulting ring with middle and thumb, tie the ring (inserting the hook under the ring) with single crochets (Fig. 2).
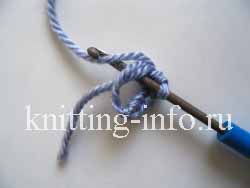
Fig.2
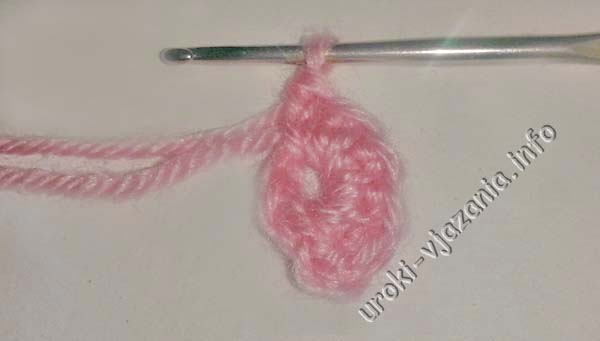
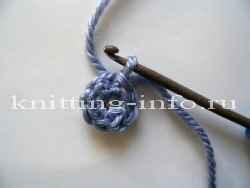
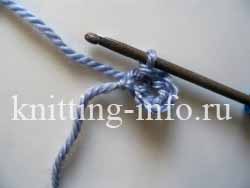
3. Having tied the ring with single crochets, insert the hook into the first loop of the beginning of the row, grab the working thread (Fig. 3) and pull it through both loops on the hook (Fig. 4).
2. A ring of air loops.
1. Knit a chain of air loops (Fig. 5), insert the hook into the first loop of the chain, grab the working thread (Fig. 6) and pull it through both loops on the hook (Fig. 7). Make 1 lifting air loop.
rice. 5
rice. 6
2. Holding the tip of the thread and the resulting ring of air loops with your middle and thumb together, tie the ring (inserting the hook under the ring) with single crochets (Fig. 8).
rice. 7
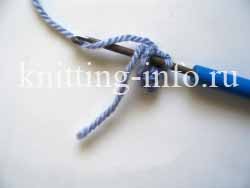
Fig.8
3. Having tied the ring with single crochets, insert the hook into the first loop of the beginning of the row, grab the working thread (Fig. 3) and pull it through both loops on the hook (Fig. 4).
3. Technique for performing increments to obtain an even, dense circle.
In order not to end up with a cylinder, so that the edge of the circle does not curl up, but is flat and even, you need to remember the rules for making increases:
1. The first row is made in columns under the ring.
2. The second row is knitted with 2 stitches in each stitch of the previous row.
3. In the third row, between a group of columns (2 columns in each column of the previous row), 1 column is knitted in each column, in the fourth row - 2, in the fifth row - 3, etc., adding 1 column with each row.
In this case, the places of increases should not be located on top of each other so that the circle is even and does not turn into a polygon.
Accordingly, the same number of air loops will be added to each row.
It looks more clearly in the diagrams as follows. In Fig. 9 shows a circle made with single crochets, in Fig. 10 circle, made with double crochets.
rice. 9
rice. 10
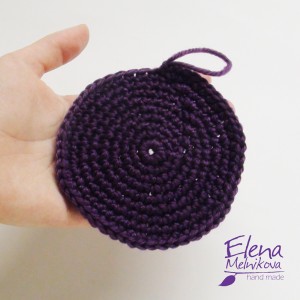
4. Hide the beginning and end of the working thread.
In order for the product to be accurately made, the initial tip of the thread must be applied to a ring of thread or air loops and tied with columns in a circle (Fig. 2). This way the tip of the thread will lie under a row of posts. Carefully trim the remaining tip of the thread (Fig. 11) with scissors. As a result, the wrong side will look like in Fig. 12.
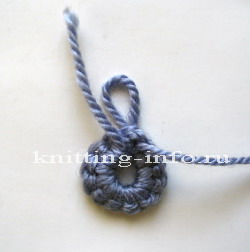
Fig.11
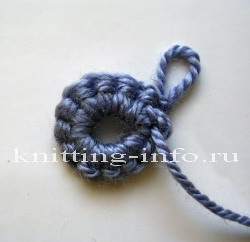
Fig.12
When you finish knitting, leave the tip of the working thread longer, thread it into a needle and pull it with small stitches from the wrong side (Fig. 13). Trim off the excess (Fig. 14). You will get a very neat wrong side (Fig. 15).
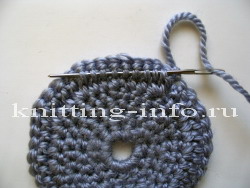
Fig.13
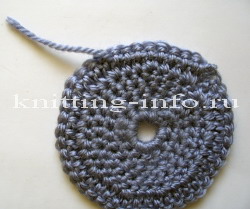
Fig.14
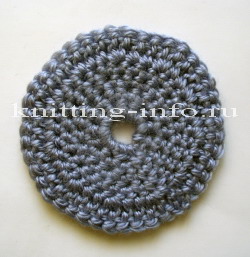
Fig.15
Rules for performing circular knitting.
1. When tying a ring at the beginning of knitting a circle, insert the hook under the ring (Fig. 2).
2. Start each row with lifting loops (Fig. 16). The lifting loops imitate a post and are considered the first post of the row! Finish the row with a connecting post in the first lifting loop (Fig. 14 - 15). This technique will prevent knitting from going in a spiral!
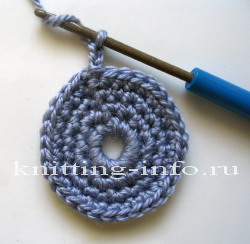
Fig.16
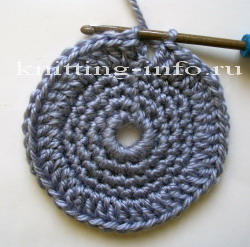
Fig.17
![]()
Fig.18
3. In the diagrams, a ring of thread is indicated by a circle in the center, but if there is a number in the circle, then the ring is made of air loops (the number in the circle means the number of air loops).
4. Perform increments evenly.
5. Carefully hide the beginning and tip of the working thread.
6. For circles with frills, do large quantity increases than for a flat circle.
7. When making openwork products and products with complex patterns in a circle, it happens that when closing a row into a circle, you need to move to the middle of the arc of air loops or shift to the desired section of the pattern. In this case, you need to knit several connecting posts and start the row in the right place.
If a row ends with an arch of air loops (for example, an arch consists of 5 air loops), and the next row begins above this arch in the middle, then at the end of the row it is necessary to knit not a full arch, but mentally dividing it in half, knit 2 air loops and a double crochet (imitation of the height of 3 air loops) in the first loop of the row. Accordingly, the row will end in the middle of the arch.
Having learned how to make circles, you will confidently knit a small hat, a napkin, or these interesting models from individual dense or small openwork circles.
It would seem that there is nothing complicated here, you knit and make increases in each added column of the previous row. I think that almost all of you knit this way. But it's not that simple. The circle is not a circle at all, or rather a circle, but with six corner protrusions. In principle, when you knit a hat or a toy, this does not interfere much; as you knit, this drawback is visually invisible. But what if you really need a circle, for example, to knit a potholder or rug.
Lately I have begun to shift the increases, i.e. add after the increases of the previous row, but then at the beginning of the row the number of columns between the increases becomes greater. Although the circle still turns out smooth. It turned out that she shifted it wrong... or rather, she did not take into account the sequence of increases at the beginning and end of the row...
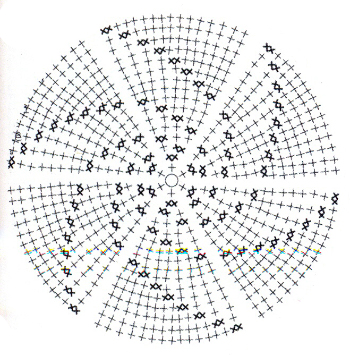
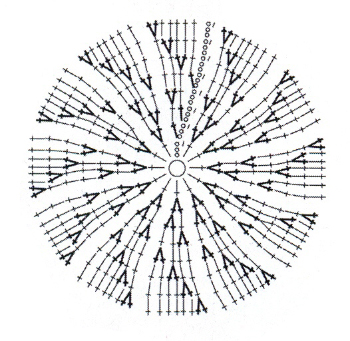
Somehow I couldn’t immediately figure out how to add correctly so that everything would be even and without extra columns, until the diagram caught my eye. I must say, looking at her for the first time, I could not understand where she transitioned from one row to another. But the eyes are afraid, but the hands do as they say. Having tried to knit according to this pattern, I got a completely even circle.
Below I present this very diagram. And I also give my transcript in words. I hope it will be clear to you.
Description of how to crochet an even circle.
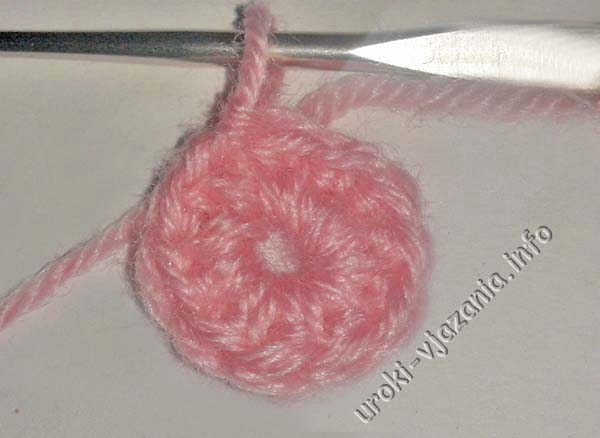
- 1st row: 2 ch, in the second loop from the hook, knit 6 single crochets (sc) = 6
- 2nd row: 2 sc. in each column of the previous row = 12
- 3rd row: “2 sc. in the column of the previous row, 1 sc.” Repeat from " to " 6 times = 18
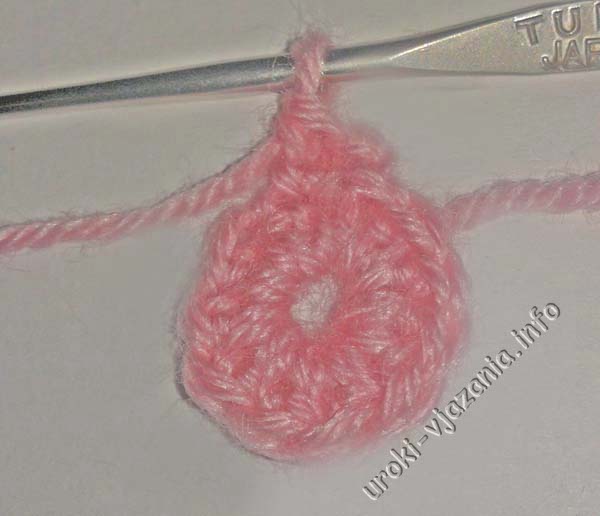
- 4th row: “2 sbn., 2 sbn. in the column of the previous row." Repeat from " to " 6 times = 24
- Row 5: “2 sc in the column of the previous row, 3 sc.” Repeat from " to " 6 times = 30
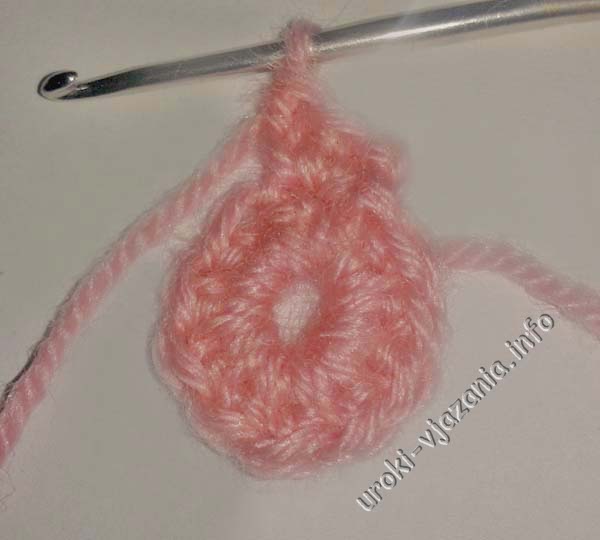
- Row 6: “2 sbn., 2 sbn in the column of the previous row, 2 sbn.” Repeat from " to " 6 times = 36
- Row 7: "4 sbn, 2 sbn in the column of the previous row, 1 sbn. Repeat from " to " 6 times = 42
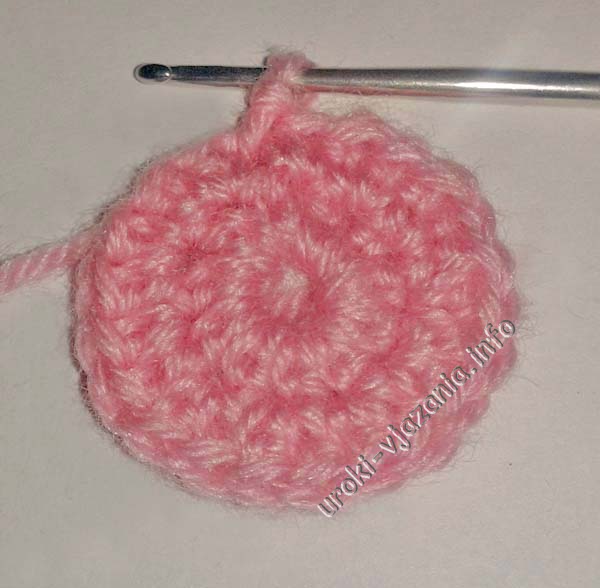
- 8th row: "6 sbn, 2 sbn in the column of the previous row. Repeat from " to " 6 times = 48
- Row 9: "2 sbn in the column of the previous row, 7 sbn. Repeat from " to " 6 times = 54
- Row 10: “2sc, 2sc in the column of the previous row, 6sc.” Repeat from " to " 6 times = 60
- Row 11: “4sc, 2sc in the column of the previous row, 5sc.” Repeat from " to " 6 times = 66
- Row 12: “6sc, 2sc in the column of the previous row, 4sc.” Repeat from " to " 6 times = 72
- Row 13: “8sc, 2sc in the column of the previous row, 3sc.” Repeat from " to " 6 times = 78
- Row 14: “10sc, 2sc in the column of the previous row, 2sc.” Repeat from " to " 6 times = 84
- Row 15: “12sc, 2sc in the column of the previous row, 1sc.” Repeat from " to " 6 times = 90
- Row 16: “14sc, 2sc in the column of the previous row.” Repeat from " to " 6 times = 96
- Row 17: Work single crochets without increasing.
I would like to note that if the circle in some row is wavy, you just need to knit the row without any increases. Although it is usually enough to knit the last row to “relieve anxiety”
The same goes for protrusions. If there is a hint of them, you can knit a row without increases or radically shift the places of increases. Even according to this scheme, something like protruding corners will appear in the last rows. It’s just that the more rows there are, the more likely they are to occur.
How to knit a circle?
When knitting napkins, hats, rugs or decorative elements, it becomes necessary to knit a flat circle. This can be done either with a hook or with knitting needles. Knitting a circle is based on the same principle - evenly adding loops in each subsequent circle.
Single crochet circle
Before crocheting in a circle, you should pick up 3 air loops and connect them into a circle.
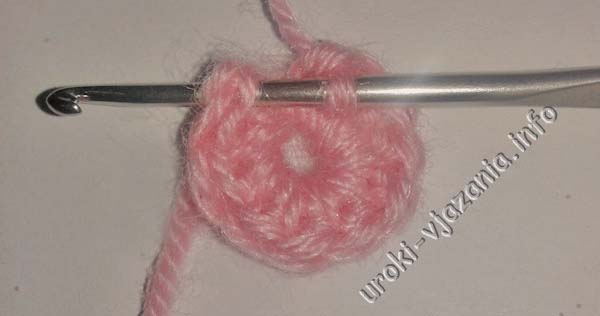
- 1st row: Work 2 single crochets from each chain stitch. There will be 6 columns in total.
- 2nd row: Perform one chain lifting loop. Work 2 single crochets into the next base loop. Repeat the same until the end of the row. As a result, there will be 12 columns in the row. We close the row by inserting the hook not into the lifting loop, but into the first single crochet.
- 3rd row: Each new row begins with a lifting air loop. In this row you also need to add 6 additional loops. To do this, 2 single crochets are knitted from every second loop. Thus, in the next loop of the base we knit 2 stitches, then one stitch, and alternate until the end of the row. There will be 18 columns in total. We close the row as described above.
- 4th row: 1 air lifting loop. To evenly add 6 stitches, you need to knit 2 single crochets from each third loop. In the next loop of the base we knit 2 stitches, then in 2 loops one stitch at a time, alternating in this way until the end of the row. We close the series. It turns out 24 columns in a row.
- We knit the 5th and subsequent rows by analogy, increasing by one in each row the distance between the loops, from which 2 columns are knitted. The number of columns in each subsequent row increases by 6.
Crochet circle from double crochets
You can knit a circle using double crochets. The more yarn overs, the looser and softer the fabric is and the faster the circle expands. At the same time, to prevent the canvas from becoming convex, it is necessary to increase the number of additional columns in each row.
The number of loops that we add in each new circle if we knit in stitches:
- with one crochet - 12
- with two crochets - 16
- with three yarn overs - 20
Circle with knitting needles
You can knit a circle not only with crochet, but also with knitting needles. It is more convenient to do this using 5 identical knitting needles pointed at the ends. The knitting technique with five knitting needles is described in the article.
Before knitting with 5 knitting needles in a circle, you should cast on 8 loops and connect them into a circle, distributing 2 loops on each knitting needle.
- In the first row you need to add 8 loops, that is, yarn over after each loop. The number of loops will increase to 16.
- Knit the second row without double crochets.
- In the third row, add 8 stitches again. To do this, yarn over is done every 2 loops.


