Knitted bibs on knitting needles. Knitting a shirtfront for beginners: detailed instructions on how to knit a shirtfront for everyone
Such a piece of clothing as a shirtfront is very rare among people, although it is not clear why, since this piece of clothing looks very stylish and at the same time insulates very well. The shirt front is worn around the neck, that is, it replaces a scarf. The shirt front very much resembles a collar, which protects the throat very well from the cold, which is why this piece of clothing is often sewn for children to protect them from colds. Knitting a shirtfront for beginners will no longer seem difficult, since this article has all the information with photos. A description of all the little things, as well as a master class, is present in this article.
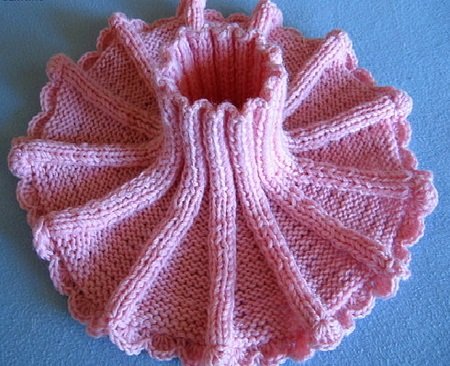
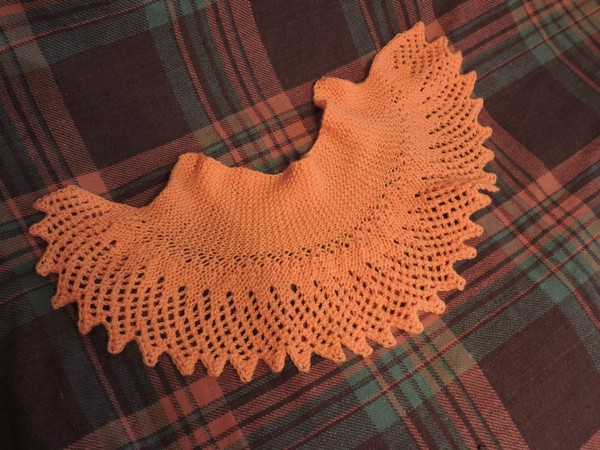
Knitting a baby shirt
This insulation is very suitable for a child, as it looks at the same time stylish, but not too provocative. It doesn’t matter whether the shirtfront is knitted for a boy or a girl, everything will look great. Yes, such a beautiful shirtfront is perfect for a child who is 1 year old. Before we start, we need to grab some things that we will need. These are stocking needles, a crochet hook, and also special acrylic, which is intended only for children.
- You need to cast on 80 stitches on the knitting needles
- After the loops have been distributed over the taken knitting needles, you need to knit an elastic band that will be 3 by 3.
- Now you need to form a throat. You just need to continue knitting the elastic until it measures 16 centimeters.
- A certain number of loops have been wasted, so you need to make up for them by casting on additionally.
- To form the shoulders and chest, you need to knit 2 purl from k. n. one side. This is done using the previous row.
- The same actions need to be done with l. p. every third row
- Thus, after everything, it turns out to be 12 and. n. in one interval.
- Now you need to take a hook to close the resulting loops and make some kind of pattern on the edges. The hook is inserted into the outermost loop, and then the first loop is pulled out. With the resulting loop you need to knit single crochets in a circle.
- These movements create two rows. And now we need to make a third one. For this, only one half-column is knitted, and the thread is pulled out through one loop.
- Then take one loop and create 5 single crochets from it. After these stitches, one loop is skipped again.
- In this way you need to continue until the row ends.
Thus, a children's shirtfront is obtained. According to the instructions, it is clear that knitting shirt-fronts is not so difficult, especially for children. Depending on the color, the shirtfront can be suitable for different genders. Pink color Great for a 2 year old girl.
Women's shirtfront with buttons
A women's shirtfront with buttons will require gray yarn, but it should contain a mixture of regular wool and alpaca. From the knitting needles you will need a number 5 knitting needle, but they will not be the main tool in this work. You need to take a tool that will be thinner than the knitting needles taken. It is with the help of this tool that the elastic will be performed.
Work begins with knitting the wrong side. First comes top part, and only then comes the lower one, this is worth remembering. First you need to make the front stitch, and to do this, cast on 62 loops on thin knitting needles. The first row is sewn with 6 liters. p., after that 2 purl. Now a 2 by 2 rib is created, using 6 knit stitches to complete the row. All steps are repeated until the dough is 4 cm in height.
Now the base of the shirtfront is created. For this, knitting needles No. 5 are taken. The beginning and end of the row will have 6 knits, both are the same.
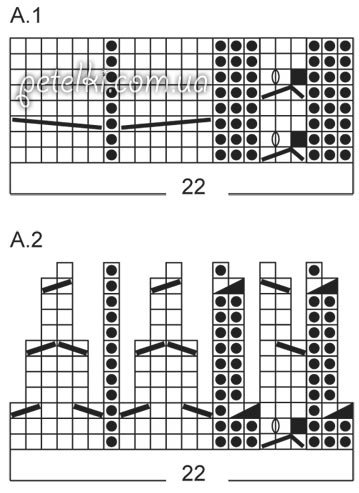
50 loops are made exactly according to the pattern shown below. And so it repeats for 16 centimeters.
We proceed to the next row, which will eventually be closed with 6 loops. As a result, there are still 50 loops left. And after this, the knitting process occurs in exactly the same way as with the first upper part. After the two parts have been completed, they need to be combined. 6 loops are cast on thin knitting needles. They are connected, and those that remain open, add 6 more loops. The continuation looks like this: 6 l. p. first at the beginning of the row, and the same number at the end. Looking at the diagram above, loops are made that are in the middle. This continues until it reaches 14 cm.
One loop is wound on the same knitting needles on both sides. First row 6 l. p., then there are 2 purl stitches, located in the middle, and at the very end there are 6 knit stitches. The loops that are located in the middle are knitted with a 2 by 2 elastic band. The lowest elastic band must be continued until it is 4 centimeters. After all the work done, the buttons are sewn on.

There is also a pattern with braids.
For men, the shirtfront may be different, but if gray material was used, a man's raglan can be perfect for it. It is not difficult to knit, almost the same as for women. Fortunately, the Internet is full of information.
Video material on this topic
There are also videos that can help with the knitting process.
As the cold season approaches, protecting your child from colds becomes more important. How to protect children during winter and autumn walks fresh air? Warm clothes, such as a scarf or hat, can save you from hypothermia and possible illness. But often, while playing, the child does not notice at all that the scarf has opened, which can no longer guarantee that there is no threat of ARVI or sore throat. A removable collar-shirt with knitting needles for a child is an ideal option for a little fidget.
A removable collar-shirt with knitting needles for a child is an ideal option for a little fidget
For small children, it is better to knit a shirtfront without a stocking pattern, since this type of knitting involves a tight fit of the scarf to the skin, which can be uncomfortable for the baby.
Necessary:
- Straight knitting needles No. 2.5 – 5 pcs.;
- Acrylic thread.
What to do:
- We measure the circumference of the child's head and neck. Calculate the number of loops required for knitting.
- We cast on loops on 4 knitting needles in equal sections. We connect the circle by tying threads.
- We knit the pattern: 1 purl, 1 knit. Work to the end of the row along the knitting needles, gradually transferring each piece of stitches to the next knitting needle.
- We knit the next row on a purl loop, on the front with a purl loop. The result is a simple relief pattern.
- Knit the number of rows according to the neck length measurements. When making the product, consider the distance of the mantle to the child’s shoulders. If the shoulder area is longer than the shoulders, the ends of the shirtfront will ride up.
- Then in each segment, in the interval between the last and first loops, we stretch the thread, hooking it to the bottom row. This creates a new loop. In the next row, knit it according to the pattern, taking into account the type of the previous loop.
Decorate the lower neckline area with floss thread.
Children's shirtfront with knitting needles (video)
- To knit a detachable collar, choose soft yarn. It is very important that the finished product provides comfort to delicate skin. Merino wool, wool with the addition of up to 50% acrylic, and angora are considered thin, easily stretchable and soft. For autumn and spring shirtfronts, use cotton yarn or mohair.
- Acrylic yarn tends to stretch greatly in volume, so when knitting, be sure to add wool threads. Angora is fluffy, and with frequent use, pellets will form on the surface of the product.
- The detachable collar looks great with large buttons. Knit a straight rib on long knitting needles, closing every 5th row with 5 stitches at the beginning. When knitting the next row, we make yarn overs in place of the closed loops and knit them as existing ones. After 10 rows we make a loop back for the fastener.
 To knit a detachable collar, choose soft yarn
 The edges of a collar with buttons can be decorated with crochet stitch or beads, sewn on with regular thread.
How to beautifully knit the last row of a removable collar
To ensure that the product is beautiful and does not bend the ends of the neckline when worn, it is very important to finish the last row correctly.
When finishing the row, join the last two loops together. Throw the resulting loop onto the needle on the left side and finish the row to the end of the indicated needle. Then we transfer the remaining loop to the next row and knit, closing the loops of this row. In this way we finish the product on the left side. From the right shoulder of the product, also pull the thread through two loops and finish the rows.
 To ensure that the product is beautiful and does not bend the ends of the neckline when worn, it is very important to finish the last row correctly
 Now you can decorate the thread seam with crochet or sewing tape.
A simple baby shirt with a lapel for a boy
You will need:
- 1 skein of yarn 50g;
- Circular knitting needles No. 4;
- Hook 3, 0 or 3.5 mm.
How to do:
- Measure the length and height of the throat. We make the base of the shirtfront from woolen threads. Cast on an even number of loops. Distributing them evenly among the knitting needles, we close the circle.
- Knit an elastic band from the starting point. Here we use the 2:2 rib knitting technique. Two purl and two knit stitches. Repeat the pattern at the end of the first circle until the required throat height. To make a lapel, knit a double neck size.
- We begin the transition from the neck to the body with facial loops. Divide the knitting into four parts. At the beginning and end of each part of the current row we make an increase - 8 loops per row as a whole.
- Continue knitting by adding loops to the desired length along the shoulders.
You can finish the product by closing the circle with crocheted openwork.
Knitting a scarf-front for schoolchildren: master class for beginners
It is not necessary to know how to knit a shirtfront using circular knitting needles. The collar can be made in another way, for example using two long knitting needles, and then sewing the sides of the piece together. This is more convenient for beginner needlewomen.
Necessary:
- Angora yarn, merino;
- Straight knitting needles No. 3.0;
- Needle, thread;
- Hook 2.5 mm.
 It is not necessary to know how to knit a shirtfront using circular knitting needles
 How to do:
- Cast on 140 angora stitches on two needles. Knit with an elastic band 1:1, one purl, one knit stitch.
- Duplicate the subsequent rows in the same way: we knit a purl loop onto the purl loop, respectively, we knit a knit stitch with a knit stitch. Knit 40 rows.
- Change the thread to merino. We visually divide 140 loops into 4 rows of 35 loops each.
- Place a yarn over between the starting stitch of the first and last row of the previous row. During the knitting process, you should get 4 new loops for each row. Make 4 rows.
- To knit a simple pattern on a shirtfront, you can make small loop weaves every 5th row. To do this, after 2 loops, swap places on the knitting needle 3 - y and 4 - y, then knit 4 loops according to the previous pattern. 6th row on the same loops we make a replacement back. The result is small braided patterns.
- Upon reaching a certain shoulder size, close the product with loops using a hook or knitting needles by pulling the thread.
Sew the sides of the shirtfront with a needle.
Knitted shirt front for a child: how to calculate the stitches
- To start knitting a product, you need to know the knitting density of the selected yarn. Cast on 20 stitches and knit them in stockinette stitch (ribbing) for 10 rows.
- Measure the volume of the child's neck and head (OH and OG).
- Calculate how many centimeters you have of the fabric knitted with an elastic band, mark the number with the designation A. Now stretch the sample with your hands and measure back, this will be B.
- Divide the resulting numbers using the formula A/B, denoting the number C.
- Multiplying OG by C plus 5 cm for stretching - we get the size of the upper part of the scarf (D).
- Now multiply D by 20 (the loops initially cast on) and divide by the number of centimeters of knitted fabric without stretching. The resulting figure is required amount loops for knitting according to the measurements taken.
A simple way to knit a baby shirt with knitting needles (video)
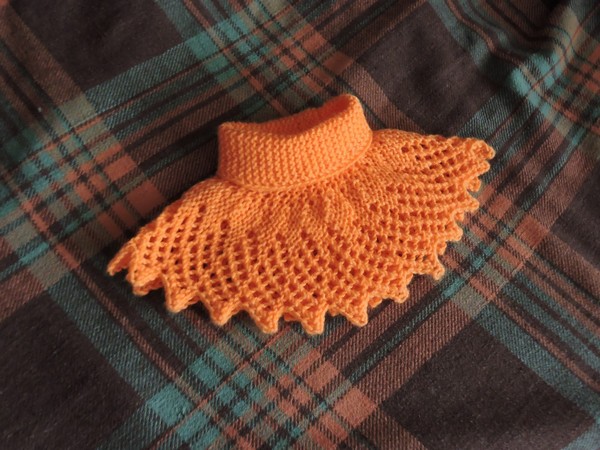
Compared to a warm sweater, a removable collar is the most practical piece of clothing, as it is comfortable for both a child and an adult. Currently exists fashion trend wearing a bib as an accessory. Such products are made from thin openwork yarn. Having learned to knit a collar, even a novice housewife can become the most fashionable. Believe me, you don’t need a lot of money to be beautiful.
Attention, TODAY only!
With the arrival of cold weather, every mother begins to think about a warm wardrobe for her babies. Hats, helmets, mittens with elastic bands, and scarves are used. For many years, a bib was a popular accessory. It was worn not only by children, but also by adults. Knitted, it looks like a removable collar and perfectly protects the throat and neck from the piercing winter wind.
Pattern for knitting a shirtfront with knitting needles
Each knitting pattern for a shirtfront is based on the same principle. It is basic. Once you master it, you will be able to knit any shirt with the desired pattern. Knitting starts from the collar. Usually, stocking or circular knitting needles are used for this. Remember, the length of the circular line should be approximately the same as the length of the cast-on edge. Otherwise, knitting will become inconvenient, and a loop of fishing line or cable will constantly appear. It is much easier to knit with stocking needles. Basic scheme knitting is as follows: we knit a collar of the required height, then we begin to add loops. Increments are made every other row or every two rows. Thus, the shirtfront expands and begins to cover the shoulders. Next, it is knitted to the required length and the knitting is closed.
Dickies have been used as accessories for quite a long time. They are not only knitted, but also sewn. Various materials, from which the shirtfronts are made, allow you to wear them when different temperatures. This accessory is ideal for winter. It should be worn to protect your neck. In some ways it resembles a regular removable collar. There are many variations of shirtfronts. They are knitted with crochet, circular, and stocking needles. Knitting a shirt front for children is a fairly simple task. You don’t have to come up with complex patterns, but use only knit and purl stitches. So in a few evenings you will have a warm winter accessory ready.
The shirt front looks like the top of a sweater with a neck. It widens towards the bottom and fits perfectly around the top. chest. High collar the shirtfront can reach the beginning of the chin. There are several types of shirtfronts. The first ones cover the necks and slightly cover the shoulders. The second ones hang down from them. We offer you a diagram of a shirt-front with a lapel.
Knitting begins with taking measurements and calculating the number of stitches needed. Next, they are cast on circular knitting needles and knitted with an elastic band 1 by 1. On circular knitting needles we knit a “pipe” 2 times longer than the desired height. This way a lapel will be formed and the shirtfront will become even warmer. From the next row we begin to add loops and expand our shirtfront. To do this, knit the first 15 loops with the selected pattern (knit or elastic). Before the 16th loop we make a yarn over. We knit like this until the end of the row. In the next row we also add loops. To do this, add 1 loop before the yarn over of the previous row and 1 more after. We knit with such additions until the end of the row. Knit to the desired length. We finish the last rows with an elastic band and close them.

To knit a shirtfront, you need to take several measurements. Measure your head, neck, and its height. For knitting, it is better to choose stocking needles. This is how we will knit the shirtfront without seams. Before starting work, you should calculate how many loops are contained in 1 cm. After this, take the measurement of your head and cast on the number of loops that is equal to its girth. Knit the shirtfront from the top, from the throat, down.
Knitting baby shirt fronts is no different from knitting for adults. Cast on the required number of stitches on two stocking needles. They should be divisible by 4, because we will knit on 4 knitting needles. Next, knit the first row and close the knitting around. After this, we begin to knit the collar. It is best to do this with an elastic band 1 by 1 or 2 by 2. We knit loops to the desired height, alternating knit and purl stitches. We knit until the collar reaches the desired length. Next we will need circular knitting needles. We form a raglan line - the expansion of the shirtfront will begin in this place. At the beginning of each knitting needle, we knit the first 2 loops with purl stitches, and the remaining stitches with knit stitches. In the sitting row we add loops. Before the first purl we make a yarn over or knit loops through a broach. Add a second loop after the 2nd purl loop. Add stitches to the end of the row before and after every 2 purl stitches to the end of the row. We make similar additions in every 2nd row for 5-6 cm. We knit the previous row according to the pattern. We knit, adding loops to the desired length of the shirtfront. In the last rows we switch to the elastic band that was used to knit the collar at the very beginning. Close the knitting. The shirt front is ready.

- To knit a shirtfront, you need to choose the right threads. It's better to stick to half-woolen ones. They should be pleasant to the body and not irritate the skin. Also, the yarn should not be very thin. Ideally, you should choose thick threads.
- The number of initial loops depends on the age of the child. They must be multiples of 4. For 1 year olds, 72 loops are usually cast on with thick yarn, for 2 years old - 80.
- The shirt front can look different. The front part can be longer, all sides can be the same.
- Raglan stitches can be marked with pins, special markers or contrasting yarn. This way you won't get confused and will know where to add stitches.
- To make the shirtfront easier to put on, it can be made with buttons. To do this, “slotted” loops are made in it. And then the buttons are sewn in the right place. They can be placed either on the side or in the middle of the product.
- In order for the elastic to be tight, it can be knitted on knitting needles of a smaller diameter than the recommended one.
- The shirtfront can be decorated. For this purpose, embroidery, applique beads and seed beads are used.
- The crochet trim around the edges of the shirtfront looks great.


