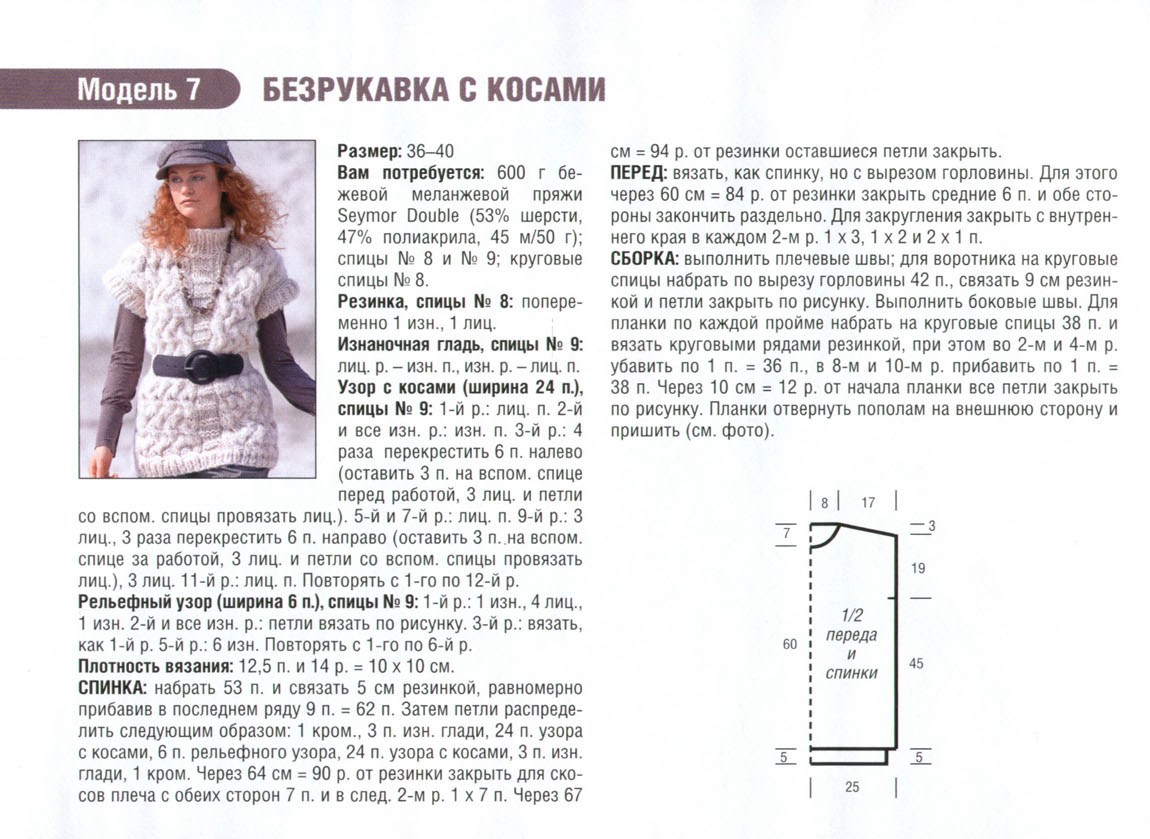
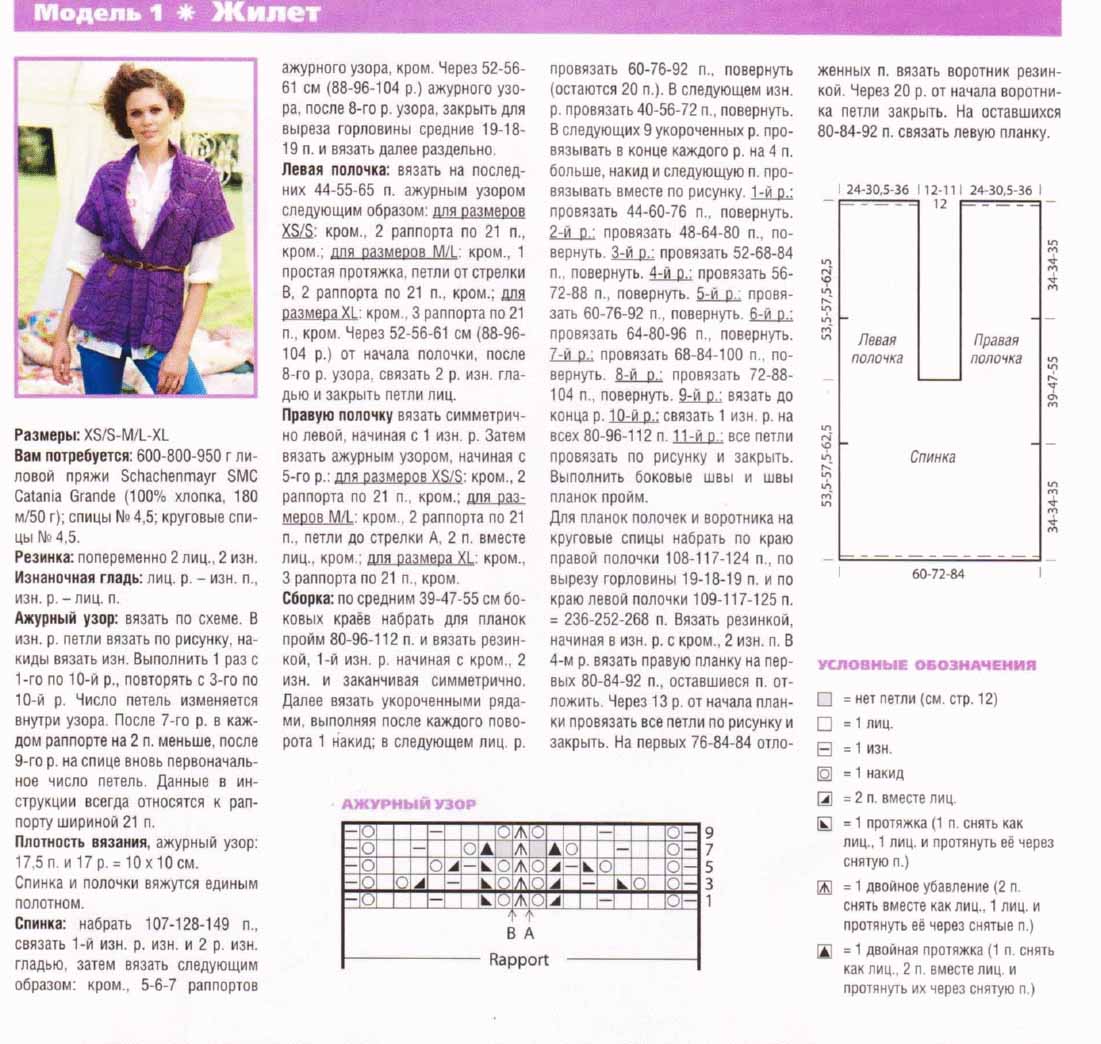
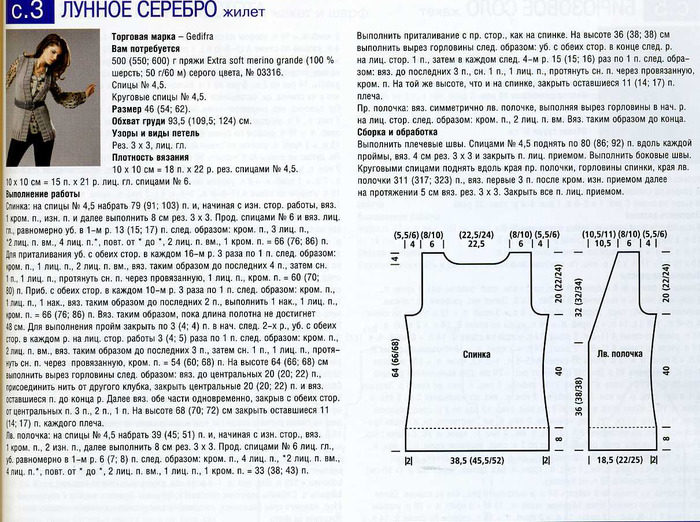
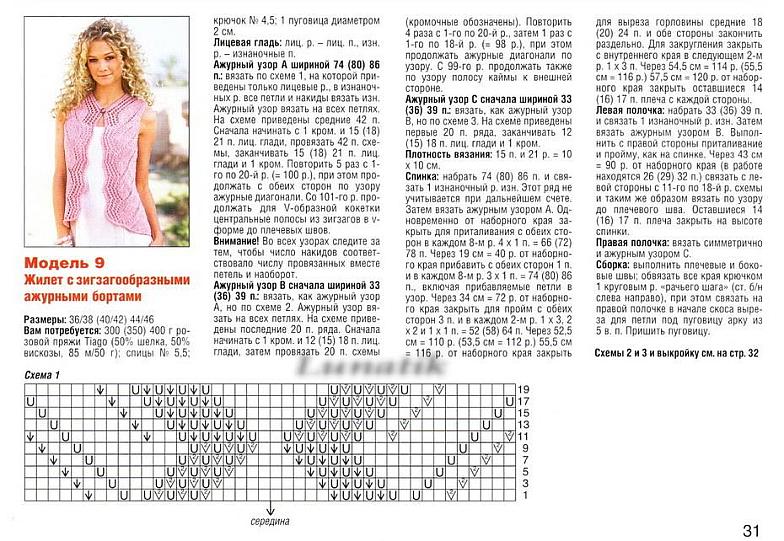
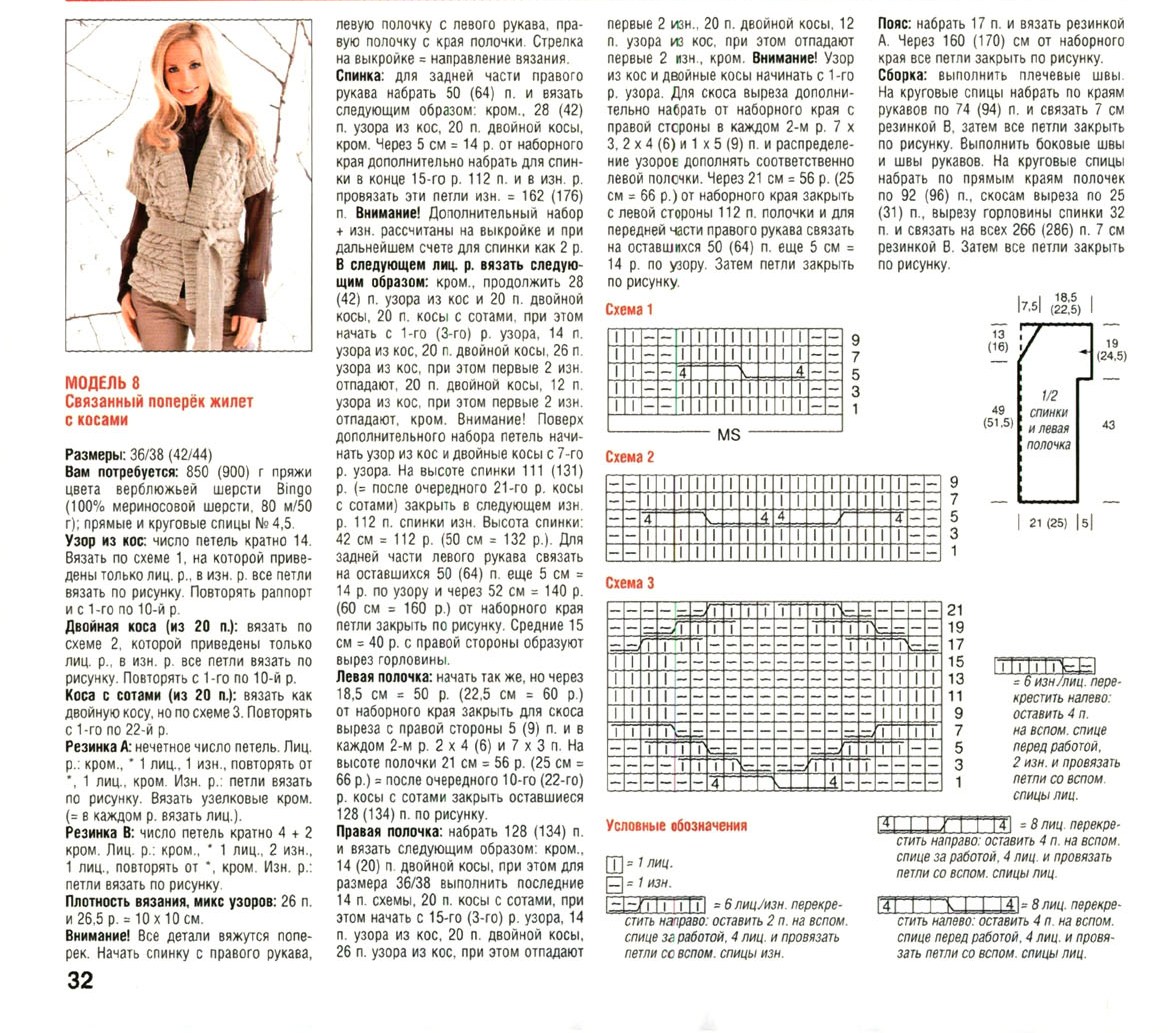
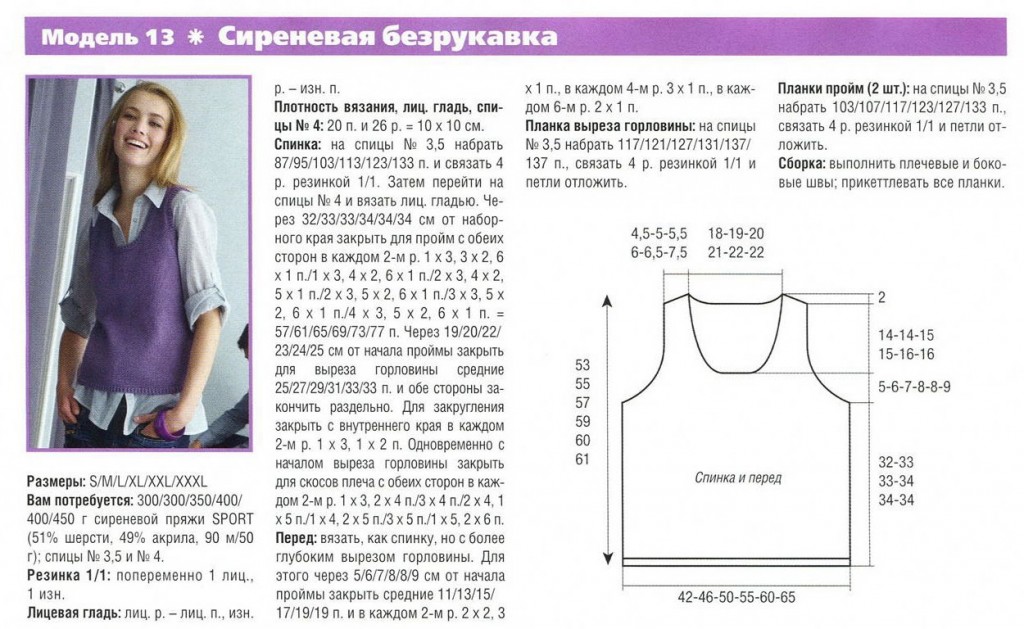
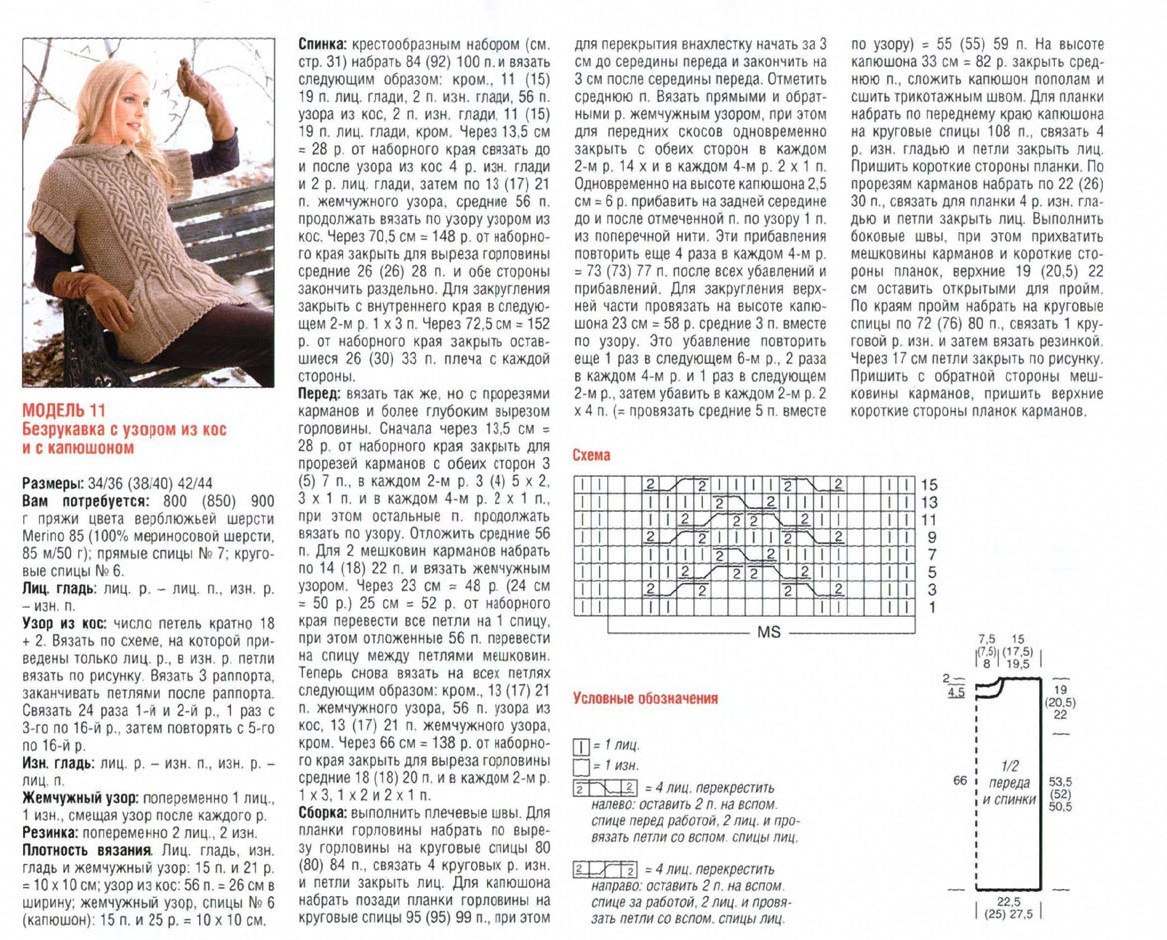
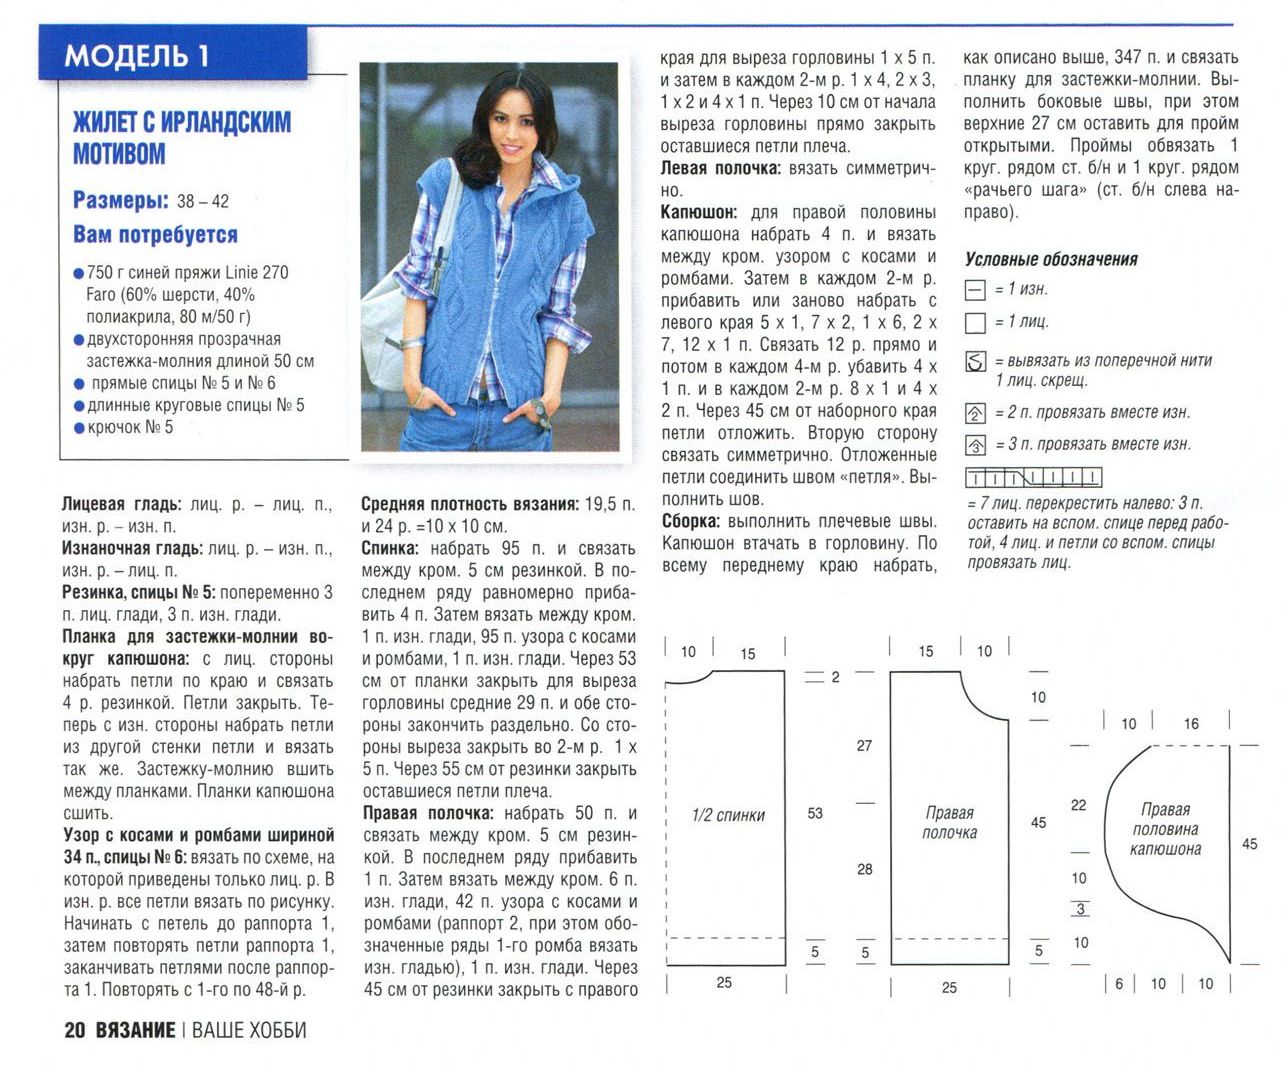
Knitted sweaters and vests for beginners. Women's jacket and vest, knitted with knitting needles. MK with description and diagrams
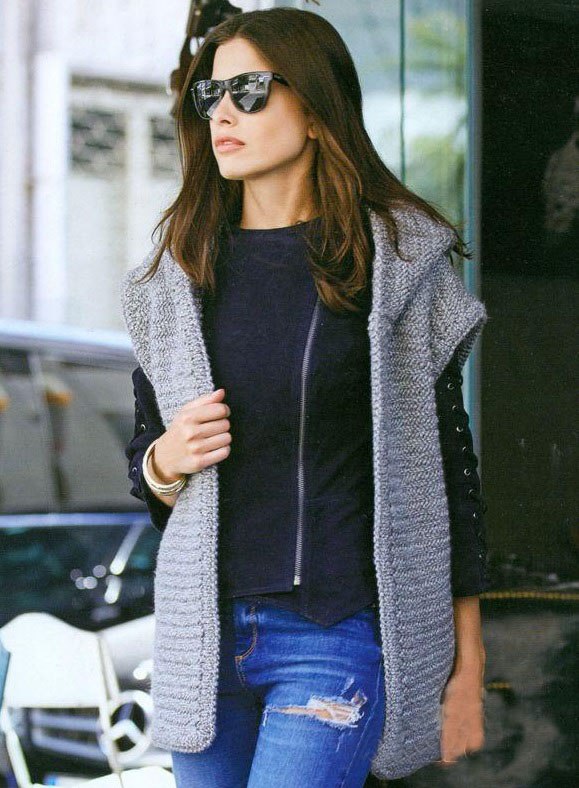
A beautiful, warm, knitted vest for women is a great option for autumn and winter. We offer a choice of 3 interesting vests, one of which will definitely suit your taste and will take its place in your wardrobe. If you know how to knit, even if not very skillfully, we have a great simple option: a gray vest large knit for women.
This stylish vest for women can be knitted with your own hands. The whole charm here is in the simplicity. The knitting is the most ordinary, garter stitch. Due to the thickness of the yarn and knitting needles, the vest looks very interesting.
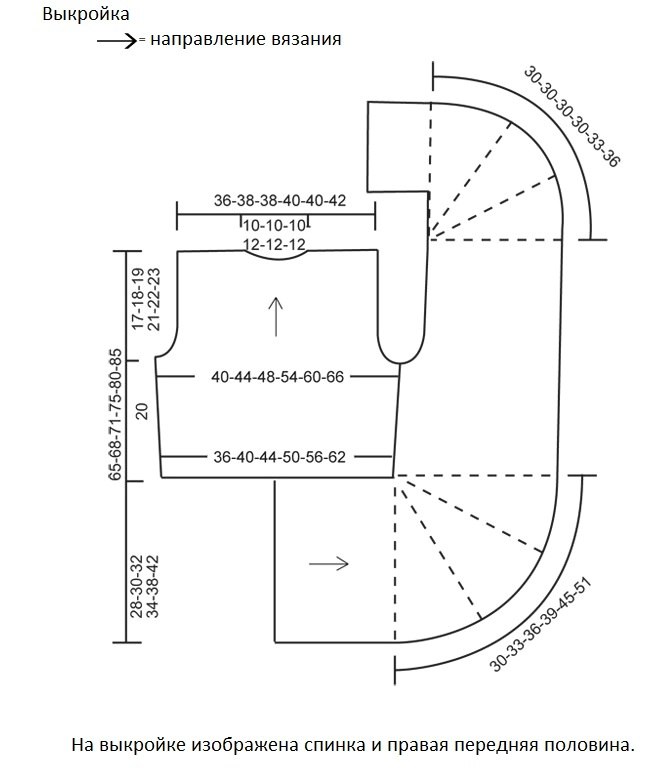
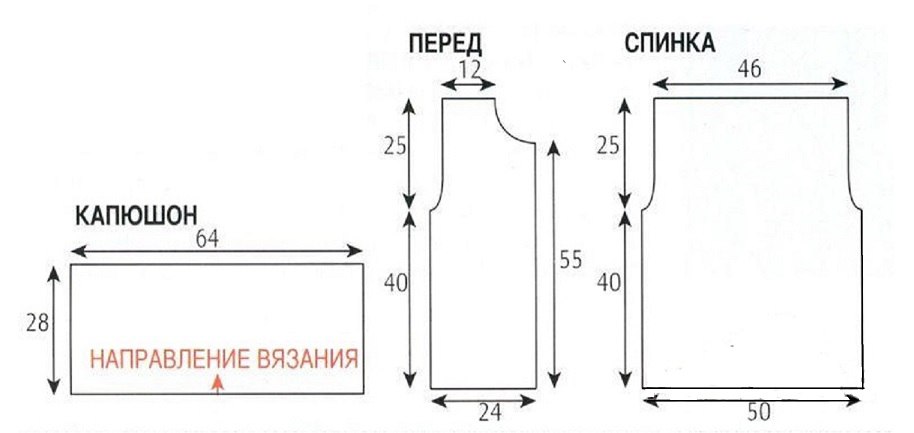
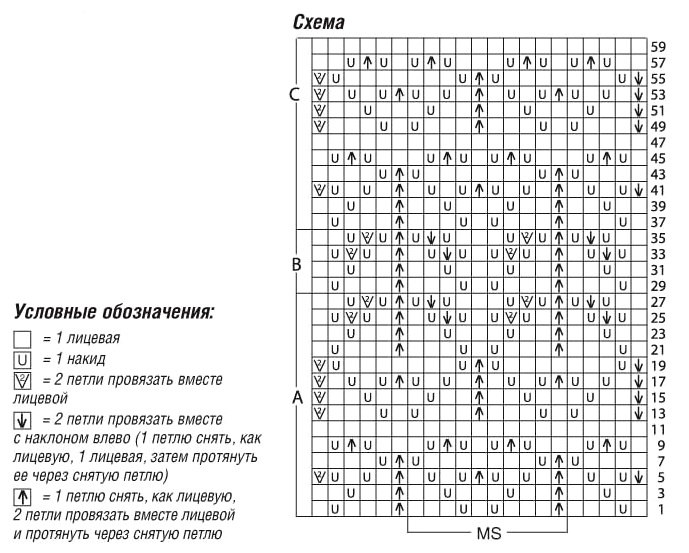
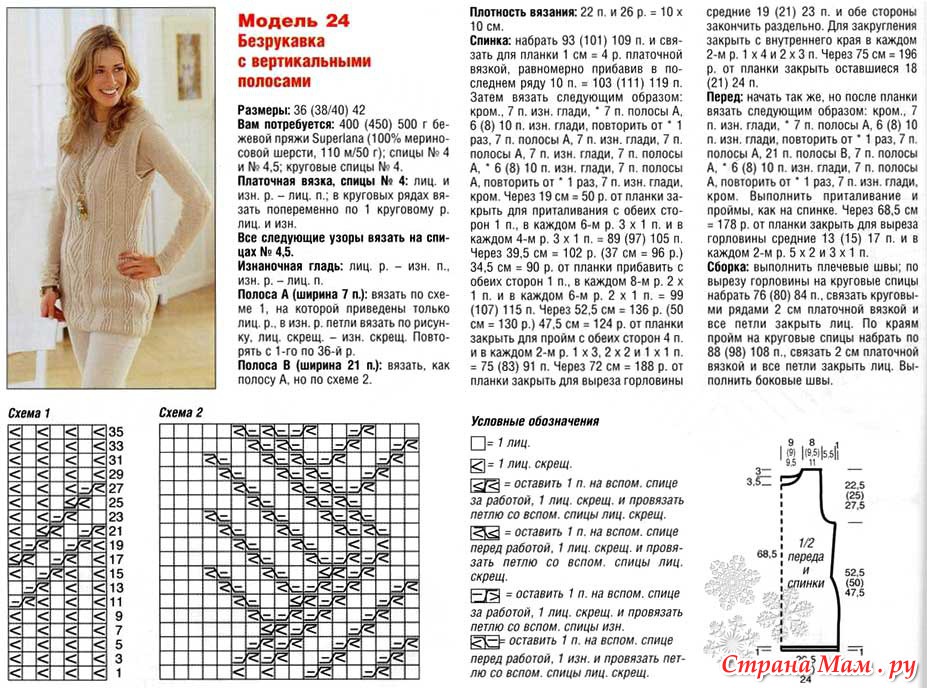
You will need from 600 (depending on the size) grams of thick yarn and knitting needles number 10. In order to find out how many loops we need to cast on in order to knit a vest, take a centimeter and measure the circumference of the hips. We knit a small fragment of 10/10 cm in one row. We look at how many 1 cm loops we got, and multiply by the resulting hip circumference, divide by 2. Please note: the back of the vest is 10 rows longer than the front. Here is the knitting pattern:
The diagram is given for big size(52-54) and tall. You must determine your size yourself; pay attention to the size of the collar: it is equal to the size of the waistcoat front. The diagram shows the places where our sleeveless vest should be sewn.
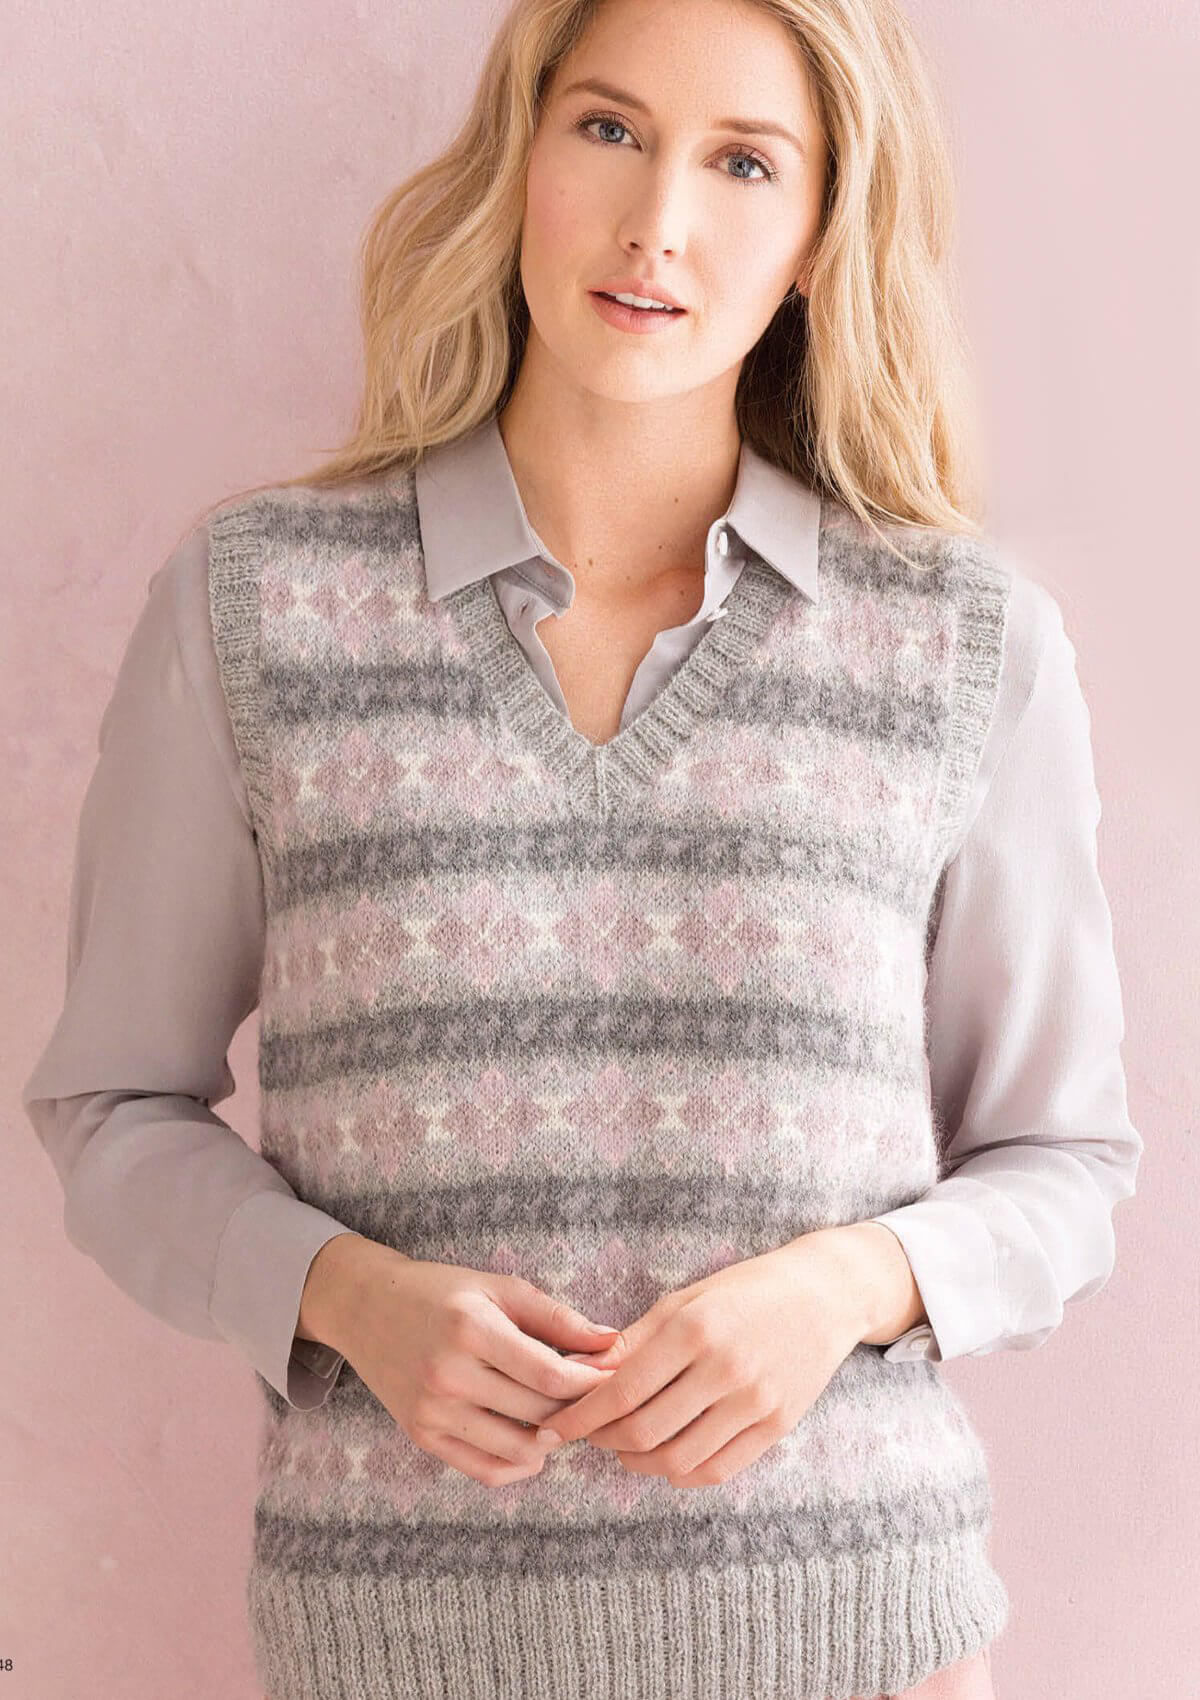
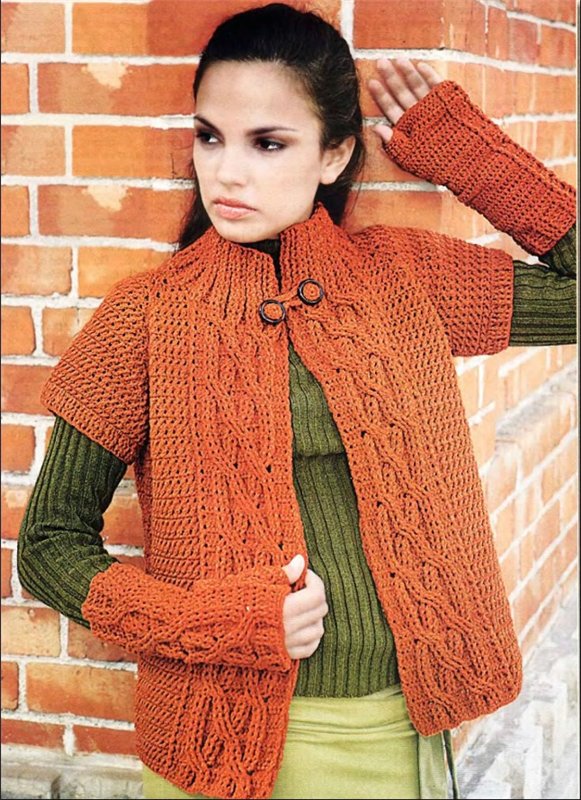
This one is wonderful women jacket This fashionable gray-pink combination will undoubtedly be a gift for women who know how to knit. Alpaca + nylon or alpaca + acrylic and mohair + silk threads are well suited for this sleeveless vest. Knitting is given for sizes M, L, XL, and XXL. Finished dimensions - chest circumference: 101, 113, 124, 134 cm. Sleeveless length: 60, 62, 63, and 64 cm.
To work you will need:
- Alpaca yarn of melange light gray (main) color - 3, 3.5, 4, 5 pieces of skeins weighing 50 grams, each approximately 130 meters long.
- The same alpaca, but in the color of a gray sail - 2 skeins.
- The same alpaca, but white, dark gray, gray-brown and pink - 1 skein each.
- Mohair with silk - 1 skein each, dusty pink and light gray.
- Knitting needles 2.5 mm and 2.75 mm and circular knitting needles 2.75 mm.
- Markers and stitch holders.
- The needle is big.
The knitting density is 30 loops and 34 rows in 10 centimeters. It is best to knit a 10/10 sample so as not to re-tie later. Using the main color of alpaca yarn we knit double rib, armholes and sleeveless neckline. We knit the shoulder using the 3-needle method. All jacquard patterns are made according to the pattern of the front stitch, so that the front ones are on the front side, and the back ones are on the back side. Try not to pull the fabric from the wrong side; the sleeveless vest will look sloppy. Cross the thread from the wrong side so that it does not sag.

Cast on 151, 167, 183, and 199 stitches using 2.5 mm needles using the basic gray color.
1st row: k2, p2, k2, p2. - to the end of the row.
Next, we knit with a 2/2 elastic band about 7-7.5 cm. We switch to 2.75 mm knitting needles.

Start knitting pattern 1: Perform repetitions (rapport) of 6 loops, look at the front part. We continue knitting until the end of the pattern (8th row is the last).
Next, we begin to knit pattern 2: We perform a rapport of 16 loops 9, 10, 11, 12
once. We knit the row to the end. Next, we knit the vest using the pattern until the end of the 17th row. Next, we will continue to alternately knit according to patterns 1 and 2. Each pattern is repeated 4 times. You should get 37 cm from the start of work to the armhole.
Armhole
We continue knitting, alternating patterns 1 and 2. Cast off 6, 8, 10 and 10 loops at the end of every second row, then 4, 4, 6, 8 loops at the end of every second row. Next, bind off 2 stitches at the end of every 6 rows. Decrease 1 stitch on each side, then in each 2nd row another 7, 9, 9, and 11 times. There should be 103, 111, 119, 127 loops left. Next, we knit according to the patterns until the armhole is 21, 23, 23, and 24 cm.
Neck
We knit the next row 33, 35, 37, and 39 loops according to the diagrams, attach the second skein of thread and close the middle 37, 41, 45, and 49 loops. We knit the row to the end. Next, we make both sides of the back of the sleeveless vest at the same time, from two skeins, close each edge of the neck 1 time with 1 loop, and 1 time with 2 loops. We should have 27, 29, 31, 33 loops left. We knit 1 row with purl stitches. We collect the remaining loops on a free knitting needle or pin.
Shelf
The sleeveless vest is half knitted. We knit the front like a back. We cast on the same number of loops as for the back. We knit elastic band 2/2 and further according to the diagrams. Then, after knitting 2.5 cm of the armhole, we finish with a purl row, marking the middle of the front with a bright thread. Continuing knitting and not forgetting to make an armhole, as on the back of a sleeveless vest, at the same time make a neckline.
Shelf neck
We begin the next row, knitting to the middle, marked with a bright thread. We put this loop on a pin and knit the row to the end. The next row is a purl row. We knit 2 sides of the front at the same time, using different skeins of yarn. Next row - decrease 1 stitch from each edge of the neckline. Next, repeat the decrease in every second row 17, 19, 21, and 23 times, in every fourth row 5 times, then in every sixth row - 1 time. 27, 29, 31, and 33 loops remain. Next, we knit according to the patterns without decreasing, until the front ends with a shoulder, as on the back. We knit the shoulders on the front in the same way as on the back. The sleeveless vest should be symmetrical. The shoulders must match in appearance and size. We finish the shoulders at the front and sew the front and back along the shoulder seams.
Sew the side seams with a needle and main thread. Using circular needles, starting from the right shoulder, pick up 46, 50, 54, and 56 stitches along the back neckline. 64, 73, 73, and 76 loops along the cutout of the left front, and the same number along the right. In total there were 174, 196, 200, and 208 loops. We knit with a 2/2 elastic band (knit 2, purl 2). In the middle of the neckline, you need to knit 3 loops together in each row, swapping loops - this is in order to get a neat corner of the neckline. (watch the video). We knit 7 rows, close the loops - the cutout is ready. The sleeveless vest is almost ready. Next, we decorate the armhole: using circular knitting needles, the main color, raise 142, 160, 160, and 166 loops from the bottom armhole. We knit with a double elastic band 2/2, 7 rows, and bind off the loops. We make the second armhole in the same way.

The video shows how to make a V-shaped neckline:
Such a cool peach women's sleeveless vest with a simple pattern will come in handy in cold weather. A sleeveless vest for women will be indispensable and will become your favorite item of clothing. We knit for size L. Knitting density: 20 loops * 28 rows = 10/10 cm.

To work you will need:
- Peach yarn 350 grams (70% wool, 30% pan).
- Knitting needles 4 mm.
- Scissors.
- Big needle.
A wonderful sleeveless vest for women, cast on 114 stitches on the knitting needles. We begin to knit a 5 cm bar with a 1/1 elastic band. Next, we continue to knit in stockinette stitch (knit 1, purl 1, and so on). At a height of 30.5 cm from the beginning of knitting, to form an armhole, first cast off 6 loops, then 8 times, 1 loop in every second row, and 1 time, 1 loop in the fourth row. Next, knit straight with stockinette stitch. To form a shoulder at a height of 53 cm from the beginning of work, close on both sides 3 times, 8 loops in every second row. At a height of 55 cm from the beginning of knitting, bind off the remaining 36 stitches of the neckline.
We put 57 loops on the knitting needles and knit 5 cm with a 1/1 elastic band. Next, with front side: 15 knit stitches, 25 repeat stitches (the pattern is called “tree”), 17 knit stitches. Continue knitting the vest like this.

From 1 loop, knit 3 loops (knit, yarn over, knit), turn the knitting and purl them, turn again and knit 3 loops together:

At a height of 30.5 cm from the beginning of knitting for the armhole, we close 6 loops on the left, then 8 times, 1 loop in every second row, and 1 time, 1 loop in the fourth row. Then we continue to knit straight. To knit a V-shaped neck, at a distance of 32 cm from the beginning of knitting, close on the right side 3 times, 1 loop in every fourth row, 12 times, 1 loop in every second row, and 2 times in every fourth row, 1 loop. At a height of 53 cm from the beginning of knitting for the shoulder, cast off 3 times with 8 loops in every second row. The left front of the vest is knitted in a mirror pattern.

Sew the shoulder seams with a large needle. For the strap, cast on 10 stitches and knit with 1/1 rib. First, at a height of 3 cm and at a distance of 5.5 cm, we make holes for the buttons. The strap has a height of 135 cm. Close the loops of the strap and sew it to the shelves and neckline. We also decorate the armholes with a strap. We raise 122 loops and knit 2.5 cm with an elastic band of 1/1. The sleeveless vest is almost ready. Sew the side seams, sew on the armhole strips. So our delicate peach sleeveless vest is ready.
1. VEST AND FASHIONABLE JACKETS FOR WOMEN. CHOOSE STYLISH KNITTED CLOTHES
In this article we will tell you how to knit an elegant women's vest and original modern jackets that are coming back into fashion. Knitted jacket can be called universal clothing for women with any body type. Using knitting needles, you can knit very beautiful models, choosing braids or diamonds as the main pattern. Today you can easily find schemes with step by step description stages of knitting, thanks to which even a novice needlewoman will be able to knit a fashionable and comfortable jacket with her own hands at home.
Many novice needlewomen mistakenly believe that mastering knitting a vest for women is quite difficult and for a long time they hesitate to knit a model even with a simple pattern. Don't doubt your abilities! If you have already mastered basic knitting skills and know what stockinette stitch and purl stitch are, then be sure to try knitting a vest according to your figure with your own hands.
We already told you in a previous article how elegant . A vest can also be classified as one of the things that will never be out of place in a plus-size woman’s wardrobe! A vest knitted with knitting needles can combine absolutely any set into a single ensemble; it suits the style of different types clothes and very comfortable. Many stylists quite reasonably believe that a correctly chosen model of a knitted vest visually reduces the weight of an overweight woman by 8-12 kg!
Option #2:
Option #3:
Option #4:
Option #5:
Option #6:
We knit fashionable vests for women with our own hands:
Option #1:
Option #2:
Option #3:
Option #4:
Option #5:
FASHIONABLE VEST WITH A WIDE COLLAR, KNITTED IN GERTIAR STITCH WITH THICK SPOKES. PATTERN DIAGRAM AND DESCRIPTION.
Option #6:
Option #7:
ELEGANT WOMEN'S VEST
Beautiful and original knitted vest never goes out of style. With the arrival of the cold season, women use it to create elegant looks that allow them to feel comfortable and look stylish at the same time. But perhaps the biggest advantage of such clothes is that you can knit them with your own hands.
A knitted vest is a type of clothing that even novice needlewomen can knit if desired. If you show a little patience, then literally in just 3-4 days you will be able to boast fashionable thing. For those who have never knitted women's vests, we offer several simple options With detailed description work.
How to knit a women's vest for beginners: diagram with description

Women's vest knitted for beginners: diagram with description
So, if you are knitting your first vest, then you need to start by measuring your body parameters. If you don’t do this, but try to estimate the approximate dimensions by eye, then you will most likely not guess how many loops you need to cast on initially and, as a result, the finished product will turn out to be either large or small.
In view of this, do not be lazy, take a sewing centimeter and measure the circumference of your chest, waist, neck and hips. Also at this stage it is important to decide what depth the armhole will have. Having received all the data, you can compare it with the description, which can be seen a little higher, and understand how many loops you need to start working with. After you figure out this step, be sure to estimate how much yarn you need to buy.
Try to determine the number of threads as accurately as possible, because if you fail to find yarn from the same batch, it will differ from the previously purchased one by several tones. If it turns out that you didn’t guess correctly, then when buying new skeins, be sure to make sure that the same color number is indicated on the label
Amount of yarn you may need for a vest:
- From 40 to 44 sizes - up to 500 g
- From 46 to 48 sizes - up to 600 g
- From 50 to 54 sizes - up to 700 g
- From size 56 to 60 - up to 850 g
How to knit an elongated women's vest: diagram with description
Long vest women's knitting: diagram with description
A long vest will appeal to those women who, in addition to beauty, also value practicality. This item can be called universal, as it will fit perfectly with classic trousers, dresses, and jeans. The only thing you have to remember is that in this case you need to try to select the yarn as correctly as possible.
If you decide to knit a new thing for the warm season, then you need to use thin threads and airy openwork patterns for this. If you are knitting a vest for autumn-winter period, then give preference to thick threads. Just remember that this yarn needs matching knitting needles. In this case, you should absolutely not use thin ones, as you will not be able to knit loops of the same size with them.
In view of this, it will be better if you use thicker knitting needles to knit your new item. You can see how to knit such a thing a little higher. As you can see, everything is done very simply and, most importantly, quickly. Of course, you can deviate from the rules and change the pattern of the vest or, for example, make its bottom more original. If you wish, you can tie it not with a standard elastic band, but with cloves.
So:
- Cast on the required number of stitches and knit one row
- Instead of a purl row, we knit two knit rows, and then make a yarn over
- We knit the next row purl and make a hem using the same number of loops that was used earlier
- Similarly, we knit the required length tightly, and sew the closed loops to the wrong side with an overlock stitch.
How to knit a women's vest with knitting needles for youth: diagram with description
Knitted women's vest for youth: diagram with description

Vest-poncho
As a rule, young people prefer more interesting and original models of vests. The most popular models are the bolero type, as well as the most elongated models. As for patterns for such new items, in this case it is best for you to forget about stocking and garter stitch and try to knit the product with an openwork pattern, cones, stars or large rice.
Yes, they all require a lot of patience and time, but in the end you will get something that will look very beautiful on your figure. As for the color of such models, in this case it is best to give preference to light colors - white, beige, peach, soft pink or sky blue.
All these shades will highlight young age the owner of a vest, thereby making her even fresher and more attractive. Above you can see diagrams describing trendy youth vests that will go well with clothes of any style.
How to knit a long women's vest with knitting needles: diagram
Women's long vest with knitting needles: diagram
Most women think long vest impractical due to the fact that the finished product is heavy. Yes, it used to be like that. But thanks to more modern yarn, even such products turn out to be light and, best of all, beautiful. If your dream is just such a sleeveless vest, then it is best to knit it from different threads, for example, from natural cotton and wool.
If desired, cotton can be replaced with acrylic yarn. Ideally, you should use 50% wool and 50% cotton to create your masterpiece. And remember, in order for your vest to have the correct pattern, you must use skeins weighing 100 g for knitting. In this case, when you introduce a new thread into the fabric, the pattern will not get lost. As for the knitting needles, such a vest is best knitted No. 4.5 or No. 5.
These knitting needles are ideal for creating complex and labor-intensive patterns that are knitted along the entire length of the product. The only exception to the rule is the so-called loose knitting. In this case, you can afford to use needles No. 3.5
How to knit a warm women's mohair vest with knitting needles?
Knitted women's mohair vest: diagram
For those who don't know, mohair is a yarn made from the wool of Angora goats. This material is valued for its strength and beautiful natural shine, which does not disappear even after prolonged wear and frequent washing. But like any wool, this yarn has several disadvantages. For example, the finished product will be prone to shrinkage, so it will only need to be washed in warm water and manually.
Another disadvantage is the appearance of pellets. In view of this, in order for your vest to remain perfect for as long as possible, knit it with threads with minimal fluffiness or insert it into the fabric artificial thread. It is also worth considering that to create patterns you need to choose the right mohair.
So:
- Openwork. It is necessary to knit with the smoothest possible yarn that has a tight twist. If you try to make a similar pattern with wool with long fluff, then the pattern itself will not be visible behind it.
- Harnesses. It is also best to knit with the smoothest wool of medium thickness. This type of knitting should be done with medium-sized knitting needles.
- Jacquards. To create such a pattern, smooth threads of different colors are perfect. They will let you without special labor create a very bright product that has several shades at once.
How to knit a women's vest with a yoke?

Women's vest with yoke
A vest with a yoke is a challenge for beginning needlewomen. Almost all women are afraid to knit such a product because they think it is very difficult to do. In fact, there is nothing complicated about a yoke. If you knit the fabric with classic raglan, the yoke itself will expand along with the product.
You can achieve a similar effect by adding loops to certain points. So that you don’t get confused about where exactly they need to be added, you can take a dark-colored marker and carefully draw four dots with it. But still remember, so that in the end you get exactly what you had in mind; when knitting, be very careful about adding loops. In the first half of the report, knit new elements during yarn overs, making sure that all the loops are the same size.
If you decide to knit a yoke with an openwork pattern, then be sure to balance each yarn over by subsequently decreasing the loops. If you do everything correctly, the vest with a yoke will turn out perfect and, most importantly, will add charm to your appearance.
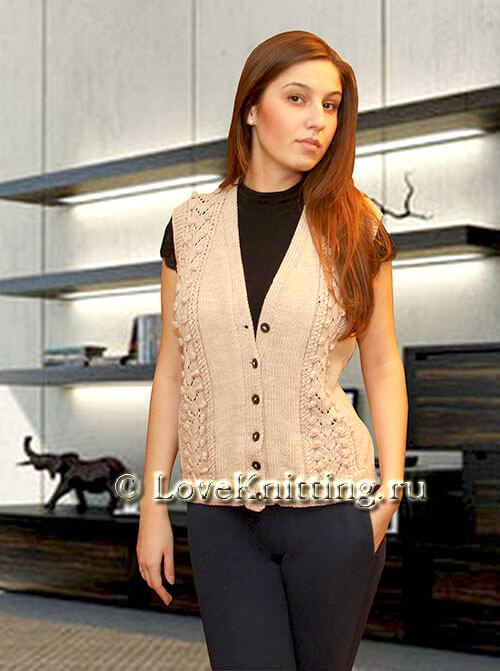
How to knit a women's openwork vest with knitting needles?
Knitted women's openwork vest
Without exaggeration, we can say that the openwork pattern is the most popular among women. They prefer it because it makes the finished product airy and very tender. You can use any thread for this knitting, as long as it is smooth and well twisted.
A loosely twisted thread will not hold its shape correctly and, as a result, the visual perception of the pattern will not be very good. But still, if you want to get the most beautiful openwork vest, then knit it with thin yarn. In this case, you can create even a very complex pattern without special effort. Yes, and don’t forget that some openwork patterns need to be edged with a thick elastic band.
If you don’t do this, the finished product will seem shapeless and, what’s most unpleasant, will deform very quickly. In view of this, if you want to avoid these problems, then be sure to knit an elastic band around the edges of the product. If you want to strengthen the bottom and neck of the vest, then insert a thin elastic band into the yarn when closing the loops.
How to knit a women's vest without a fastener?
Women's vest knitted without fastener
A fashionable women's vest without a fastener can become the most favorite element of your wardrobe. If you knit it from thin yarn with openwork diamonds or stars, you can wear it at any time of the year. Yes, and if you knit a product from separate pieces, then make sure that all rows are symmetrical when sewing.
If you see that in some place the pattern has fallen or risen, then you will need to unravel this part and knit it again. If you do not want to have a similar problem, then at the initial stage create a mirror diagram that will help you not get confused. And finally, I would like to mention one more feature.
Since in this case it is important that the edges of the entire product are elastic, you can close them using a hook. To do this, you will need to pull the hook into the loop, and then pull 1 yarn over into it. By continuing these steps, you will be able to close all those parts that should hold their shape well.
Models of women's vests knitted with large size knitting needles
Model No. 1
Model No. 2
Model No. 3
Speaking of models large sizes, then women have a choice here too. If desired, they can knit both short and long models to suit their figure. The main thing that plump beauties should remember is that in this case they should determine their sizes as accurately as possible and only after that start knitting. Measurements must be taken in such a way that the sewing meter lies freely on the body and does not squeeze it anywhere.
If a woman tries to downplay her parameters, then with a high probability the finished product will fit her more than necessary, thereby deforming the shape and making the design ugly. And, of course, remember that in this case it is best to avoid too loose knitting and voluminous patterns. If you want a vest to make you look more attractive, then knit it using fine or medium yarn in the simplest pattern.
Women's vest with pockets: knitted
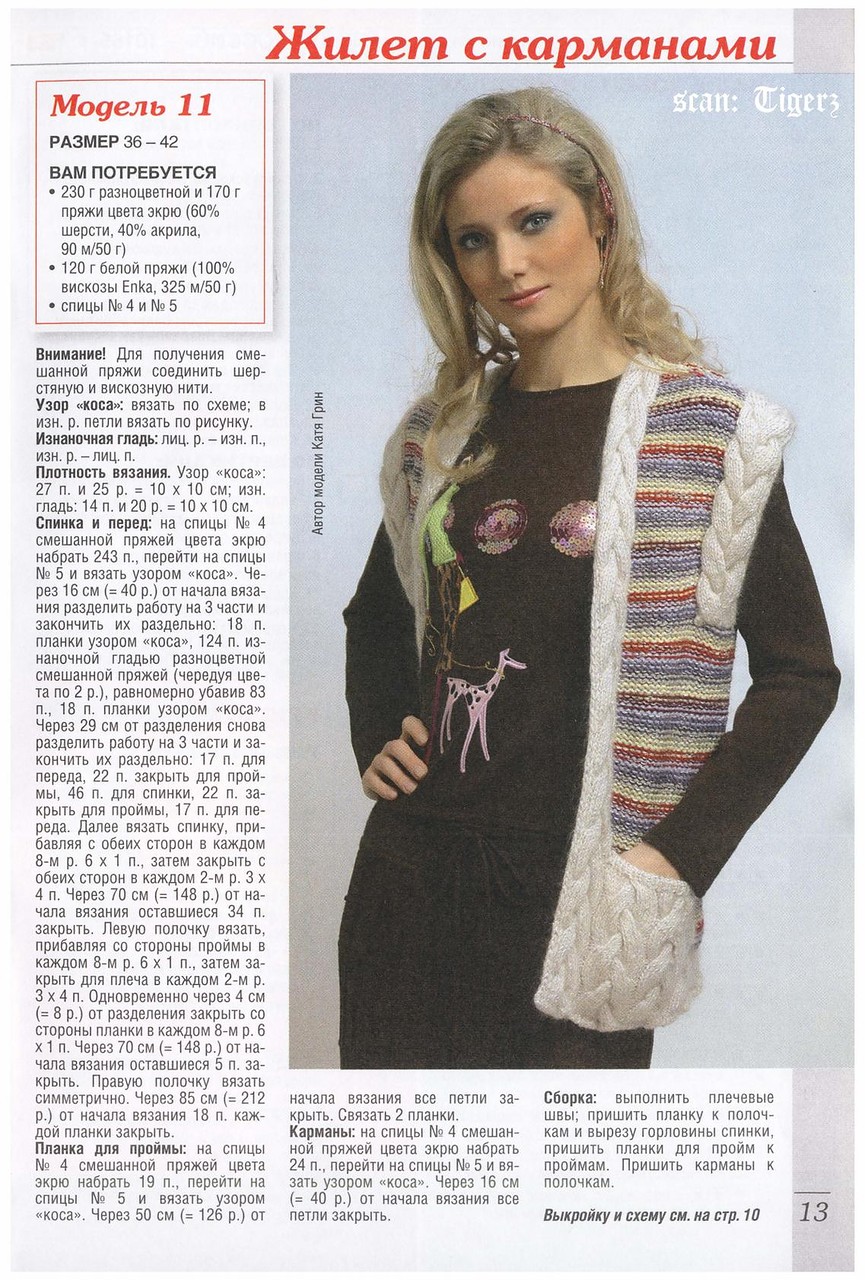
Vest with pockets for women
A little higher you can see how you can knit a women's vest with pockets. As you can see, it is knitted in a standard way without any nuances. All that will be required of you is to knit the fabric of the product, and then knit pockets of the required size separately from it. They can be knitted in the same pattern as the entire product, or knitted in stocking or garter stitch.
The pocket may have a standard square shape, rectangular or even extravagant round. Having knitted the blanks, all you have to do is arm yourself with a hook and yarn of the desired color and fix them in the right place. When attaching pockets, it is extremely important not to overtighten the thread. If it is stretched very tightly, it will begin to tighten the entire fabric and this will immediately begin to deform the entire vest.
How to knit a women's vest with an ornament?
Women's vest with ornament
Norwegian jacquart is considered a classic pattern in knitting. For those who don’t know, these are designs of snowflakes, deer, fir trees and stars of different sizes, which are knitted in a darker or lighter shade than the main fabric. In this case, you will need to insert the required thread into the row being knitted in time, and also remember to pick it up from there in the right place. At first glance, it may seem to you that this is very difficult, but when you get the hang of connecting two threads together, the pattern will be knitted almost instantly.
If you want to decorate your vest with a heart, flower or any other shape, then simply draw it on a checkered sheet of paper, and then highlight more dark color outline of the ornament, and based on this diagram, transfer everything to the canvas of the product. Yes, and remember that you also need to be able to place the ornament correctly. If you do not want your product to look too extravagant, then decorate the pockets, neck or hood of the product with it.
How to knit a women's vest from grass yarn?
Women's vest made of grass yarn
Grass is a yarn with a pile of at least 5 mm. Due to the fact that it is made of polyester and lurex, it is painted in the brightest, and sometimes even acidic colors. In view of this, if you want to knit an original and memorable thing with your own hands, then this yarn is just what you need. A big advantage for beginning needlewomen will be that when using such yarn, you will not need to knit the product with a complex pattern.
Since it will still be covered with pile, there will simply be no need for this. Therefore, you don’t have to bother and knit the vest using stocking or garter stitch. Also remember that such threads do not like thick knitting needles. As practice shows, the loops end up being too loose, which makes the fabric almost shapeless. In view of this, it will be better if you knit your new thing with thin knitting needles.
How to knit a women's vest with buttons?
Women's vest with buttons
Probably the most difficult thing for novice needlewomen to understand is how to immediately make buttonholes for buttons while knitting fabric. If you are doing this for the first time, then give preference to the so-called hole loop. It is done very simply. Knit the edge of the fabric with a placket, alternating knit and purl stitches.
Yarn over in the right place and knit a purl loop together with the one located next to it. Knit another loop in this way, and then return to the desired pattern. If you do everything correctly, a round hole will form on the canvas, into which a small button can easily fit.
How to knit a women's vest with a hood?
Women's vest with hood
If you have not yet learned how to knit a hood along with the entire product, then you can simplify your task and make it separately. First, knit the vest, and then use a sewing meter to measure the length of the neckline. Having received this data, start knitting a rectangular fabric, using the same pattern as for the vest.
The height of this canvas should exactly match the height of your head. If you want the hood to form beautiful wavy folds, then add 3 cm to the above indicators. When the fabric is ready, secure it to the neck of the vest with a hook and yarn.
Photos of models and styles of beautiful creative knitted women's vests: images

Women's vests
Loose vest

Women's vest with hood
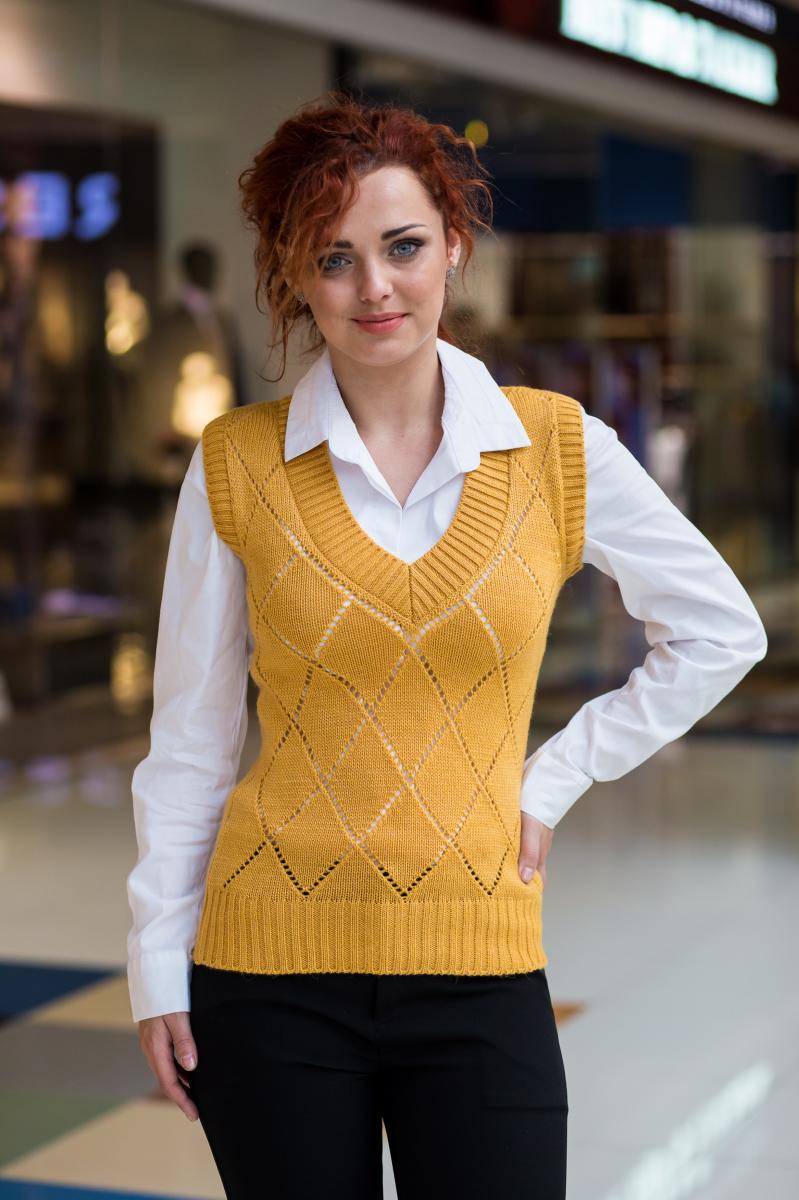
Office model
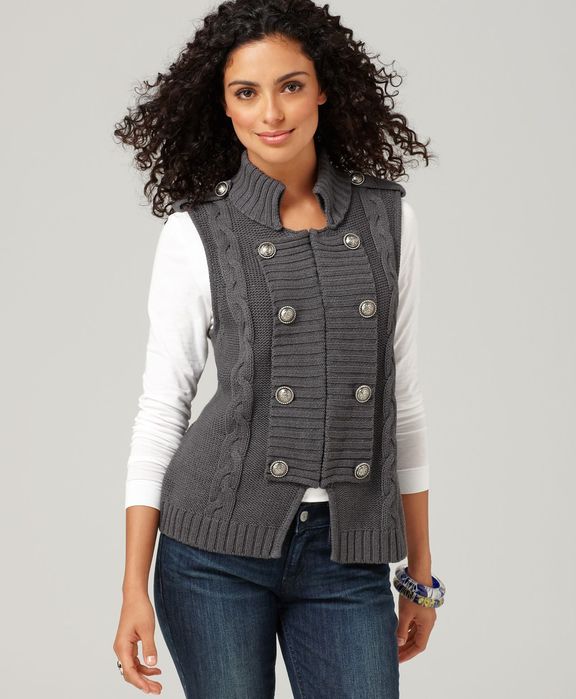
Stylish vest
Knitted vests and sleeveless vests have firmly established themselves in stylish wardrobes real fashionistas. Classic styles, fashionable and original models, round or V-neck – there are many models. Sleeveless vests can be worn as an addition to your everyday look, or as a key element of your office outfit.
Things knitted from such yarn are very original. Ladies of any size can wear them. But, given the texture of the yarn, it is better not to use it for overweight women. And for slender girls, grass models are just a godsend! No need to knit them highly qualified knitters, since the patterns used are very simple.
Sizes: S; M; L; XL.
We will need:
- grass type yarn, 100% synthetic, (100g per 18m), Brown– 800; 900; 1000; 1100g;
- regular yarn, melange, grass color, containing 60% acrylic, 40% polyamide (50g per 80m) – 350; 350; 400; 450g;
- knitting needles No. 4.5 and No. 8;
- hook No. 4.5.
Patterns:
- elastic band: 2 knits. X 2 purl. – knit with needles No. 4.5;
- persons smooth surface: in faces. rows - knit stitches, purl stitches. rows - purl. Knit with needles No. 8.
Alternating stripes: 2 rows with grass yarn / 2 rows with regular yarn.
Technique for performing decreases
In the process of work, we will need to make decreases of 1 p., retreating by 2 p. from the edge. The algorithm is as follows: at the beginning of the river. – we knit 2 p., then from 2 p. we knit 1 p.; at the end of the river – when we have 4 stitches left on the knitting needle, we knit 1 broach (remove 1 st. knit, 1 p., pull it through the removed one), 2 p.
Density: face. smooth sp. No8 10p. for 13r. equal to 10 cm by 10 cm.
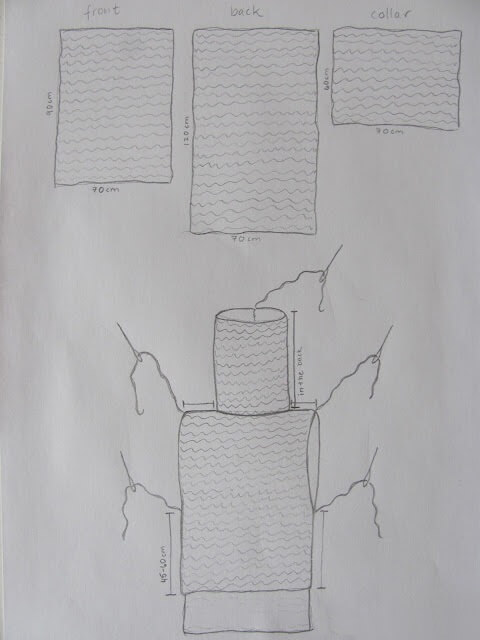
Description - how to knit a vest with your own hands
![]()
Back
We start knitting the pattern with set 68; 74; 80; 88p. smooth yarn with knitting needles No. 4.5. We knit 18 rubles. elastic bands (about 7cm). In the last row we make decreases of 20 at equal intervals; 22; 24; 26p. That leaves us with 48; 52; 56; 62p. Next - persons. satin stitch using No. 8 knitting needles with alternating stripes of regular yarn and “grass” (see explanation above). In every 4th row on both sides, not reaching 2 sts to the edge, add 1 st. three times, then twice more, 1 p. in every 2nd row; twice 1p. in every 6th p., three times 1 p. in every 4th r.; 2 times 1 p. in every 6th r., 3 r. 1 p. in every 4th r.; 2 rub. 1 p. in every 6th r., 3 r. 1 p. in every 4th r.
We continue knitting sleeveless vests for women using the existing 58; 62; 66; 72p. After 70; 72; 72; 74 rub. (this is about 47; 48; 48; 49 cm) from the beginning of work, we reduce the shoulder bevels on the sides of the p., retreating 2 p. from the edge. Decrease pattern: 5 times 1 p. in every 4th p., 5 times 1 p. in every 2nd row, every other row - 1 time in 5 stitches, every other row - 1 time in 6 stitches; 5 times 1p. in every 4th r., 6 r. 1 p. in every 2nd row, every other row 1 time in 5 stitches, every other row 1 time in 6 stitches; 5 times 1p. in every 4th p., 7 times 1 p. in every 2nd row, 2 times 6 p. in every 2nd r.; 5 times 1p. in every 4th; 8 times 1 p. in every 2nd r.; then in every 2nd r. 1 time 6 p. and 1 time 7p.
In the series of performing the last lateral decreases for rolling out the closed. central 12; 14; 14; 16p. and finish the resulting sides separately. To round the rollout from its inner side, close it 1 time in 2 stitches.
Before
Left half front of sleeveless vest
We cast on with knitting needles No. 8 13; 15; 17; 20p. yarn from "grass". We knit faces. satin stitch, alternating stripes. On the right side of the part we make increases, as on the back. On the left side, retreating 2p. from the edge, add 4 times 1 p. in every 2nd p., 3 times 1 p. in every 4th r. We get 25; 27; 29; 32p., continue knitting evenly on them. After 46; 48; 48; 50 rub. (this is about 35; 36; 36; 37 cm from the beginning of the work; for rolling out, we decrease along the left side of the loop, retreating 2 points from the edge.
The scheme is as follows: 4 times 1 p. in every 8th r.; 3 times 1 p. in every 6th p., 2 times 1 p. in every 8th row; 3 times 1 p. in every 6th row, 2 times 1 p. in every 8th row; 3 times 1 p. in every 6th row, 3 times 1 p. in every 8th row. For the shoulder bevels, we perform decreases using the description for the back of the sleeveless vest. Closed n. at the height of the back.
Right half front of sleeveless vest
Strap of the right half of the front and 1⁄2 rollout of the back neck
We cast on with regular yarn using knitting needles No. 4.5 190; 200; 210; 220p. and knit an elastic band. In 20r. (this is 9cm) from the beginning we put a stitch on the left side in every 2nd r. 1 time 160 p., 2 times 7 p., 2 times 8 p.; 1 time 168p. 4 times 8 p.; 1 time in 176 p., 2 times in 8 p., 2 times in 9 p.; 1 time in 184 p., 4 times in 9 p. Knit one row on all stitches, closed. All P.
Plank of the left half of the front and 1⁄2 rollout of the back neck
Performed in a mirror manner to the previous part.
Assembly
We sew the shoulders. We sew the strips along the bottom edge, then along the front halves to the center of the rollout on the back. We join the edges of the planks and sew them with a knitted seam. We sew the sides, leaving gaps for the armholes - 23cm each. We crochet the edges of the armholes with 1 row of connections. columns. For the ties, we collect a chain of air stitches 40 cm long. Then we knit 1 connection. stitch in the 2nd stitch of the chain and in each next stitch. Sew the strings to the back. side of the slats, retreating 9 cm from the beginning of the neck rollout.

The next model of a sleeveless vest for women is knitted from yarn with a pronounced “fur” effect. A large percentage of mohair in the thread makes the sleeveless vest warm enough to be worn instead of a jacket. The range of sizes allows you to knit a vest for graceful and plump women.
Stylish azure vest with knitting needles: video MK
Sleeveless vest knitted from bouclé yarn

Sizes: S; M; L; XL; XXL; XXXL.
We will need:
- boucle yarn, composed of 94% mohair, 6% polyester (50g per 50m) – 550; 600; 650; 700; 750; 800g;
- knitting needles No. 7.
Patterns:
garter stitch: knit all stitches in all rows.
Density: 10p. for 20r. equal to 10 cm by 10 cm.
How to knit shortened rows K1– explanation for beginners:
1r. and 2p.: tie 26; 28; thirty; 32; 36; 40p., turn the fabric. Knit a purl row;
3 rub. and 4p.: knit 24; 26; 28; thirty; 34; 38p., turn the fabric. Knit a purl row;
5 rub. and 6p.: tie 22; 24; 26; 28; 32; 36p., turn the fabric. Knit purl p.
Next, we knit straight and reverse rows on all loops. We got 10 each; eleven; 12; 13; 15; 17 pairs of rows (straight + reverse) made on the outside and one pair of rows - on inside sleeveless vests.
The rounded side on the outside has a length of 30; 33; 36; 39; 45; 51cm, and on the inside - 2cm.
How to knit shortened rows K2– explanation for beginners:
Short rows are knitted to round the front edge. The scheme is like this:
1r. and 2p.: tie 26; 27; 27; 27; 28; 30p., turn the fabric. Knit a purl row;
3 rub. and 4p.: knit 24; 25; 25; 25; 264; 28p., turn the fabric. Knit a purl row;
5 rub. and 6p.: tie 22; 23; 23; 23; 24; 26p., turn the fabric. Knit purl p.
We continue, repeating this simple algorithm: each time we knit by 2p. less until you get 10 stitches on the left needle. On these 10p. We knit the straight and reverse rows once.
Next, we knit straight and reverse rows on all loops. We got 10 each; 10; 10; 10; eleven; 12 pairs of rows (straight + reverse) performed on the outside and one pair of rows on the inside of the sleeveless vest.
Repeat three times, starting from 1st.
The rounded side on the outside has a length of 30; thirty; thirty; thirty; 33; 36cm, and on the inside - 2cm.
How to knit a vest with fur yarn - diagram and description for beginners
Vest back for graceful and plump women
We cast on fur yarn 36; 40; 44; 50; 56; 62p. and knit a scarf pattern at 6cm height. Next row on both sides add 1 stitch. We repeat the increase after 6cm. We got 40; 44; 48; 54; 60; 66p. 20cm from the start of knitting for closed armholes. at the beginning of every day 3p on both sides. 0; 0; 1; 1; 1; 1 time, 2 p. 1; 1; 0; 1; 2; 3 times, 1 p. 0; 1; 2; 2; 3; 3 times. We end up with 36 in total; 38; 38; 40; 40; 42p.
At model height 35; 36; 37; 39; 40; 41cm closed central 8; 8; 8; 10; 10; 10p. to roll out the neck and finish the resulting parts separately. By inner edge roll out closed 1 p. next row. There are 13 left on each shoulder; 14; 14; 14; 14; 15p. At altitude 37; 38; 39; 41; 42; 43cm closed all the loops.
The right half of the front of the vest for graceful and plump women
All measurements are taken on the short side of the part!
We cast on fur yarn 28; thirty; 32; 34; 38; 42p. We knit a shawl pattern for 16; 18; 20; 23; 26; 29cm height. Then we proceed to the shortened rows of K1 for faces. side - see description above.
After 3 repetitions of shortened rows, we continue to knit garter stitch on all stitches.
In the future, we will take measurements from here. After 6 cm and after 12 cm we add 1 stitch. on the short side. We have 30; 32; 34; 36; 40; 44p. For an armhole at a height of 20cm closed. loops according to the description of the back at the beginning of each row. from the short side. We have 28; 29; 29; 29; thirty; 32p.
We continue to knit a shawl pattern with fur yarn up to a height of 35; 36; 37; 39; 40; 41cm.
Next, we begin to perform shortened rows K2. Having completed knitting all the shortened rows, we obtain the height of the part 37; 38; 39; 41; 42; 43cm on the short side. Next R. on the wrong side of the closed initial 13; 14; 14; 14; 14; 15p. under the shoulder. The remaining 15; 15; 15; 15; 16; 17p. knit with fur yarn to a height of 5; 5; 5; 6; 6; 6 cm with a scarf pattern (measured from the shoulder) - this will be the collar. Closed P.
The left half of the front of the vest for graceful and plump women
It is made using fur yarn in a mirror image of the previous part.
Assembly
We sew the shoulders. We make the side seams. Using a knitted seam, we connect the halves of the collar and sew it to the main part.
Vest made from sectional yarn: video master class
Long women's vest with hood
A very practical clothing option for the off-season. An elongated vest with a hood is ideal to wear on autumn days with changeable weather. With such a sleeveless vest, you are always protected from sudden cold snaps. It can be knitted from mohair or wool with the addition of synthetics.
A special feature of this simple model is the use of large knitting. The fishbone pattern may seem difficult for beginning knitters. In fact, once you figure it out, you will understand that knitting this pattern with your own hands is not difficult.
Sizes: 38/40.
For this model we need:
- yarn containing 50% wool, 50% acrylic (100g per 240m) – 1100g;
- knitting needles No. 6.
Patterns:
- persons smooth surface: in faces. rows - knit stitches, purl stitches. rows - purl;
- fishbone pattern:
1r.: 1kr., right sp. insert into two loops, pull out k1, remove the 1st of the knitted stitches, leaving the 2nd on the left knitting needle. Through the remaining st and the next one we again thread the right sp., pull out 1 l., remove the first of the knitted sts, leaving the second loop on the left knitting needle. We continue like this until the end of the row;
2p.: according to the principle of the first row, only with purl loops.
For beginner knitters - see video
We knit a long women's vest with a hood - detailed description
Front sleeveless vest with hood
We cast on with knitting needles 61 sts. and perform 40cm of coarse fishbone knitting. Next row on the outside under the closed armhole. in even p. 3p., 2p., 1p.
At a height of 55cm internally. edge for rolling out closed in even p. 4p., 3p., 2p., and 3 times 1p. 65cm closed all loops.
Knit the second part of the front in a mirror manner.
Back of sleeveless vest with hood
We cast on with knitting needles 111 sts. and perform 40cm of coarse fishbone knitting. Next row on the sides under the armhole closed. in even p. 3p., 2p., 1p. 65cm closed all loops.
Hood
We cast on with knitting needles 99 sts. and perform 28cm of large fishbone knitting. Closed p. For the strap along the front edge of the hood, we lift the loops evenly with our hands and knit 5p. persons satin stitch Then - 1 rub. purl stitches (this will be the fold line). We knit 5 rubles again. persons satin stitch Closed loops. We fold the strip outward along the fold line and hem it. We make the same strips along the edges of the armholes, the front edges of the shelves and the bottom of the model with a hood.
Openwork long women's vest
Summer vest models look very stylish. They are fashionable to wear with trousers, tight skirts, even shorts! They are suitable not only for thin, but also for plump beauties: while hiding the flaws of the figure, such models will favorably emphasize its advantages. An openwork elongated version of the vest can be worn even for beach walks - with it your look will be very romantic!

Sizes: 38-40; 46-48.
- To knit an openwork vest with your own hands we will need:
- yarn containing 40% viscose, 30% cotton, 20% linen, 10% polyamide (50g per 125m) – 500; 600g;
- knitting needles No. 4.5;
- hook No.4.
Patterns:
- openwork pattern A.: performed according to the diagram. The number of points is a multiple of 10 + 1 point + 2 cr. The diagram shows persons. rows. In purl r. Purl all loops and yarn overs. The first and last stitch in the row is the edge stitch. Between them are repetitions of rapport. In height it is knitted once with 1p. 28 rubles each;
- openwork pattern B: tie like a knot. Ah, but repeat in height from 29 rubles. 36 rubles each;
- openwork pattern C: tie like a knot. Ah, but repeat in height from 37 rubles. 60 rub.
Sequence of patterns: the first pattern is 28 rubles, then 128 rubles. the second pattern, then 52 rubles. third pattern. There are 208 rows in total.
Density: 20.5p. for 24.5 rub. equal to 10 cm by 10 cm.
Description

Back
We dial 113; 133p. and do 1p. facial This row will be purl; we will not take it into account in further calculations. We continue to knit, alternating patterns. Through 156r. (63.5cm); 146 rubles (59.5 cm) on both sides for sleeves 1 time 10 stitches. and include them in the pattern. We have only 133 (153) points. After 194p. (79cm) from the beginning of the close. for the shoulder line on each side 1 time 7; 8 p., then in every second p. 1 time in 7 p., 5 times in 6 p.; 1 time in 8 p., 5 times in 7 p. Through 208r. (85 cm) from the beginning we will have 45; 51p. Of these, central 33; 37p. – neck rollout, the remaining 12; 17p. – shoulders (2x6p.; 7p.).
Left shelf
We dial 63; 73p. and do 1p. facial This row will be purl; we will not take it into account in further calculations. We continue to knit, alternating patterns. We make additions to the sleeve according to the description of the back. In total we have 73; 83p. Through 158r. (64.5 cm) from the bottom of the close. under the rollout bevel on the left side 1 time 1 p., then in every 2nd p. 22; 24 times 1 p. Don't forget to make decreases along the left edge for the shoulder bevel. To do this, we use the description of the back. At the same height as the previous part, closed. 6; 7p. for the shoulder.
Right shelf
We knit as the previous part, only in a mirror way.
Assembly
Sew the shoulders and sides. Sew the sleeves. We crochet the vertical edges of the shelves and the neckline, performing 1 p. connecting posts.
How to knit a vest for any size: video mk
Selection of schemes


![]()