What is light in photography. The role of light sources in lighting design
Hello! Welcome, Timur Mustaev. The topic of interaction with lighting - rules, schemes, views, etc. - should be in the first place for every photographer. I guess that many of you have heard about the main source of light, that is, the one that creates the drawing itself on the object.
But he is far from the only one, not knowing about others, it will be difficult for you to create a good photo. Moreover, the shooting conditions are different. So how many have heard fill light in photography? What does he mean?
I'll start by briefly identifying the important fluxes of light. There are four types that can be combined as you like:
- Drawing(RS) is the main and most powerful light source in the pavilion. The sun can be seen as its counterpart in a street photo shoot. The PC is clearly directed towards the model and creates a basic play of light and shadow.
- Filling... More about it below.
- Background(FS). One or two fixtures are placed directly in front of the background. FS is needed for highlighting, changing the tone or color effect in the background.
- Modeling... It is often directed at a detail, such as the hair of the model. It makes them stand out with golden highlights. The size of this light beam can be adjusted.
You can also note the so-called, or back modeling. In this case, the light lines highlight, for example, in a portrait photo the shape of the head and body. The model is thus separated from the background.
Types of light: fill
We now turn to the complete characterization of the filling light flux (LS). It is considered subsidiary and less powerful. It is not always used, but when it is necessary to create uniform illumination on an object (model) or on an entire specific area.
Do your photos have a lot of unwanted shadows and generally strong contrast? ZS is definitely what you need. In addition to softening the transition from light to shadow, it also makes the volume more pronounced, and gives the faces a realistic roundness. In most cases, this kind of filling with light evens out the tonal properties of the object.
What features can be used to understand that the light (device) is exactly filling?
- Wide angle of dispersion. It depends on the selected attachment.
- Low luminous intensity. The power on the device can always be reduced.
- Soft light is provided by the fabric surface of the ZS.
- The inner reflective surface is usually matt.
How do you get this kind of light?
In order to obtain such indicators, special materials are used for the ES. In particular, it should be a large softbox, i.e. the device is square, elongated rectangular (street-) or polyhedron (octobox), and a stream of light passes through the fabric.

Unlike rigid reflectors, such a box simulates natural light from a window. Sometimes, for additional softening of shadows, photo umbrellas or a large white canvas are used.
Mostly we talked about the design and possibilities of lighting in studio rooms, but different lighting equipment can be used outdoors. They are easy to move and easy to handle: catch the beam and bounce it onto a little or unlit part of the subject. As you can imagine, they act with reflected light.
Fill light is also created. Reflectors can be white, silver, gold or black. White is considered the most neutral and versatile, while black is needed to absorb light.
Colored options are not for everybody, so silver gives a colder, metallic tone, and golden - a warm one, enhances yellow shades. Windows, light walls and ceilings are also examples of reflectors that we have at our fingertips.
Light layout
And finally, a little about the layouts of light sources, of which there are a great many, and they depend on the purposes of photography. The most convenient order of turning on the light is as follows: first painting, then to the background and, if required, filling, modeling.
Once you can take only one of them, for example, drawing, sometimes two of the same - for a special dramatic shot, and, sometimes, all at once.

The last combination is considered the most difficult, because you need to set the devices so that the light of one does not interrupt the other. Especially it is necessary to watch so that there are no double shadows that arise, at times, in the presence of RS and ZS. The fill source must not be visible to the viewer.
Directly, the ZS can be installed in the front or diagonal (at 45 degrees) position to the model. It is believed that this is the best way to work on softening shadows and contrasts. For example, the model is in the center of the room, with a key light on the right and a fill light on the left.
In this case, the background is illuminated from two sides, and a modeling one is turned on behind the person. The tripod height of the instrument is also adjustable. The classical scheme includes fewer sources - three, and always with filling, in addition to PC and FS. In this case, the ES can be positioned both sideways and frontally - depending on the location of the main source and, it turns out, as if in opposition to it.
If you have a studio with good window light, use it to fill in the shadow areas. Only the windows will have to be covered with a cloth. And now you get even soft lighting! A great option is a window as a painting source, and additional lighting is a fill one. In principle, built-in and external flash units are capable of performing this task well.
That's all for me. Goodbye readers! Learn, practice. And remember, light creates photography!
All the best to you, Timur Mustaev.
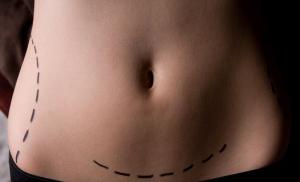
What is fill light for?? In order to fill in the shadow areas of the subject, highlight it. If we are shooting a subject in a studio, there is no natural backlighting. The main light source, which creates the so-called key light, illuminates only one side of the object. All other parts of it remain in the dark. This results in high contrast, that is, a sharp difference in the brightness of the subject. This, in turn, leads to a loss of detail in both shadows and highlights. In order to get away from all this, fill light is used. Fill light gives the object plasticity, softness, it illuminates the shadow areas of the object.
We can constantly observe how the fill light works in our daily life. This seems natural to us, and we do not attach any importance to it at all. For example, looking at the trunk of a thick tree on the street, we see not only one side of it illuminated by the sun, but also those areas that are in the shade, we distinguish the texture of the bark, its color. In nature, shadows are illuminated by light that is scattered by a layer of air and reflected from surrounding objects - asphalt, walls of houses, etc. In rooms, natural light is supplemented by light reflected from light surfaces - walls, ceilings.
Fill light is diffused light, as soft as possible. The device emitting it can illuminate the object being shot with the so-called "open lamp". In this case, the luminous flux coming from the device is directed directly to the object. When the lamp is open, a soft filter or a special diffuser must be installed on the device. There is another type of fill light - reflected light. In this case, the flow of light is directed not to the object, but to some surface, and, already reflected from it, hits the object and illuminates its shadow areas. And in this case, the principle of the diffused light flux is also preserved.

The fill light fixture is usually installed close to the camera, on the same side as the key light fixture. If you set the fill light fixture in such a way that the light emanating from it becomes opposite to the painting flow, double shadows will appear on the subject, which will spoil your shot.
The fill light should not be noticed by the viewer. You cannot make it give its own shadows, different from the shadows of the main, painting light. But sometimes this fails and the fill light shadows become very active. This happens, for example, if the studio is cramped and the background is close to the subject. In this case, you need to apply some trick and build the frame in such a way that the viewer does not see your flaws.
The quality of shadow illumination is not only the technical side of photography, it is also the desire to find the most vivid, interesting light pattern. The nature of the illumination of the object mainly depends on the strength of the filling stream of light, and, naturally, the result itself is the picture itself, the degree of its aesthetic impact on the viewer. For example, it is easy to turn the "day" version of object illumination into "night" by just changing the intensity of the fill light, while leaving the direction and intensity of the key light unchanged. The reverse process is also possible. Thus, we came to the conclusion that fill light is one of the tools that allows you to influence the contrast of an object's image. Ideally, you should strive to ensure that the viewer perceives one light source in the picture, and not several.
In nature, fill light is also used to illuminate the shadows of an object. The direct and bright light of the sun makes the object overly contrasting, the shadow areas in this case are practically not worked out. Here you can resort to additional lighting. As a backlight, you can use reflectors, both professional, with different reflection coefficients, and simple sheets of paper or even a newspaper. It all depends on specific conditions: light intensity, shot size, etc. It is important to know that using sunlight as a fill light, you preserve the quality characteristics of lighting, including the color temperature.

Artificial light sources can also be used as a source of fill light in nature. For these purposes, a flash is mainly used, both built-in and external. But you need to remember that in any situation, artificial light, including on the street, must be scattered, to ensure that the luminous flux is soft. Most often, when shooting on location, backlighting is used with backlighting. If in this case the subject is not additionally illuminated, in your picture it will turn into a black silhouette.
If you shoot during the day in interiors with large and open windows, then you should not forget that in this case, a high contrast is also inevitable, that is, a very noticeable difference between those parts of the object that are in the shadow and those that are in the light. In order to reduce the harshness of these transitions from light to shadow, you can use a slight additional lighting. In such cases, reflected light is usually used. Walls and ceilings are good reflectors. But there can be danger here. You need to pay attention to what color these surfaces are painted. If walls and ceilings have a rich color, then unwanted color reflections, reflexes, which will distort the color of your subject, may appear on the objects of shooting. In this case, it is most convenient to use a flash with a diffuser, for example, with a soft box.

Some photographers use gold umbrellas to light up their portraits. The luminous flux from the lighting fixture is directed to the umbrella, and is reflected from the umbrella onto the model. In this case, the color of the luminous flux changes. If shooting on location, then the picture will have a high color contrast. Why is this needed? Here it is worth turning to the theory of painting.
The eye of a person observing the color and light distributions under natural lighting notices that those parts of the object that are exposed to direct sunlight seem to be cold. And those in the shade are much warmer. Many painters have been using this for several centuries. For example, Van Gogh always added cold paint to the spectrum of the solar disk, thus achieving the blinding effect of the sun on his canvases.
One can cite as an example Rembrandt, in whose painting considerable attention is paid to shadows. In his picturesque portraits, shadows are always deep, their solutions are complex in color, but, nevertheless, this color does not go beyond the golden brown tones. These traditions of painting were partly transferred to photography. This is what gold umbrellas are used for. However, the filtered light output from the fill light device should be applied sparingly. An overly yellow complexion may seem painful to the viewer, and it will not brighten up your picture in any way.
We've already talked about color contrast. The warmer the shadow portion of the subject appears in the picture, the colder the highlights appear. This can lead to a violation of the color harmony in your photo. But even here there are possible exceptions to the rules. Check out the winter landscapes of one of the classics of painting. For example, "March" by Isaac Levitan. In this painting by a remarkable Russian painter, shadows in the snow range in color from pale blue to violet-black. Therefore, the fill light stream can be of any color. If only it corresponded to the task at hand.

Henri Matisse. "The Artist's Family". 1911
Let's take a look at the painting by Henri Matisse "The Artist's Family". At first glance, no light is visible on it, as if it does not exist. The entire space depicted in the picture is filled with some decorative elements, and the people themselves look nothing more than spots that the artist needs to build an accordion in a combination of color contrast and rhythm. People on this canvas are only formally people. These are self-sufficient characters, each of whom is immersed in himself, the views of these people do not intersect. Everything here is subordinated to color contrasts - the depth of space and lighting, plot, volumes. Matisse, as it were, illuminates the space of the picture with a filling, diffused, even light that comes from the viewer. This light highlights all the elements of the picture to the same extent, attention is not focused on anything. If we had before us not an artist's painting, but a photograph, then this could be called a fill light, which is also a painting light. Light that fills the entire image space evenly.
It is known that any successful shot can be decomposed into several basic elements. Namely: composition, theme and light. The latter is the main component in every photograph. As we talked about the art of photography, a snapshot is light.
Natural light and lighting in photography is the most challenging but also the most inspiring type of lighting. You need to keep an eye on the sun - it needs to be the center of attention. The direction of movement, the amount and quality of light, the continuously changing angle - all this must be taken into account.
Types of lighting in photography
Every newbie (which you are) should remember the long-standing terms that classify the type of lighting of the subject, these are:
- drawing;
- filling;
- and backlight.
While shooting on the street, in the role painting light sunlight is often exposed. Also, sources can be various reflective surfaces with high efficiency, for example: a silver reflector or a mirror. Filling light It creates a cloudy sky, in addition, light surfaces around the object can do this: a white reflector, a light wall, even sand on a beach. Concerning backlight- it can be obtained by shooting at dusk or dawn when the sun is behind the subject.
Painting light characterized by the overall contrast of the image, hard light-shadow transitions, as well as high detail.
Fill light - this is a kind of addition to the painting light, because it has neither high contrast, nor texture, nor high detail, but such light has its strengths. It is soft, flexible and retains details, both in light and dark areas of the picture ...
Back light works great for volume. It adds depth to the image, separates the subject from the background, clearly outlining the silhouette.

Natural lighting in photography
If you studied physics well in school, then you know that light travels in a straight line. Just imagine how powerful illumination has! It is unlimited power over tone, form and shadow. When shooting in natural light, it is important to remember that the direction of the light is always proportional to the movement of the sun.
- Diffuse light, without character, is “flat lighting”. It is often not very favorable for creating masterpieces, as it destroys all glare and creates ugly shadows.
- If you create a light source directly behind you, then you will almost certainly get a harshly lit object. Try to find an angle with your light source.
- Experimenting with changing the direction angle between the subject and the light source while shooting will achieve a good result.
- The dream of any photographer is lighting that comes from behind the subject at a certain angle, and the direction would allow you to create an simply amazing image. To make this dream come true, in most cases, you need to use reflectors.
- Transillumination is also a pretty good method of lighting a shot. Light is transmitted through translucent objects such as hair (especially light colored ones) and foliage. This technique adds something unearthly to the subject!
- Also, do not forget about the soft light coming from the window. Such a light source is capable of transmitting an impressive amount of light, which is very easy to control. It is enough to slightly cover the window, curtain it and voila: you have achieved the result. Also, this technique helps to maintain a proper balance between dark and light areas of the image.
- Hedgehog is clear: where there is light, there will be a shadow. If you know how to create a shadow, control it, and also effectively apply it in photography, you are guaranteed a masterpiece.
Artificial lighting in photography
While shooting en plein air the photographer can only slightly affect the illumination of the object, then the studio has everything it needs to create the desired character of lighting. Studio light sources include pulsed light sources (flashlights) and continuous light sources (special incandescent lamps and fluorescent lamps of diffused and directional light).
Photo flashes give a spectrum of light radiation close to daylight. They are used both when filming in open space and in studio photography. The high intensity and short duration of the light signal allows photographing moving objects and using photographic materials of varying degrees of sensitivity. Pulsed light sources are energy efficient.
Constant light sources include powerful halogen or fluorescent lamps... The advantage of halogen lamps is a constant light temperature and a large illumination radius. The disadvantages are high energy consumption and high heating levels. Fluorescent lamps are good for their economy and low price, but the level of illumination that they can provide is enough only for a small studio. In addition, such lamps are characterized by a wide range of light temperature, which can significantly affect the final result of photography.
Lighting types:
Drawing- the main light source that creates the cut-off pattern. The power of the painting light should always be higher than the fill light. As a rule, the difference between the shadow and the illuminated side for color photography should be 1-1.5 stops, for bw. photo - 2 steps and more. For a family portrait, the fill light should be slightly weaker than the painting light so that there are no harsh shadows. Painting light can be used as the only light source, or combined with others.
Filling- is set after the key light is installed. Use to fill light in parts or the entire subject, and to soften shadows.
Modulating- used to highlight the sides of the subject, highlight hair, shoulders and separate the subject from the background. Modeling light can be soft or hard depending on the purpose and creative ideas.
Back- illuminates the object from behind, separates it from the background, highlights the outline.
Background- serves to highlight the background. The background light, as it were, separates the subject from the background, while creating a sense of volume.
The direction of light can be frontal, diagonal, side, back-diagonal, back.
Basic lighting schemes in studio photography
1. Butterfly
In this setup, the light source is positioned frontally just above the subject's head, resulting in a symmetrical nose-shadow that resembles a butterfly.

2. Scenic light
We move the device from the frontal to the diagonal position and get a picturesque light. In this case, the shadow from the nose of the model goes a little to the side.


3. Triangle
We continue to move the light source to the side position until the shadow from the nose merges with the shadow from the cheek, forming a light triangle. When the head is turned to one side or the other, the triangle expands or narrows. As the height of the light source changes, the triangle also moves up and down.

4. Shadow and light-tone half-turn
With this light pattern, the subject's face is rotated three-quarters from the camera. The painting source, located in the lateral position, illuminates the part of the face that is farther from the camera, and most of the face that is closer to the camera remains in the shadow. The light-tone half-turn is the same as the shadow half-turn, only a reflector is installed on the side of the camera to obtain a semi-transparent shadow.

5. Modulation
The source is in the rear-diagonal position, while a narrow stream of light passes along the cheek of the subject. A directed stream of light can be created using a tube or curtains.

6. Backlight
The light source is located at the back of the model. Backlight is used when it is necessary to convey a clear contour of the object, and not its volume.

7. Fireplace light
In this scheme, the light source is located below the model's face, practically on the floor. This position allows you to simulate the light from a fireplace or fire. The subject's face is illuminated from below at an angle of 45 degrees. The light source can be directed into a gold reflector, which creates a more natural yellowish tint to simulate fire.
8. High and low key
High key. The light source is installed frontally, just above the model's head, you can install the second source from the bottom at an angle of 45 degrees. This scheme allows you to achieve soft, uniform, almost shadowless lighting. We put two strips behind the back, which will highlight the white background. The power of the sources should be 1.5 - 2 stops higher than the key light. Those. in other words, we simply overexpose the background to make it look dazzling white.

Low key. In contrast to the high key, dark tones prevail in the photo - the background, the model's clothes, a minimum of lighting. A photo taken in a low key creates a sense of drama. More often, one light source is used, highlighting individual parts of the object (semantic center), for example, the face, and not the entire object.

9. Reflex light
Reflex light is light reflected from a surface. On both sides of the model, we set it according to a light source directed to a reflective surface, for example, an umbrella. It is necessary to achieve such a position of the devices so that, when reflected, the light evenly fills the model's face, without leaving shadow patterns. Building insulation with a silvery surface stretched in a semicircle around the model's face can also be used as a reflective surface. Light sources (preferably strips) with the same power are installed on both sides. It is advisable to rotate the strips in such a way that in the eyes they are reflected not as two separate light sources, but form an arc, this looks more natural.


Let's talk about the main thing in photography - about light. It is through light that the photographer "paints" his images. No wonder the word "photography" means "to write with light." Like any instrument, light has its own technical characteristics, of which intensity, directivity / diffusion and spectral composition (color temperature) are important for the photographer. The main part of our photography lesson is devoted to their skillful use.
Before moving on to practical work, let us note several very important points related to the fact that a person perceives light differently than a camera:
· Vision is a psychophysiological process. The eye not only perceives the light flux, it processes it intellectually. Consciousness often "completes" what a person does not actually see or corrects the perceived light picture. According to the principle: "I see what is, and how it should be."
A camera, no matter how “intelligent” it is, is not capable of this, it captures only what the lens “sees”. A dimly lit sheet of white paper for a person will be white, but in a photograph it will turn out to be gray, and vice versa, a brightly lit gray-toned object in a photograph will turn white.
For example, you shoot a portrait in the rays scattered by the crown of a tree, and a brightly lit green leaf against the background of a shaded white wall comes into the frame. For the human eye, the frame will have a green leaf on a white background, while the photograph will most likely have a white leaf on a gray wall.
Any illumination contrasting to the human eye for the camera will be super-contrasting.
· The eye operates in the "intelligent video camera" mode with a quickly updated "picture", thanks to this, even a dimly lit moving object is "not blurred". In a camera, a picture is formed by the accumulation of a luminous flux in one fixed frame, therefore, at high shutter speeds, the moving "picture" is blurred. By the way, it doesn't matter at all whether the image moves in the frame or the camera itself “moves”, the “blurriness” will be the greater, the higher the speed of the image movement or the longer the shutter speed. The first skill that needs to be brought to automatism: while pressing the shutter button, do not move the camera. Practice without tape, controlling finger movement and immobility of the hands.
· The eye has a much higher dynamic range than the camera **.
We see a huge number of shades of gray in both light and dark areas at the same time. The camera, on the other hand, depending on the selected exposure, can reproduce well the gradations of halftones in the light part and the shadow as a solid black spot, or, conversely, will work out the shadows, whitening the light part. You can focus on the middle part, then there will be a "blockage at the poles" in the highlights and shadows.
Much, of course, depends on the sensitivity of the photographic material. Very few photographic films are capable of capturing an image in the light-dynamic range of the order of 124 shades - about the same as the human eye can distinguish. (We wrote in detail about photographic films in the May issue of the magazine.) The situation with the dynamic range of digital photographic equipment is even worse. Vision has a high adaptability to the color of the light flux. The spectral composition of light can be very different, this is well understood by the example of a hot metal - from deep orange to white to blue. Speaking about the color of the luminous flux, they use the concept of "color temperature" (see the magazine "Photodelo" No. 6, 2003).
* Light is usually called electromagnetic radiation with a wavelength of 440 to 700 nanometers. Only in this range can the eye perceive electromagnetic waves. Waves outside this range are called infrared and ultraviolet.
** Dynamic range is the difference between the lightest and darkest point in an image. Otherwise, the ability to reproduce a certain number of halftones between completely black and completely white.
We can talk a lot about this, but it is only important for us that light-sensitive materials objectively convey the color composition of light, and a person sees with a large adjustment. In the human mind, a stable idea of a certain color as a stable feature of familiar objects is developed and fixed, therefore the white sheet remains so under the light of a clear sky and by the light of a candle. On film, it will turn out to be bluish and yellowish, respectively. For correct color reproduction, you need to use a film for daylight or artificial (marked with T). There is an advantage here in digital cameras, which are able to adapt to changes in light by changing the "white balance".
Color temperature, wavelength and luminous flux color
The temperature of 10000-6000 K approximately corresponds to radiation with wavelengths from 380 to 470 nm, having violet and blue colors; 4000-6000 K - from 480 to 500 nm - blue-green; 3000-4000 K - from 510 to 560 nm - green; 2000-3000 K - from 570 to 590 nm - yellow-orange; 1200-2000 K - from 600 to 760 nm - red. (Intermediate values correspond to different shades of color). Natural light - the average light of the sun and sky - has a dominant spectral composition with a color temperature of 5500 K in the range 4500-18000 K, conventional artificial light sources emit from 1200 to 3500 K.
Light characteristics
The first and most important characteristic of light is direction. This category is tied to the location of the subject relative to the light source. Light can fall on an object from above, below, horizontally, or occupy any intermediate positions - this is the height of the source. Can shine frontally (front), diagonally, from the side, from behind - this is the orientation in the horizontal plane. The most losing light, it is also the most commonly used one, is the frontal horizontal one. It illuminates all areas of the subject evenly, making the image flat. Such light carries a minimum of information. Under natural conditions, such lighting is rare, and in artificial conditions - regularly. The simplest example is shooting with the built-in flash *.
* Paradoxically, it is useful to shoot with a flash when there is a lot of light. The flash will act as an additional light source, which will soften shadows, work out the drawing in the shadows.
Backlight, which is directed at the face of the photographer, is also bad. With this kind of lighting, only the outline of the object will be visible. For a high-quality picture, you need the light to fall on the subject at some angle. This will create relief and volume. Rule: the larger the angle of incidence, the more pronounced the relief.
The second characteristic of light is its intensity... We talked about it partly in the introduction. It must be remembered that the light for the camera fades away much faster than for the human eye. A simple example. We take a table lamp, shine on the wall from a distance of one and a half meters. The wall is lit. Let's take the lamp another one and a half meters. The wall got worse lit. Visually, quite a bit, for a camera - significantly.
The so-called rule of squares applies here: when the distance from the subject is doubled, the illumination intensity decreases four times.
Let's make a reservation, the rule works differently for a directed light flux, for example, a laser beam or a soffit with a good focusing reflector.
The third characteristic is softness / hardness light - is closely related to the first, but for us it has an independent meaning. The hard light flux comes from one source - ideally from a point. Perfectly harsh sunlight, for example on the moon, is practically not scattered due to the lack of an atmosphere. There can be no halftones in a moon photograph. Everything there is either absolutely white or absolutely black.
Everything is different on Earth. There is an atmosphere here that scatters light, there are objects that reflect light and change its direction. The directivity and, accordingly, the hardness of the light can vary over a wide range. Hard light will be in the near-noon sun and cloudless sky. Highlights and harsh shadows will appear in the image. Soft light - diffused, more uniform can be observed in cloudy weather. The entire celestial sphere begins to shine. In fact, the sunlit cloudy sky is a huge natural softbox. Under conditions where an artificial directional light source is used, a hard cut-off pattern is obtained. Partial light reflection from dark walls, floors and ceilings has no noticeable effect. A completely different "light picture" will be in a bright room - multiple reflections will add a lot of soft diffused light. Diffuse directed hard light can also be milk glass, any curtain.
Now let's look at all this in practice. In order to show how light creates volume in the image or takes it away by playing with light and shade, we walked with a light source around our model.
SERIES 1. Hard top light.
To begin with, we placed the directional light on top, approximately 45 degrees to the horizon, opposite the subject, above the photographer.
Photo 1. Frontal lighting. It can be seen that there are practically no shadows on the face, it is devoid of relief and volume. This will be seen even more clearly when we lower the light parallel to the shooting axis.
Photo 2. Moved to the left. Got an unnamed front light. Some kind of cut-off pattern appeared: a shadow was formed from the nose, from the eyelashes. A certain relief is being created. However, the left side of the face is still quite flat. This makes the face seem disproportionate.
Photo 3. Move the source further clockwise to an angle of incidence of 45 degrees - a diagonal light. The shadow became even more, the feeling of relief increased on the right. The face is no longer perceived as asymmetrical. Of the entire series, this option is perhaps the most interesting.
Photo 4. Front sliding. A drawing appeared on the left side of the face: a nasolabial cavity, a distinct jawline. But the right half of the face went into shadow.
Photo 5. Side light. The chin is gone. Half of the face is illuminated, the other half is practically nonexistent.
Photo 6. Rear sliding. Only part of the cheek is highlighted, the protruding nose. The eyes were completely gone.
Photo 7. Rear diagonal. The face is practically not illuminated. A little bit of the forehead and part of the cheek. But a new quality appears - the light begins to outline the hair and figure.
Photo 8. Rear unnamed. The face is not lit at all. The luminous flux illuminates the hair and the figure and "detaches" the model from the background.
Photo 9. Backward. The light is strictly behind and on top of the model. Most often, this kind of light is used to separate the model from the background.
The lighting in shots 10 to 16 is mostly symmetrical, with the only difference that the model's shoulders and neck are slightly to the right. You can estimate the difference yourself.
SERIES 2. Hard horizontal light.
Now we lower the light source to the level of the model's head, the light goes parallel to the shooting line. Let's go around the model again in a clockwise direction.
Photo 1. Frontal lighting. No shadows, no relief. A completely flat face with nose, mouth and eyes painted on it.
Photo 2. Front unnamed light. A small shadow appeared on the cheek, the relief of the nose and lips was clearly visible at the bottom right. Everything else is flat.
Photo 3. Diagonal light. In contrast to the same direction in overhead lighting, the right half of the face is heavily shaded. Softening the light or additional lighting can create an interesting look.
Photo 4. Front sliding. Half of the face is almost in shadow.
Photo 5. Side light. A relief appears on the illuminated part. The chin, nasolabial fold, eyes begin to be worked out.
Photo 6. Rear sliding. A bright highlight on the cheek, on the nose, but the eyes are almost in shadow. Hair and shoulders begin to glow.
Photo 7. Rear diagonal. Light practically does not capture the face, only the edge of the nose, the edge of the lip, outlines the cheekbone.
Photo 8. Rear unnamed. Practically does not shine on the face. An unpleasant glare appears on the cheek, the geometry of the face changes. The only advantage is highlighted hair. Photo 9. Backlight - backlight. Located strictly behind the back. In contrast to the top contour, the horizontal one completely outlines the silhouette. The top one flooded the hair and shoulders with large strokes of light.
SERIES 3. Bottom rigid frontal.
The light source is located below the shooting plane. Frankly speaking, a very exotic way of lighting a photo model, primarily due to unnaturalness. In nature, such light is practically not found, but it is thanks to this that very expressive, emotional photographic portraits can sometimes be obtained with such light.
Photo 1. Frontal lighting. In contrast to the similar picture, in the first two series it is evenly lit and the chin is practically lost. A light shadow appears on the upper eyelids and an unpleasant shading on the nose.
Photo 2. Front unnamed light. The shadow from the nose literally "sticks" into the eye and greatly distorts the face. The upper lip darkens, and a shadow appears from the cheek under the eye.
Photo 3. Diagonal light. A very coarse shadow from the lip and nose covers half of the face. An unpleasant spot of light formed near the lips. At the same time, the chin line was indicated in the shaded part.
Photo 4. Front sliding. Half of the face went into shadow. Light chin detailing. A rough shadow appears over the lighted eye, and the forehead becomes prominent.
Photo 5. Side light. Hard lines, clear relief of the cheeks, chin and nose.
The shadow from the eyelashes lays down interestingly, which can become a curious artistic detail.
Photo 6. Rear sliding. The light goes away, picking out only a few details. Moreover, unlike the two previous series, this light does not create an outline of the figure.
Photo 7. Rear diagonal. Only part of the cheek is visible. Hair begins to barely glow.
Photo 8. Rear unnamed. The hair is lightly highlighted, the rest of the figure looks like a solid black silhouette.
Photo 9. Backward. Due to the low location, the luminous flux works only at the ends of the hair.
In pictures 10 through 16, we slightly increased the distance from the light source to the model. The light picture became somewhat softer, but this did not give significant changes.
SERIES 4. Soft light in three levels.
In this series, with the same movement of the light source around the model, we used a softbox. It can be seen that the fundamentally cut-off pattern does not change in comparison with the previous three series. However, due to the large area emitting a luminous flux, the borders of the shadows are greatly softened.
We thank the photo model Natalia Gissek for her patience and kindness.
SERIES 5. Light setting scheme
The task of the photographer when using artificial light, oddly enough, is to simulate natural lighting. As a rule, several light sources are used for this at once.
The main light is painting. This is a luminous flux directed to a plot important part. It creates the actual relief of the image. Traditionally, this light is from above and from the side. Even before the advent of photography, artists used light from a window as their main source.
It's a pretty harsh light. He painted facial features with contrasting shadows. At the same time, the entire image has no volume.
The second most important is modeling light. Used to highlight and soften shadows. It can be a lamp or any reflector: a sheet of white paper, a mirror, a light wall, a stretched sheet. It is placed, as a rule, from the side opposite to the source of the key light, closer to the photographer. Such light can be both directional and diffused, depending on the task of the photographer. For example, if you do not need to touch anything in the face plastic, but you only need to remove the shadow under the chin, you can send a directed light beam there. In any case, the modeling light should always be several steps weaker than the painting light, so as not to create shadows.
The third type of light is fill. This is general uniform illumination. In terms of intensity, such light should be weaker than the painting one, as a rule, by two or three steps. Rule of thumb: the brighter the fill light, the weaker the pattern, the lower the light contrast, the flatter the image. It is advisable to install the fill light source from above, behind the photographer's back. It is best if the luminous flux is diffused. The photographer's task is to find such a balance between the key and fill light, so that the subject is shown in the most volumetric way. It should be added that the role of the fill can be partially played by the modeling diffused light.
Back (or contour). This light reveals the shape of the entire object or any part of it. The backlight is positioned close to the back of the subject. Such illumination produces a line of light contour that can expand with increasing intensity or moving the light source away from the object.
Background light. Illuminates the background against which the subject is drawn. It solves two problems - it creates additional spatial depth and illuminates the background, emphasizes its color and texture. Its intensity is less than the illumination given by the general and key light. Can be uniform and uneven. It is better to set the background light so that the light areas of the object are painted on a dark background, and the dark ones on a light one.
Painting light + modeling- the simplest and most effective lighting arrangement. The photographer only has to correctly orient the model in the key light in order to find the most successful relief, and correctly place the reflector in order to soften this relief in the most successful way.
We used a small reflector. The drawing has softened compared to the single drawing source, but not enough. Deep shadows are still below.
So far, we have considered the photo with only those light sources that are located in front of the model. To reveal the shape of the model or any part of it, a backlight (or contour) back gliding light is used. To do this, you need to install a source that will shine on the model from behind. You can direct two light fluxes to the model at once. One is slightly more intense, the other is weaker. The subject will be detached from the background, and it will have additional volume.
Photo 5. Painting + filling + modeling. Modeling light brought the chin out of the shadow, made the whole face pattern soft. The image has become plastic, the face has a volume. But the feeling is that the whole figure is glued to the background.
Photo 6. Painting + filling + modeling + backing. The model is detached from the background, the hair is lit up. The figure has more volume.
Photo 7. Painting + filling + modeling + backing + background. The background light slightly increased the backlight and slightly complemented the fill light. In addition, we lit the background so that the lighter side of the model is in the shaded area, and the dark one is in the lighter areas of the background. This emphasized the volume of the model and heightened the sense of versatility. The dark background gave depth to the picture, and the light one - lightness and airiness.
We thank the model Nadezhda Gorbunova for her patience and kindness.
_______________________