Do-it-yourself didactic games for seniors. Making play aids for children
Tactile counting cards.
A lot about sensory development has been written in the works of Maria Montessori, who taught children to distinguish materials by touch and remember adjectives that describe tactile sensations - smooth, rough, rough, slippery, ribbed, etc.
Such tactile cards can easily be made at home using available materials without spending money.
DESCRIPTION.
“Touching Game” (from the word touch) is a set of 10 cards with different surfaces and numbers from 1 to 10.
WHAT'S THE USE.
Tactile cards develop the child’s sensory perception, tactile memory, fine motor skills of the fingers, and as a result have a beneficial effect on the baby’s mental potential and promote learning to count from 1 to 10.
MATERIALS.
- cardboard for the base;
- glue “Moment”;
- scissors;
- numbers made of velvet paper
- materials with different surfaces (sandpaper, felt, satin ribbon, pieces of leather, wood, plastic, buttons, the prickly part of Velcro, etc.)
When making a second set of cards, game variations can be different, for example:
we take several pairs of cards, turn them face down, then in turn each player opens two cards, if they match, then the player takes the cards for himself, and if not, then puts them in place;
we take one card at a time, swipe it along the hand (leg), the child needs to guess what kind of card it is, but first, of course, you need to say the name of each material and touch everything carefully;
find identical cards;
It's interesting to just touch it.
Educational toy for children: "Box with cups - inserts."
The essence of the game is simple and obvious to any adult, but the little one still has to master this “so simple and difficult” task!
DESCRIPTION.
Making a toy is really easy. We take any cardboard box, preferably a stronger one. Next, we cover the box with colored paper.
You definitely need to put something rattling and ringing in the cups, so that along with the flowers, children develop sound perception. You need to try to make the clinking of the cups different. To do this, put buckwheat in one glass, rice in another, semolina in a third, and seeds in a fourth.
We cover the tops of the cups with cardboard and glue them with glue, not forgetting to attach a loop to each one.
We make a delimiter inside the box, and add pebbles of a certain color inside each hole (by color).
WHAT'S THE USE.
Consolidating knowledge of size; colors; development of hand motor skills, counting skills.
Variations of games can be different, for example:
arrange the pebbles by color;
count how many pebbles of one color or another;
guess what is in the cup, remember the sound and try to determine what is in the cup by the sound;
It's interesting to just touch it.

Sorter: "Flower jar".
A sorter is a children's educational toy, the main purpose of which is to sort objects according to one or more criteria. These characteristics are usually shape, size or color. The development of fine motor skills of the hands is the main, but not the only purpose of the sorter. Sorters develop the child’s logical thinking, coordination of movements, sensory skills, form analysis skills, the ability to compare and find cause-and-effect relationships, introduce the baby to the shapes of various objects, and teach colors. What is a sorter?
Description of the manual: This is a jar in which there are holes of various shapes: these are rectangular holes of primary colors for large beads from old abacus painted in a certain color, holes for pushing counting sticks also in colors, holes for laces (laces), and screwing on lids of a certain color to the flower. You need to insert figures of appropriate shape into these holes.
Variability:
Screwing the centers to a certain color flower;
Lacing;
Pushing certain items by color

Dry aquarium. (for children 2-7 years old).
A “dry aquarium” - a set of kinder eggs collected in a plastic basin or box, can be offered to a child at any time: when he is in a bad mood, or, conversely, he is too excited, or he simply has nothing to do. The main value of this manual is that the child is not afraid of breaking or losing something. By plunging as deeply as possible into the “aquarium” filler (eggs), the child’s hands are massaged, the fingers become more sensitive, and their movements are coordinated.
Self-massage of hands and fingers in a “dry aquarium” (“pool”) promotes:
- normalization of muscle tone;
- stimulation of tactile sensations;
- increasing the volume and amplitude of movements of the fingers;
- formation of voluntary, coordinated movements of the fingers.
Option 1. “Bathing” hands in a “dry aquarium”, immersing hands, arms up to the elbows, up to the shoulders in the covers, rustling with eggs. Self-massage in a “dry pool” can be performed to music or accompanied by a poetic text: Place your hands in the “pool”, mix the eggs, simultaneously squeezing and unclenching your hands, saying: In the “pool” the eggs are different: green and red. We decided to look at them and let our fingers run wild, causing a commotion there so that our fingers wouldn’t be sad.
Option 2. Hide Kinder surprise toys at the bottom of the “pool”. Dip your hands into the “pool”, mix the eggs, then find and take out the toys.
Games will give the concept of size, will contribute to the development of fine motor skills, teach how to solve logical problems, and develop creative abilities.

Didactic manual “Place the pencils in cups.”
Goals:
develop fine motor skills of the fingers;
attention;
logical thinking.
develop the ability to distinguish colors;
learn to combine a pencil with a glass; act purposefully, sequentially: from left to right
Description of the tutorial: Cut out rectangles and pencil shapes from ceiling tiles. We cover the rectangles to the middle with squares of self-adhesive film of different colors. We paste the pencils with the corresponding colors. Fast, beautiful, economical!
Variability: invite children to find a mistake (put one of the pencils in the wrong color or shade), and correct it, while pointing out the mistake.

Didactic manual “Place the eggs in your houses”
Goals:
Description of the tutorial: Paint the cells of the egg container with the main colors and varnish them. We tie the Kinder Surprise capsules in the appropriate color.
The result is a bright and beautiful manual.
Children must arrange the eggs into houses according to their color.
If possible, name the color of the eggs and the color of the houses.
find identical testicles
count how many eggs of a certain color
arrange the eggs according to color into plates

The game “Geokont” is a wooden field with “nails” attached to it, on which multi-colored rubber bands are pulled during the game. each “stud” has its own coordinates (for example, Zh-2 – yellow “ray”, second “stud”).
"Geokont" is an original designer. Using multi-colored rubber bands on the playing field, you can create geometric shapes of various sizes, multi-colored contours of object forms in the surrounding world, and symmetrical asymmetrical patterns.
The set of the game "Geokont" includes the methodological work "Skillful Paws". this is a fairy-tale story about Yucca the Spider and his grandchildren - spiderlings, game tasks, diagrams.
The methodological fairy tale “Little Geo, Raven Meter and I, Uncle Slava” opens a cycle of fairy tales of the Violet Forest. In it, “Geokont” becomes the Wonderful Glade of Golden Fruits. The fairy tale “revitalizes” geometric concepts, making them interesting and understandable for preschoolers. Its plot is structured in such a way that the child, by completing tasks, helps the fairy tales overcome the obstacles that arise in their path.
The educational essence of the game.
The game "Geokont" develops the sensory and cognitive abilities of preschoolers. Independent construction of geometric figures, when visual and tactile analyzers are involved, contributes to the formation of ideas about the standards of form. Play activities develop fine motor skills of the fingers, memory, speech, spatial thinking and creative imagination, the ability to coordinate one’s actions, analyze, and compare. Preschoolers become familiar with such a property as elasticity (rubber bands stretch and return to their original position). The use of schemes in play activities contributes to the formation of the symbolic function of consciousness. Constructing figures on a sheet of paper according to the coordinates of the playing field prepares children for mastering simple programming. Using a coordinate grid, preschoolers can draw a plan of the playing field and diagrams of figures using a verbal formula.
The game “Geokont” and the fairy tale “Little Geo, Raven Meter and I, Uncle Slava” immerse the child in the world of geometry, he masters the basic geometric concepts: “ray”, “straight line”, “point”, “segment”, “angle”, "polygon", etc.
Guidelines.
The game "Geokont" is used for the mathematical development of preschool children, introducing them to the objective world, developing design skills and solving creative problems. In addition, the fairy-tale environment helps preschoolers indirectly perceive the main learning task. For example, during the game, children face an “obstacle” (task, question, task, etc.). The personification of this obstacle is an elastic band (“web”) of any color stretched in the Geokont field. If the problem is solved correctly, it “disappears.”
Junior preschool age. When mastering the game “Geokont”, children of primary preschool age simply pull rubber bands onto “nails”. Then they construct simple geometric figures, elementary contours of object forms and create images of objects according to their own plans. Children are introduced to the characters of the fairy tale and told a simplified version of it.
Senior preschool age. Children of senior preschool age not only construct geometric figures or object forms, but also perform more complex developmental game tasks and become familiar with the concepts of “ray”, “straight line”, “curve”, “segment”. Preschoolers draw a plan of the playing field, memorize the coordinates of the points, and transfer figures invented and constructed on Geokont onto the plan. Game activities with “Geokont” are based on a fairy tale plot.

Decoration - decoupage technique. We train our fingers and hang fleece, paper, felt (whatever you like best) clothes on strings using clothespins!


Tactile pillow. Training in fastening different types of fasteners.

Didactic manual “Place the pebbles in your houses”
Goals:
develop the ability to distinguish and correctly name the 4 primary colors;
learn to combine a testicle with a cell, perform correlating actions (color guide); act purposefully, sequentially: from left to right, without skipping cells; develop fine motor skills of the fingers.
Children must arrange the pebbles into houses according to their color.
If possible, name the color of the stones and the color of the houses.
When making the second manual and using disposable plates of 4 main colors, variations can be different, for example:
teach children to distinguish colors and use the names of colors in speech.
develop fine motor skills of hands
find identical testicles
count how many pebbles of a certain color
arrange the pebbles by color into boxes
The master class is designed to work with teachers and parents.
Purpose: DIY didactic toy.
Goals: the use of unconventional methods in making toys, the development of fine motor skills and sensory perception in children.
Description of the master class:
In my work, I paid attention to the unconventional way of making toys with my own hands, using different types of cereals that differ from each other in size, shape, texture: small (millet), medium (buckwheat) and large (barley).
If your child gets a “Miracle Ball”, I am sure that he will be happy. After all, by playing with such a toy, children develop fine motor skills and speech; the child receives a variety of sensory impressions; he develops attention and the ability to concentrate. No wonder V. Sukhomlinsky wrote: “The mind of a child is at the tips of his fingers.” Therefore, I recommend the “Miracle Ball for all-round development, and besides, it will simply bring joy and pleasure to your children.
Required materials and tools:
Fabric of different colors and textures;
Needle and scissors;
Multi-colored threads;
Bright and colorful braid;
Various cereals (millet, buckwheat, pearl barley);
Sintepon.
Step-by-step work process
1. Prepare the appropriate material to get started.


2. Cut out rectangles of the same size from various types of fabric.


3. Sew six rectangles one by one, leaving a hole on one side.

4. Turn each stitched rectangle of fabric right side out (use a pencil to help).

5. Fill the resulting bags with cereals (buckwheat, millet, pearl barley and padding polyester).


6. We carefully sew up each filled bag so that the cereal does not spill out.

7. The resulting square-shaped convex bags are equal in size.
8. Sew each square to exactly the same one, different in color, forming a pair.

9. Sew the double pads together one at a time.

10. Forming a ball, sew the finished pairs of squares to each other.

11. It turns out to be a ball.

12. Using braid, we decorate our product, giving it a beautiful and elegant look.

13. Our “Miracle Ball” is ready.


Good luck!
Do-it-yourself play aids will help your child’s development. Offer children plenty of entertainment, as well as homemade musical instruments.
Making game aids for children: master class
There are plastic bottles in almost every home. We will use them for the next tutorial.
Game "Flower Glade"

To provide yourself with everything you need to create such entertainment, take:
- a cardboard box with low sides, for example, for candies;
- plastic bottles;
- colored cardboard;
- scissors.

Here's how to play with your baby using these items. Tell him to:
- put flowers of the same color on the lids;
- I would put plants of a certain color in this impromptu flowerbed;
- I counted how many flowers and what color they came out with.

Game "Clothespins"
It will help the child develop his fingers, improvise, and come up with interesting stories.
For crafts, take plastic clothespins so that your child can easily squeeze them and put them on the object.
To make a game tutorial like this, take:
- cardboard;
- colored paper;
- markers;
- clothespins of different colors;
- scissors.
- Use templates or draw figures on cardboard: various funny animals, suns, clouds, flowers, people.
- Glue colored paper onto the cardboard and draw the characters' features using a felt-tip pen.
- Place the clothespins in the box. Let the child take them out and pin them: on the sun - rays, on a fish - fins, on a caterpillar - legs, on a cloud - rain, and so on.

Game "Feed the Animals"
Kids will also like this fun; it will also require clothespins. Children will learn what some animals look like and what they eat. To do this, you need to cut a circle out of cardboard, use a ruler and a thin felt-tip pen to draw segments on it. Glue or draw the following products into each:
- fish;
- nuts;
- carrot;
- bananas;
- grass;
- corn;
- bone;
- acorn.
- cat;
- squirrel;
- hare;
- monkey;
- cow;
- mouse;
- dog;
- pig.
Tactile covers

For such an interesting game you will need:
- caps from baby food and plastic bottles;
- pieces of leather;
- scraps of various fabrics;
- glue;
- scissors.
First, show the child the fabric on the lid and let him touch it. Now, without looking, you can take a pair of circles out of a bag or box. In the same way, he will find a lid with pieces of fur and leather.
Finger Theater
This kind of fun helps children develop motor skills, hand coordination, thinking, and speech. You can see that the child put small characters on these parts of his hands. But you can make heroes in such a way that the child’s fingers temporarily turn into their feet.
The baby will surely be amused by how the character walks or runs briskly, thanks to the child.

As you can see, you need to cut out figures of people and animals from cardboard, stick colored paper on them, and paint the character so that it is clear who it is.
In place of each person’s legs, you need to cut out two equal circles. When it is necessary for a specific character to move, the child will insert his index and middle fingers here and “walk” with them.
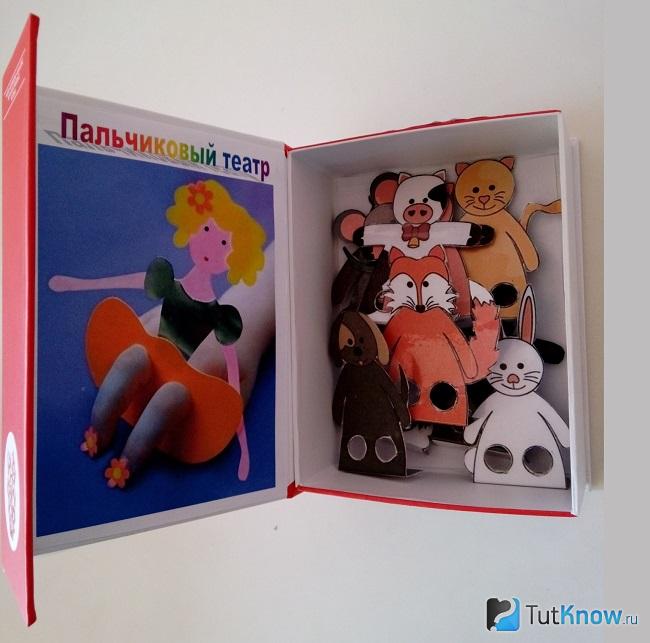
This is how you can make a finger theater with your own hands.
Outdoor and indoor games for children
They will also help the child's development. After all, after quiet entertainment, the baby needs movement. Both boys and girls will be happy to help their parents make the following game aids.

They are made very simply. First take:
- carton boxes;
- colored paper;
- pencil;
- scissors;
- glue.
Cut out the wheels from dark paper, and their inner part from yellow paper. Make headlights from the same.
You can come up with many games for children using these items. For example, children will simply stand inside such a car and run races with their peers or with adults.

If there is not enough space at home, then you need to conduct such outdoor games on the street. Of course, on a playground where there are no real cars.
Let the child try himself as a driver, and the other one become a gas station worker.

It's just as easy to do. To do this, cover a tall cardboard box with colored paper. Make a hole at the bottom of the structure, attach a piece of corrugated pipe or an old hose from a vacuum cleaner here. Stick a sign showing the amount of gasoline.
For girls, you can hold a competition on the topic “Who will drive the most beautiful car,” and after that, at the same time, do exercises, telling them that now they need to run on their toes, as if it were a light sports car. Then they will stomp their feet as they move, as if a heavy truck is passing by.

You can also make the following game aids yourself.
"Move the fish"
This entertainment will help strengthen the coordination of children's movements and prevent the development of flat feet. To organize such fun, take:
- gymnastic hoops;
- dish sponges;
- marker;
- scissors.
Place the hoop on the floor, place the inhabitants of the aquatic depths in it, as many participants as there are, so many more hoops are needed. This is where each child will put the fish they catch. But you need to take them not with your hands, but with your feet.

Air football game

It will help develop the child's lungs and promote proper breathing. To make such tabletop entertainment, you need to take:
- plastic egg from Kinder Surprise;
- glass ball;
- 2 cocktail straws;
- marker;
- a box of chocolates.
On command, they begin to blow on the glass ball through the tubes in order to drive it into the enemy’s goal.
"Catch the Ball"
For your next educational game, take:
- plastic bottles;
- colored paper and glue or wide electrical tape;
- rope;
- bottle caps or small balls.
- Cut the bottles about halfway, you want the part with the neck. To prevent your child from getting hurt on a sharp cut, cover it with colored paper or tape.
- Tie one end of the rope to the neck of the container, attach a ball to the second, you can use a bottle cap instead.
- This game trains dexterity. Let the child try to get the ball inside the container by tossing it. If several people play, the one who managed to do it the most times wins.
Game "Fishing Rod"
For it you need:
- long rope;
- scissors;
- small weight.
- Cut the rope to the required size and tie a weight to its end. One child becomes the driver, the others stand opposite him in a semicircle.
- The driver takes the end of the rope without a weight in his hand. In this case, the second edge with a weighting agent is located near the children’s feet.
- The leader will spin around its axis, while the rope should describe a circle. When the weight comes to the children's feet, everyone should jump. If someone did not have time to do this, was touched by this object, he himself becomes the leader.
Instead of rope and weights, you can take ordinary jump ropes of the required length and use them as a fishing rod.

Game "Chairs"
This fun can be included in the outdoor entertainment program. Bring folding stools and use them. Both children and adults can play such outdoor games on the street. You will need musical accompaniment. Place chairs in a circle, their number should be 1 less than the number of participants.
Turn on some fun music and let the competitors run around these attributes. When you stop the song, everyone should take a chair. Anyone who does not receive this attribute is eliminated from the game. For the next round, you need to remove another chair and so on.

Game "Traffic Light"
The kids really like her. To do this, you need to put on accessories of different colors in advance; this trick will help you win. You can put handkerchiefs of different colors in your pocket, tie laces of different colors on your sneakers.
- One person will play the role of Traffic Light. He stands with his back to those around him. When the game begins, the Traffic Light turns sharply towards the competitors and pronounces a certain color.
- Now, in order to get to the other side, each participant must hold on to an item of that color that he has.
- If there is no such color on the details of the clothing, then the person quickly runs to the other side. If the Traffic Light managed to leave him at this time, then the unlucky runner must now take the place of the driver.
DIY children's musical instruments
It is important to develop a child’s ear for music. To do this, make the game aids presented below.
Sounds of the rain

To recreate it you will need:
- cardboard tube from baking paper or foil;
- scissors;
- awl;
- toothpicks;
- glue;
- colored tape;
- cardboard;
- cereal.

The more there are, the more the instrument will begin to resemble the sound of rain. Now insert toothpicks into these holes and secure them with drops of glue. Cut the sharp ends of the wooden skewers flush with the cardboard tubes so that they do not extend beyond the edges. Cover the bottom with a piece of cardboard and secure with a piece of tape.

Experimentally find out how much grain you need so that when you shake the instrument, it makes sounds similar to the sound of rain. You can add buckwheat or rice, but it is best to use millet. Cover the top hole of the tube with a circle of cardboard, and also secure it with colored tape.
You can make another noise instrument.

To make it, you just need to take:
- sheet of cardboard;
- scissors;
- reliable glue;
- plastic or iron bottle caps.
If you have large buttons, use two. Sew elastic bands to each so that the child can put them on his fingers and tap one against the other.

Metal lids on cardboard will make more high-pitched sounds.
You can make a noise musical instrument from other materials. Use nut shells, coffee cans and other waste materials that are usually thrown away.
Noise musical instruments

For this, take:
- two toilet paper rolls or empty metal cans that used to hold coffee;
- cereals or small pebbles;
- beads;
- cardboard;
- colored paper;
- stationery erasers.
- If you are using toilet paper rolls, then glue a piece of cardboard onto the other ends.
- Cover them with a sheet of colored paper, securing it with rubber bands.
- Pour small pebbles, beads, sand or grain inside, and fix this hole in the same way.
- If you are using empty coffee cans, then after filling them, secure them in the same way on one side only.
Do not give such toys to a child under 3 years old. Also keep an eye on the older ones, because these noise instruments contain fine filler.
Here's another fun little thing made from scrap material.

To make this musical slingshot, take:
- wooden rogulin;
- sandpaper;
- thin elastic band;
- acorn caps;
- small metal buttons on the legs;
- awl;
- scissors.
After pistachios or walnuts are eaten, they are left with a pile of husks. To avoid throwing this garbage away, use it to create other noise-based musical play aids.

To make this type of ratchet, take:
- dense threads;
- two sticks;
- awl;
- pistachio shells.
An interesting noise musical instrument is also made from walnut shells. Holes are also made in them using an awl, threads or elastic bands are threaded here, and then tied at the top. The child will shake the instrument, holding it by the handle, and interesting sounds will be produced.

Drum

To make one, you'll take:
- a metal biscuit or tea tin;
- awl;
- semolina;
- thin satin ribbon;
- 2 gel or ballpoint pens;
- two containers from under shoe covers;
- scotch;
- scissors.
- Sprinkle a 1 cm layer of semolina onto the bottom of a metal can; this will prevent the sounds produced from being too loud.
- Using an awl, make a couple of holes opposite each other on the top of the wall, thread a ribbon here, and secure it by tying it. Secure the lid to the jar with tape.
- To make drum sticks, unscrew the tip from the handle and use a knife to make a small hole in the lid of the shoe cover capsule. Insert the handle body into it and screw the tip.
- Close the capsule from the shoe covers. If you want to get an even more interesting sound, then first pour cereal, small stones or beads into these two small containers.
- empty can of canned food;
- burst balloons;
- stationery erasers.

Wind instruments
You can easily turn a cocktail straw into a pipe. The tip must be cut at an angle.
If you want your child to make different sounds, then make straws of different lengths.

And if you take these blanks, fasten them in pairs with colored tape, arranging them according to size, you will get this kind of musical wind instrument.

For the following you will only need two items:
- comb;
- tissue paper or foil.
Here are some play aids you can make with your own hands so that your child receives comprehensive development from an early age. Watch the video to see how to make musical instruments from scrap materials.
The following review will show you how to make play aids for a child.
![]()
Fairy tale "Turnip" on clothespins. MK from me
I suggest you make a fairy tale “Turnip” for your kids. This method using clothespins develops the kids’ imagination, attention, they can independently rearrange the characters, develops the baby’s motor skills and tactile perception. The point is that the clothespins easily attach to each other.
Actually, what I’m saying is, let’s try to create a fairy tale together and you will see everything for yourself!
To work you will need:
Cardboard with images of characters (I copied them from the Internet and mirrored the drawing so that the characters were visible from 2 sides, this allows you to gather several children around you and no one will remain indifferent), scissors, clothespins 8 pcs (I took wooden ones, clean material, but you can use any kind), glue (I used hot-melt glue, I had it on hand, but you can use anything that glues paper to wood). The whole action, along with printing the characters, will take a maximum of an hour.
We cut out all our characters and glue the heroes of the fairy tale with glue to the base of the clothespin on both sides.
!!!Before you stick it, look carefully to see if the characters are positioned in the right direction!!!

For the theater, you can also take a box and stick the background of the fairy tale and the ground on the inside of the sides, place the box and perform all the actions against its background.
We finished doing it and then the fairy tale began..... 
1.
2.
Municipal autonomous educational institution
"Secondary school No. 10."
Master Class
"Developmental didactic games with your own hands."
Performed by Nazarova Yu.I.
Gai urban district
2016
Topic: do-it-yourself educational didactic games.
First, let's figure out what the word “game” means? A game is a type of cultural, human activity, the motive of which lies not in its results, but in the process itself. It is important in the upbringing, training and development of children as a means of psychological preparation for future life situations. Now let's see what a didactic game is - an activity whose meaning and purpose is to give children certain knowledge and skills, and the development of mental abilities. Didactic games are games designed for learning.
Didactic games play a dual role in the pedagogical process: firstly, they are a teaching method, and secondly, they are an independent gaming activity. As a first, they are widely used in classes to familiarize children with the environment, with living nature, to form elementary mathematical concepts, to develop speech in order to teach children certain methods of mental action, to systematize, clarify and consolidate knowledge. At the same time, the content of the game and its rules are subordinated to educational tasks put forward by the specific program requirements of a particular type of activity. In this case, the initiative in choosing and conducting the game belongs to the teacher. As an independent play activity, they are carried out outside of school hours.
In both cases, the teacher leads the didactic games, but the role is different. If in class he teaches children how to play, introduces them to the rules and game actions, then in the students’ independent games he participates as a partner or referee, monitors their relationships, and evaluates behavior.
Guide to didactic games
In the management of games, three stages should be distinguished: preparation, conduct, analysis of results.
1. Preparation for the game includes the following: selection of the game in accordance with the objectives of education and training of a specific age group, taking into account the time of the game (during class hours or outside of school hours), location (in a group room, on the site, on a walk, etc. .); determining the number of participants (entire group, subgroup, one child).
Preparation for the game also includes the selection of the necessary didactic material (manuals, toys, pictures, natural material).
The teacher chooses a game, invites the children to play, starts and invites the children.
Younger age : a visual explanation of the entire course of the game while playing together with an adult.
Average age : explanation of 1-2 rules, specific ones are given during the game in joint activity with an adult, you can use a trial run of the game, where the teacher clarifies the rules.
Older age : verbal explanation of the rules before the game, explanation of the meaning of the rules, if complex, then demonstration and trial moves are used.
2. If the teacher carefully prepares for the game, then conducting it itself will not cause difficulties. Any didactic game must have both game rules and game actions. If one of these conditions is missing, it turns into a didactic exercise.
The teacher controls the process of the game, reinforces the ability to play, monitors the implementation of the rules, using reminders, additional explanations, assessments, questions, and advice.
Younger age : the teacher plays the role of a leader, during the game he connects game actions with the rules.
Average age : the teacher acts through the rule and does not directly suggest game actions.
Older age : the rules are explained before the game, children are involved in explaining their content.
3. Summing up the game is a crucial moment in its management. The teacher notes those who followed the rules well, helped their comrades, were active, and honest. Analysis of the game should be aimed at identifying effective methods of playing it, as well as mistakes made (what did not work and why).
Structural elements of the game
The structure of a didactic game includes: task, action, rule, result, conclusion of the game.
Task. Each didactic game has a precisely established task, which is subordinated to the actual didactic goal. Children are offered tasks whose solution requires a certain amount of intellectual effort and mental work. By completing a task in a game, a child activates his thinking, exercises his memory and observation skills.
The objectives of didactic games come down to several types:
Compare and select objects based on the same, different or similar characteristics (the task becomes more complicated according to the age of the children).
Classify and distribute objects or pictures. Children classify pictures or objects by type or material from which they are made.
Identify an object by several or only one characteristic. Children guess objects from a simple description, or one of them describes the thing, and the rest guess.
Exercise attention and memory. Children must remember a fact or a certain composition of objects, a group of players, etc., and determine the change that occurred in their absence.
Action . In each didactic game, the task is accomplished by an action that determines and organizes the behavior of each child and unites the children into a single team. It directly attracts children's interest and determines their emotional attitude to the game.
The action in the game must meet two basic conditions:
a) be sure to obey the task and fulfill the educational purpose of the game;
b) be entertaining and exciting until the end of the game.
In a well-designed educational game, children should not suspect that they are learning anything. Here the activity should, to a greater or lesser extent, hide the educational, didactic purpose of the game.
Rule : activities in the didactic game are strictly related to the rules. They determine how the child should behave during play, what he can and cannot do. It is important that the rules correspond to age characteristics and are compensated by entertaining activities. Therefore, it must be interesting so that the child willingly obeys the rules.
Result, conclusion of the game : the result of the game is solving the problem and following the rules.
The result is assessed from two points of view: from the point of view of the children and from the point of view of the teacher. When assessing the result from the children’s point of view, we take into account what moral and spiritual satisfaction the game brought to the children. When performing didactic tasks, children show intelligence, resourcefulness, attention, and memory. All this gives children moral satisfaction, increases self-confidence, and fills them with a sense of joy.
It is important for the educator whether the task has been completed, whether the prescribed actions have been carried out, whether it has brought certain results in this regard. At the end of some didactic games, you need to reward the participants, praise the children, or assign them leading roles in the game.
Types of didactic games
Didactic games differ in educational content, cognitive activity of children, game actions and rules, organization and relationships of children, and the role of the teacher.
In preschool pedagogy, all didactic games can be divided into 3 main types: games with objects, board-printed and word games.
Games with objects : for them it is necessary to select objects that differ in properties: color, shape, size, purpose, use, etc.
Board-printed games - This is a very exciting activity for children. Most often, didactic games with paired pictures, cut pictures and cubes are used. In this case, for middle-aged children, one or more objects should be depicted: toys, trees, clothes or dishes. Children can independently differentiate their distinctive features: size, color, shape, purpose. To work with cut pictures, older preschoolers can be asked to independently put together a whole picture from its parts without first examining the whole image.
Word games are built on a combination of words and actions of the players. In such games it is required to use previously acquired knowledge in new connections, in new circumstances. Therefore, in junior and middle groups, games with words are aimed mainly at developing speech, cultivating correct sound pronunciation, clarifying, consolidating and activating vocabulary, developing correct orientation in space, and the formation of dialogic and monologue speech.
Now I’ll show you what games I made with my own hands. The first game is “who eats what?”
Materials: Cardboard, scissors, clothespins, glue or glue gun, gramophone record or other solid base.
First, we look on the Internet for pictures of animals and what they eat. We print out the animals we like on cardboard or draw them ourselves.
Carefully cut out the animal faces and glue them onto clothespins.

The basis for the game can be a gramophone record; I have the lid from a round box.

Progress of the game: The child is asked to attach clothespins with animal faces to the circle in such a way as to indicate the correspondence between the animal and the type of food.
One more game"Mom and Cub." We look for pets on the Internet, print them on cardboard or draw them ourselves. Carefully cut out the cards. On one side, we make holes with a hole punch.

We prepare laces according to the number of animals.

Progress of the game: the child is asked to tie the mother of the animal and her baby with a string.

We put everything in a beautiful box (you can cover a candy box with self-adhesive paper, or just colored paper) and write the name of the game. Ready. 


