How to properly attach the binding to your skis. Choosing ski bindings and boots
From how to put the mounts on cross-country skiing, as well as the quality of their execution, the performance characteristics of the skis depend. Skis presented in modern stores have a special platform that ensures reliable fixation of sports shoes. Even if you are perfect, improper installation can damage the structure of the skis, reducing the lifespan and strength.
What tools are needed to install the fasteners?
Everyone can handle installing cross-country ski mounts with their own hands. To do this you will need the following set of tools:
- template for perfectly accurate drilling of holes;
- ruler or corner to determine the center of the ski;
- drill with drills 3.4-3.5 mm;
- marker or pencil;
- special glue or simple PVA;
- screwdriver or screwdriver.
How to place the mount correctly?
For cross-country skiing today there are several most popular systems for attaching boots to cross-country skis:
- SNS - produced by Salomon;
- NNN - produced by Rottefella;
- NIS - they are produced by Madshus and other companies.
The methods for installing different mounting systems on skis may be different, but there are certain requirements that are always the same:
- ski boots must be securely attached to the skis;
- the system should provide high maneuverability and ease of control when moving;
- the fastening should increase the strength of the ski at the place of its installation.
Use a ruler to measure the center of the ski and mark it with a pencil. To mark the holes for screwing in the mounting bolts, use a template or a special jig - this is very convenient and quick. Install a conductor that matches the type of fastening you have chosen - SNS or NNN. The carefully measured and marked center of gravity must coincide with a special mark on the conductor.

If you don’t have a conductor, make a template from cardboard or thick paper (sometimes the fasteners are sold already supplied) ready-made template). If it is missing, attach the mount to the ski so that the center of gravity mark on the ski aligns with the mark on the template. The same applies to the axis of attachment of the boot bracket. The holes present on the template must be marked with a pencil or pressed with an awl. This marking option is not the most accurate, so it is better not to use it.
Modern mounts may have shifting elements, so the holes for the screws that hold the platform should be marked when the mount is assembled and closed. Otherwise, the holes will shift by about a centimeter.
Once the holes for the ski bindings are marked, we begin drilling them. You can make holes with a drill with adjustable speed and special drills of a suitable diameter and with a depth limiter. A special drill has an extension that centers it in the hole of the jig and stops when it reaches a certain depth.
Holes should be drilled at low speeds with light pressure. A hole with a diameter of 3.4 mm is required for installing the NNN mount, and 3.6 mm for the SNS. In both cases, the hole depth is exactly a centimeter.
Procedure for installing bindings on cross-country skis
If you're wondering how to install bindings on cross-country skis, keep the following information in mind. Before installation, you need to fill the holes with glue, which fills all the cracks, providing strength and protecting the internal structure of the skis from water. Without proper protection of the holes, moisture will seep into them and be absorbed into the cavity of the ski, causing rot from the inside. This usually happens with products that have a honeycomb structure or are made from natural materials.

You can buy a special branded glue, but regular PVA will also work. Epoxy resins cannot be used, as the solvent can damage the structure of the ski. The mount is screwed to the ski as efficiently as possible so that there is not the slightest play. After this, the glue should dry within 24 hours.
NIS ski bindings
Every skier should know how to install bindings on cross-country skis. The use of NIS bindings significantly simplifies the work process and allows you to adjust the position of the platform under the boots on the ski.
NIS bindings can only be installed on special skis that have a special platform. Similar models are produced by Madshus and some others. When installing, the ski mount should be guided along the guides until a characteristic click occurs. A thrust bearing is also installed along the guides, which is fixed in a suitable position with a special key from the kit.
Installing the footrest on inexpensive models of ski bindings does not require special tools. The NIS system makes it possible to select the correct location for the ski mount, taking into account the characteristics of the route and weather. You can change your position before each ski trip or workout.
Choosing ski bindings is becoming more difficult as brands struggle to retain customers. If until 2015 there was only a screwless NIS platform, which everyone could drill without any problems and install any fastenings, then since 2016 everything has become more complicated. The IFP system has appeared with a new platform, on which it is not so easy to install screw mounts without an adapter. Now the choice of fastenings - headache for the user uninitiated in these marketing wars.
In the article we briefly and clearly talk about the types of ski bindings, platforms, their compatibility and which one is better to choose.
Types of ski bindings: differences between SNS, NNN and Turnamic, compatibility
More than one generation of skiers has grown up on the competition between the SNS and NNN systems, everyone is already accustomed to this - the difference between SNS and NNN is in the number of guides. In 2005, NNN switched to the NIS screwless platform and gradually phased out screw mountings. In 2016, the IFP system with Turnamic bindings was released - only Fischer and Rossignol skis are available with it. Salomon and Atomic release their Prolink system - an analogue of NNN, only with screws. Now let's look into this leapfrog so that everything becomes clear.
Ski bindings NN75
Outdated fastening system Nordic Norm 75. Has no advantages other than price. Rarely found on sale and even in ski rentals.
Fastenings standard NN 75
Ski bindings SNS (Salomon Nordic System)
The system of the French brand Salomon, over time it began to be copied by unknown manufacturers, including Chinese. SNS mounts are distinguished by one wide guide. They are divided into Pilot (2 boot fastening brackets) and the rest with one fastening point (without the word Pilot in the name). All fastenings of this system are placed on screws in drilled skis.
SNS boots are compatible with the following bindings:
- Salomon Profile and SNS Access
- Salomon Pilot(Pilot bindings only fit Pilot boots, Pilot boots fit any SNS bindings)
Ski-binding compatibility:
- SNS mounts can be screwed onto any ski

SNS Pilot boot sole
Ski bindings NNN (New Nordic Norm)
System from the Norwegian brand Rottefella. NNN mounts are available on screw and screwless platforms. In 2016, the Turnamic fastening system and boots with Turnamic soles (Fischer, Rossignol) were released - similar to the NNN sole, the boots are fully compatible. Salomon and Atomic did not stand aside, but released their Prolink fasteners - the same NNN, but with screws.
NNN and Turnamic boots are compatible with:
- Rottefella NNN, NIS,Move
- Fischer Turnamic and Rossignol Turnamic
- Salomon Prolink and Atomic Prolink
Ski binding compatibility:
- Rottefella NIS mounts only on NIS platforms
- Turnamic mounts only on IFP platforms
- Prolink fastenings are only with screws (you can drill any platform, but more on that below)

NNN and Prolink boot soles. Turnamic is compatible, but does not come with a tread in the middle.
Skate and classic bindings
Fastenings are divided into ridge and classic. On skate bindings, the flexor (elastic band) is stiffer, and on the SNS Pilot there is a second point for fixing the boot. Bindings for classic skis have a softer flexor. Amateur combination bindings include a universal flexor, which is only suitable for classic riding and walking.
During the skating stroke, the ski will dangle on the soft flexor during the carry phase. In the classics, on the contrary, you need a softer flexor so that it does not interfere with the work of the foot and pushing off. Be sure to pay attention when purchasing which style of mounts are intended for.
Which ski bindings are better: mechanical or automatic?
All manufacturers have automatic and mechanical fasteners in their line. Automatic ones latch themselves and unfasten manually. Mechanical - fastened and unfastened manually.
- Automatic bindings are less reliable and are designed for skiing; they are much cheaper than mechanical ones. They can come unfastened at the most inopportune moment if snow has clogged the mechanism before riding.
- Mechanical The mounts are reliable and durable, designed for training and competitions, and can withstand heavy loads. They cost more, but they work like a clock - they don’t come off at the wrong time, and the mechanism doesn’t freeze.
SNS or NNN: which system is better?
Marketing and the patent war force skiers to make compromises. In this war, only Salomon and Atomic did not fence themselves off - they released boots with different soles for different fastenings. In the article, we wrote that it is better to choose mounts for boots, and not vice versa. It’s impossible to say whether NNN or SNS is better – both are reliable and of high quality. The only thing that can stop you from buying SNS boots is that they are gradually losing popularity, and there are fewer and fewer of them on sale. Plus, many people don't want to drill their new skis if they don't have to be drilled.

Which brand of fasteners should I choose?
The answer is probably predictable. If possible, choose fasteners from famous brands such as Salomon, Rottefella, Fischer, Rossignol, Atomic. They will be more expensive than their Russian and Chinese counterparts, but are made of durable, frost-resistant plastic and undergo strict quality control. Russian and Chinese analogues have a higher percentage of defects, worse quality, but lower prices.
What are the advantages of NIS and Turnamic over screw mounting?
The main advantage is not the simplification of installation, but the ability to move the mount along the ski and adapt the operation of the skis to your needs. This is convenient in the classics, when you can adjust the holding of the skis by shifting. Moving it forward a couple of clicks will give you better grip, but the glide will suffer a little. By moving it back, on the contrary, the glide will improve, but the grip will become worse. The holding and sliding can only be adjusted by shifting the fasteners.
In skating, the stability/speed ratio is adjusted by shifting the fasteners. Shifting forward increases the stability of the skis, shifting backwards reduces stability but increases rollout. The effect is not as significant as with the classics.
How to install NIS and IFP bindings on skis without a platform?
The NIS and IFP platforms are sold separately and can be installed with screws on any ski.
How to install SNS bindings on skis with NIS and IFP platforms?
How to use NIS mounts?
How to use IFP Turnamic mounts?
Play sports, move and travel! If you find a mistake or want to discuss the article, write in the comments. We are always happy to communicate. 🙂
If you have a modern NNN or SNS type mount from Salomon, then you are terribly lucky. So, as they themselves can determine the center of gravity of the ski. It is enough to take a ski, find its thinnest part (like a ruler) and place it edge-on on the floor, then take the second ski and place it across, it is very advisable to place it at a right angle. After which we observe the process of how the scales work (the front and rear ends of the ski should hang in the air at the same height). But if you purchased a mount that is quite heavy, then you should measure the center of gravity a little differently. Everything is so accurate with the first ski, but the second one needs to be placed through the boot fixation groove.
After the skis are in desired position, you will need to mark a perpendicular line on the top side of the ski and always above the mount itself. This procedure repeat with the second ski. Read on and answer the question: how to properly install bindings on skis?
So, now you need to determine the center of gravity of the boot. It is important to understand whether it is old or modern. The first ones should be attached at the very edge of the boot, and for the second, the center of gravity is set along the edge of the boot. But we are guided by SNS standard mounts, don’t be alarmed, there is absolutely no difference for others. Other than that, it doesn't matter what style you use when running. Find a rod on the boot that will fit into a special groove in the mount; it is this groove that should be where the center of gravity of the ski is.
By the way, under this groove, in the center, there is another groove in which the middle part of the mount is attached. Then we take the fastener, apply it to our markings, and in the places where the screws should be, we use an awl to make small holes. Once marked, you can remove the mount and check that the center mark is aligned with the center and the back marks are equally spaced from the edges. We repeat the operation with the second one so that we can install the bindings on the skis.
We take the core and measure how deep the screw will go into the ski - this is done so that later we don’t drill through the ski. When we have measured it, we take a drill with a diameter of 6-4 mm, smaller if possible, and drill. Important: after measuring the depth, mark it with electrical tape, or even better if there is a ruler on the drill.
Now that we have 3 holes ready in each ski we can remove the plastic clip that releases the ski. Then we fix the fastening in it with a screwdriver. You don't need to tighten it all the way, about halfway. By the way, don't use glue. Previously, skis were made of wood, but glue has a detrimental effect on modern skis.
Replace the removed bracket. We assemble the mount and install it end-to-end, while closing the previous screws until they stop. Don’t forget to mark the holes on both skis, and then tighten the bolts (you definitely won’t need glue here). After all this, close the “heels” with plugs. That's all, I hope it worked for you.
Naturally, skis are one of the most important components of a skier’s equipment, but not everything. You will need bindings and special boots. And their diversity will confuse any beginner in skiing. And in order to decide on the choice of this ski equipment, before going to the store it will be useful to familiarize yourself with what you should look for when purchasing.
Choosing boots
First of all, you should choose the most comfortable boots for yourself, and then look at the appropriate ski bindings. Therefore, we will begin the description with ski boots.Cross-country ski boots, like skis, are divided into three types according to the intended skiing style and four according to the target audience.
Depending on your cross-country skiing style, you will need the following boots:
- for the skating style you need a high boot with a rigid cuff to secure the leg. The load on the leg with this style is higher, therefore the presence of a cuff is mandatory - without it, the skier can damage the leg;
- a low boot with a soft sole is suitable for a traditional style;
- There are also universal boots, they come with or without a removable hard cuff, with a moderately hard sole.
- boots for professionals. These boots are subject to the heaviest load, and therefore, during their production, much attention is paid to reliability and quality. Used on professional cross-country ski boots Newest technologies, so you rarely see leather elements in them - there are synthetic materials that are superior to leather in many respects. Boots for professionals are expensive, but they will last quite a long time;
- boots for sports tourism. These boots also have serious requirements. They are mainly purchased by tourists with extensive experience, as well as climbers. Boots for sports tourism make them comfortable for walking, without skis, if necessary. They are most often made combined, with a replaceable cuff, the material is Genuine Leather with synthetic inserts. They must be reliable and durable, shock-resistant;
- boots for recreational skiing. These boots do not apply high requirements, so there are both expensive and cheaper ones: depending on the materials from which the boots are made;
- boots for children. Children's boots should be comfortable, durable and warm. In addition, they should be both easy to put on and easy to take off.
 Cross-country ski boots primarily use laces. If you loosen the laces on a shoe so that it can be put on freely, the laces should not fall out through the uppermost lacing hole, i.e. be long enough. A properly laced boot, on the one hand, securely fixes the foot, and on the other hand, does not squeeze it. It happens that there is additional linden at the top of the boot - it protects against snow getting into the boot and serves as an additional fixation.
 Under no circumstances should you purchase ski boots without trying them on, and be sure to wear socks when trying them on. These can be either specialized socks for skiing, or woolen ones - neither thin nor thick. The ski boot should not press under any circumstances. On the other hand, boots that are too loose will make it difficult to control your skis.
So, when trying on a boot, you need to walk in it, stand, lift your heel off the floor - inside the boot, the heel should fit snugly to the sole and not come off it. MirSovetov also recommends paying attention to the fact that the fold that forms when lifting the heel in the area of the instep of the foot should not put pressure on the toes. If the boots do not meet these criteria, this means that they are not suitable for you.
In addition, if you are choosing boots for skating, the cuff should hold the leg well, but not squeeze or interfere with its movement. In general, as for the stiffness of the boot, for the skating style it is the largest, for the classic style it is the smallest, and for the combi style it is average.
 The structure of ski boots is fundamentally different from the structure of cross-country ski boots. Ski boots consist of two elements - an outer boot and an inner boot.
The outer boot is responsible for the impulse transmitted by the skier during movement - the stiffer the boot, the better the skis handle.
Different companies designate the stiffness of ski boots differently. Some companies characterize them simply: “soft”, “hard”. Others, namely Nordica and Salomon, have derived an absolute value of stiffness - kilograms of force per degree of deflection (meaning forward bending). For beginners, MirSovetov recommends boots with a stiffness in the range of 15-60 kgf/deg. For those who have already mastered skiing and have basic skiing skills, this bar rises to 40-80 kgf/degree. Further, when you are already quite confident on your skis, you should take a closer look at ski boots with a hardness of 60-90 kgf/deg. And the hardness of 115 kgf/deg and more is designed for those who engage in skiing professionally; they are not worth taking into consideration for now.
In general, the stiffness of the outer boot can be adjusted - but if the skier is standing on skis for the first time, this, of course, will not help him. The stiffness adjustment is designed for advanced skiers. Depending on the slope or effort applied, it may be slightly modified.
On the front part of the boot there are metal or plastic clips, equipped with length adjustment for a clearer and more comfortable fixation of the leg. The number of clips can be from 1 to 4 per shoe.
In addition to clips, boots can be equipped with screws designed for different purposes. For example, with a folding heel, such a screw is built into a large clip; when it is tightened, the tape securing the leg is tightened inside the boot.
Ski boots may also have a power belt that secures the cuff (shaft) along its upper part.
The cuff itself can be adjusted forward and backward, which serves to more accurately fit the boot to the skier's stance. Additionally, ski boots may have one more functionality, called canting. This option allows you to change the angle of the boot cuff left/right, adjusting it to the skeletal structure of the legs of a particular person.
At the back of the boot there is an element responsible for improving the transfer of force to the ski.
When walking off-slope it is convenient to top part the boot was loose. For this purpose, there is a “walking-skating” switch, which just frees the leg enclosed in the boot from being constrained.  Another existing difference in ski boots - the principle of entry. In boots with a front entry, the cuff opens at the front, which allows the boot to better fit the foot. Most often, this principle is used for sports and expert models; in such boots, the cuff does not have an adjustment for tilting back. Center-entry boots feature a partially fold-down back of the boot, making it easier to put on and take off. Finally, rear entry boots, which are the most comfortable for beginners, have a flip-up heel, making them fairly easy to put on.
The inner boot in ski boots is made of soft materials. It both eliminates the need to wear a sock under the boot and allows for a more precise fit.
The materials for inner boots differ in their properties. For models intended for beginners, the boot is made in such a way that it takes on the exact shape of the foot within the first minutes. In expert models, this takes time - the inner boot is made of a tougher, more unyielding material. On the one hand, it provides better contact with the ski (as well as the rigidity of the outer boot), but on the other hand, skiers without the proper level of training will find it uncomfortable in such boots. It will be possible to switch to them over time.
Choosing boots for mountain skiing is more difficult. There is one thing about the size elementary rule, which should be followed: if the foot is wide, it is better to take half a size larger, because under load it will definitely become even wider. For the same reason, you must try on shoes while standing.
Try it on with a thin elastic sock. It should be perfectly even and smooth, without any folds, and end above the end of the cuff.  You need to understand that it is useless to rely on a manufacturer when choosing - each of them produces boots with their own characteristics - with a wider or narrower toe or heel, with different insteps, and so on. The price for a ski boot is also not the most accurate indicator. The most expensive boots are expert ones and will be very difficult for a beginner. It is extremely important to choose comfortable boots - if there is even a little pressure when trying them on, you should not take them - on the slope this discomfort will intensify many times over, which can cause a spoiled holiday (at best).
When trying on a boot, you need to fasten all the clips. You should start fastening the boot with the second clip from the toe, the one that tightens the arch of the foot, thereby fixing the heel. After this, you should listen to the sensations - are your toes resting on the toe, is it possible to move them a little; The heel should not dangle or come off the insole when tilted. You need to move your leg back and forth, from side to side.
Now you can try to tighten the clips as much as possible. There is a pitfall here: do not forget that the inner boot has not yet collapsed, and that later you will need to tighten the clips more. And if, when trying them on, they are already tightened as much as possible, then later, when it is really needed, the clips cannot be tightened.
If it seems that the shoe is still too small, MirSovetov recommends putting half a size larger on the other foot and again listening to the sensations of which foot is more comfortable. When trying it on, you need to sit down - if it throws you back, it means the boot is too stiff. It’s better to spend 15-20 minutes in your boots, stand, and walk a little. Having bought boots, you don’t have to put them away before skiing - you can wear them at home, preparing your feet for the slopes...
As for companies producing ski boots, there are many of them. Rossignol, Salomon, Fischer, etc. have proven themselves well.
It is useful to know that, along with typical target groups, manufacturers distinguish ski boots for carving and women's models.  There is no need for carving boots for beginners; they are designed for athletes who have been skiing for a long time and have a strong footing. The differences between these models are as follows:
- on the one hand, increased rigidity of the outer boot in the lateral direction and, conversely, weakening of the resistance of the cuff when tilted back and forth;
- Along with the usual “walking-skating” switch, there is a third one (“soft”, “carve”), which is responsible for the soft resistance of the boot when bending forward or backward.
- this model almost always uses a “platform” that raises the skier’s foot higher above the surface of the ski.
Selection of mounts
 There are three types of cross-country ski bindings:
 - front (Nordic 75);
- with a “gutter” (SNS system);
- with “rails” (NNN system).
Let's look at each of the fastenings in more detail.
Front mounts, Nordic 75. As mentioned above, this type is outdated and is almost never used anymore.
 The NNN system has two lugs for mounting, “rails”. This type of binding is preferable for amateurs, since, unlike SNS, the front bracket of the boot is moved back, which allows for better control of the skis.
 There are rubber stops on the front of the NNN mounts. You can easily determine their hardness by their color. Determining the stiffness is important in order to understand which bindings are best for you based on your preferred riding style. For a skating stroke, greater rigidity is required, for a classic one, correspondingly less. The color options for bindings indicating rigidity are as follows: white for the hardest style, green for softer riding, black for standard rubber bands and red for soft ones. Thus, white and green are suitable for skating style, and black and red are suitable for classic style.
Rottefella specializes in such fastenings, and also produces them for other companies. Thus, boots from Alfa, Artex, Alpina, and new items from Rossignol are also suitable for NNN bindings.
 The SNS system differs from the above-mentioned one in that the boot bracket is fixed directly to the toe. As for the color of the rubber stops, they are also different. There are three types, but the rubber bands also have a number stamped on them that corresponds to the hardness. There are yellow ones (with the number 85) - for classics, red (115) - for skates, and universal ones (95) - pink-lilac. It has one protrusion for fastening the “groove”.
 SNS bindings and boots for them are produced by Salomon. MirSovetov would like to draw your attention to the fact that the new models of SNS bindings and boots are different from the old ones, and therefore, when purchasing, you should consult about the compatibility of both.
The following boot brands are suitable for SNS bindings: Salomon, old models Rossignol, Adidas, Karhu, Fisher.
SNS and NNN fastenings suitable for all shoe sizes. Exceptions are for children and youth; special fasteners are produced for them, which are distinguished by a large latch handle and a softer fastening mechanism.
 By the way, there are two types of fastenings:
 - automatic;
- mechanical.
As for installing fasteners, MirSovetov recommends doing this in a specialized place (a service center or a store). The danger is that you can incorrectly determine the center of gravity, accidentally drill through the ski, or make the holes for fasteners too large.
Skiing IN alpine skiing The safety of a skier largely depends on the bindings. Everything is done so that when moving, they securely fix the boot, preventing it from moving, but at the same time, in the event of a risk of falling or injury, they immediately unfasten.
Modern bindings for ski boots are made of heavy-duty materials - titanium, steel or high-strength plastic. The main fastening elements are: the fastening head, the fastening heel, the platform and the ski stop.
Mounting head. This is the front part of the fastening, which is responsible for releasing the toe of the boot when the skier falls - sideways and backwards. Its most important characteristic is elasticity. This is the ability of the head to not open during short impulse impacts, but to return the “left” shoe to its original position. Vertical elasticity can be up to 20 mm, lateral - up to 45 mm. In addition, some models have a TwinCam system, which allows the boot to move sideways by half the sole. If the displacement continues, the head unfastens; if not, it returns the shoe to its place.
Fastening heel. Performs the same functions as the head, only it frees the heel of the boot if necessary. It also has an indicator of vertical elasticity (up to 25 mm).
According to the method of fastening, they are divided into:
- manually fastened;
- semi-automatic - they are set manually and then snap into place when pressed with your foot;
- automatic - the fasteners snap into place when pressed;
 Platform. The part of a ski binding that connects the head and tail. Its main function is to provide better contact bindings and skis, in softening micro-shocks (for example, on an uneven track) and dampening vibration. In addition, a higher position of the boot relative to the sliding surface and edge provides a number of advantages: it allows not to interfere with the flexibility of the ski, contributes to a more convenient distribution of efforts spent on movement, etc.
 Skistop is a system responsible for braking a ski when it falls. Roughly speaking, the bars of metal that slide down the sides of the ski when the boot is released from the binding. Therefore, for skistop to be effective, i.e. was able to slow down the ski when unfastening it after a fall, MirSovetov advises selecting ski stops so that the width is more width skis.
It is very important to initially choose the most suitable skis, bindings and boots for them. Because any discomfort while skiing will discourage further skiing. But at the same time, it is very difficult not to make a single mistake when choosing for the first time. The final understanding of what you really need will come only with time, with riding experience. Therefore, if possible, before purchasing your first equipment, try out several different skis, boots, and bindings (for example, renting or borrowing from friends). Then you will be prepared for the purchase not only theoretically.
In the next article, in order to finally prepare you, we will tell you
Abstract. Detailed description of installing bindings on cross-country skis. Video at the end of the note. You can download a markup template for installation.
It so happened that my old ski boots with 75 bindings broke. Naturally I wanted to switch to new level progress and install modern ski bindings. And then my son had some good extra Salomon boots for SNS bindings. I didn’t have to worry about choosing fasteners and they were purchased for 800 rubles. The exact name is Salomon SNS PROFIL AUTO MEN.
These bindings are marketed as: “Comfortable touring bindings with flex characteristics targeted at male skiers.” Just what the coach ordered.
Because I remembered that I had drills, a drill, an awl and a screwdriver at home, so I politely refused the offer to install the fasteners in the store. Moreover, the box contained instructions in 10 languages.
We install ski bindings ourselves.
At home, when I started studying the instructions, I discovered an interesting point:
Installation of fasteners.
“Your bindings must be properly installed on your skis by a certified professional at your Authorized Salomon Dealer shop or service center in accordance with the instructions and recommendations in the latest edition of the Salomon Cross Country Ski Technical Manual. Failure to follow this rule increases your risk of injury while riding.“.
That's it, not a word more about installation. I also read from this manual helpful advice that when fastening on uneven terrain, you should tie the ski to your right or left leg to avoid losing it. By the way, very wise.
The remaining points, as usual, are complete reinsurance of the manufacturer against various legal claims of a spoiled Western consumer.
Based on the lack of that same manual, I had to remember my carpentry and plumbing skills from labor lessons and install the fastenings myself. Who worked hard at school and then managed to consolidate the skills of marking, drilling and driving screws in Everyday life, he must cope.
Here is a set of tools that we will need. You can use a Phillips screwdriver to drive screws. But it’s much better to have a special PZ3 bit that costs 35-40 rubles. The bit has a blunt tip and fits tightly into the cross of the screw. When driving screws with a regular Phillips screwdriver, you need to press it firmly so that it does not slip.

The RZ3 bit will make it easier to drive screws

Tool kit for self-installation of fasteners
Our main task is to establish the axis of attaching the boot to the ski strictly at the center of gravity of the ski. Professionals can move the mounts to one side or another from the CG. Fans of Sunday ski trips have no need for such troubles.
First of all, I dismantled the old 75 mounts. There were three holes left from them, which did not interfere with the installation of SNS mounts.

Find the center of gravity of the ski. To do this, we use the thrust bearing from the fasteners themselves. After several unsuccessful attempts this center will be found. We make a line with a felt-tip pen.

Using a square, we draw a perpendicular to the side edge of the ski.
Above this line there should be a rod that is on the sole of the shoe.

Draw a perpendicular through the center of gravity
We apply the mount so that the clamping point of the boot shaft is above the center of gravity of the ski and carefully use an awl to prick the center of the front hole. We do this maneuver very carefully. One day, I was installing a mount and drilling three holes at once. As a result of inaccurate drilling, the heel of the boot was slightly shifted from the center of gravity and nothing could be corrected.
So now, I decided to drill the front hole in the center first. Screw the mount onto one screw, try on the thrust bearing and then mark the other two holes.
The front hole must be located strictly along center line skis and at a distance of 35 mm from the center of gravity. I found this out later, having found this markup template from Salamon on the Internet.
We select a drill. We take the screw from the kit and use a caliper to measure the diameter of the screw shaft.

This is the drill you need to use to drill the hole. There are tips to drill with a 3.6 mm drill. http://www.skiline.ru/sport-technology/169-ski-binding-mounting. But it's somehow risky. Too much tension in the hole can lead to cracking of the ski. According to classical carpentry canons, the diameter of the hole should be equal to the diameter of the screw rod. I decided to go 50/50 and drilled with a 3.8 mm drill. In order not to drill through the ski, we place an emphasis on the drill using insulating tape.

You should first make sure that the length of the screw is not too long and it will not come out from the sliding side of the ski.
We drill a hole, trying very hard to keep the drill perpendicular to the ski. Here a screwdriver or electric drill is preferable to a hand drill.
When drilling, do not press too hard on the drill. We remember that a ski is a layer cake and its filling is not very strong.
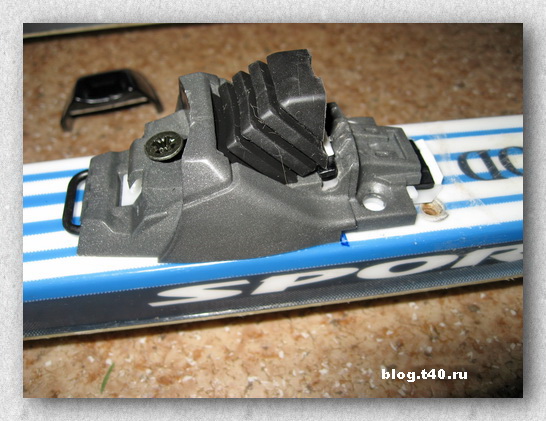
We place the mount on the first screw. We apply a thrust bearing. Carefully align the mount. Holding the front part, remove the thrust bearing and mark two other holes.

Do not snap the front mounting bracket. The front screw is located under it. The fasteners are in the box with the bracket not latched. As a rule, everyone starts turning the mount and snaps the bracket.
If the bracket is accidentally snapped, then we do this. We insert one screwdriver with a rod diameter of 4 mm into the groove where the boot rod is inserted, and with the second screwdriver we carefully pry the bracket up. It is better to remove it and put it aside until the end of installation.

I install the screws without glue. The tension in the hole is very good and in my opinion there is no need for glue.
We do the same with the second ski.
The process of installing the ski binding is shown in more detail and in dynamics in the video. Here I installed the SALOMON SNS SKATE skating bindings on new skis.


