Dishonored 2 how many missions. Mission "Grand Palace"
Arkane Studios has created one of the most interesting games in the stealth action genre, in which the main emphasis is on adventure. It's about about Dishonored 2, and it is a sequel to the famous Dishonored (2012).
Dishonored 2: game plot ry
The island empire in which the action takes place is going through hard times.
In Carnac, a city on the coast, live Corvo Attano and Emily Kaldwin. For 15 years after the events of the first part, they, together with the rest of the people, have been experiencing the events that plunged the empire into disaster. Firstly, the ruler of the islands lost her power due to a character with supernatural powers. You can return the throne only by playing as Emily or Corvo - after all, they are the only hope to free the empire from the oppression of the otherworldly usurper. You have a choice of Dishonored walkthrough 2 for Emily or Corvo, who during the game must complete tasks that have several options for completing several solutions - from stealth to violence.
The idea of Dishonored 2 has appeared ever since the developers decided to work on an addition to the first part. The first step was to give Corvo a voice, since his constant silence oppressed many people. At first, Emily Kaldwin was just a new heroine of the game, but later they decided to develop her line into a separate story campaign. Both characters were placed in the fictional city of Carnaca, which was inspired by medieval paintings and sculptures. Also, the basis for urban design was the Greek, Italian and Spanish cities of the mid-19th century.
Kills and chaos level
From the moment you start the game, you begin the passage of Dishonored 2 as Emily Kaldwin, an empress who survived the dethronement. After the prologue, you can choose who to play next - Corvo, known from the first part, or continue with Emily. You can progress through the game either by killing enemies or without touching them. Same with magical abilities- you can develop and use them, or you can not touch them at all.
In the new part, the passage of Dishonored 2 includes battles that do not require you to kill the enemy. To destabilize the game world, you can commit murders - then your level of chaos increases. There is also one specificity in the chaotic system: when you just decide to complete the next task, each character you are not playing receives one state - sympathetic, guilty or deadly. If you kill a sympathetic one, the level of chaos will increase greatly. But after the murder of a deadly person, chaos almost does not grow. The chaotic system changes the plot dialogues and the situation in the city. If there are a lot of corpses around, which are inevitable when high level chaos, many bloody flies will appear and settle in the corpses. Each stage of the game is special - this is manifested in mechanics or plot.

According to the developers' statements, total time The game will last from 12 to 20 hours.
Prologue
You control Emily. Your goal is to undergo training in agility, secret movement, shooting, fencing, so that the passage of Dishonored 2 will be successful.
Long day in Dunwall
Corvo Attano began to frame someone, killing Emily's opponents. The first chapter begins from the moment you meet Delilah. She kills your friends, Corvo and Emily survived. Choose who to play for.
For Corvo: Emily turns to stone, Corvo is stripped of the Dark Mark and made a prisoner of Dunwall.
For Emily: the same, only in reverse.
Next, the passage of Dishonored 2 includes the path to the throne room. There you will learn about Mortimer Ramsay, who wants to commit a robbery. Steal his ring. Follow to the treasury, where you will use the stolen artifact.
Run from Dunwall to the street towards the pier.
On the edge of the world
Here you will meet the Alien. Thanks to this, you can return your magic powers or not (then the difficulty level will increase).
Also, during the game you will have to find 8 amulets on the ship in the teeth of a shark, also find a building in which a corpse will hang from the window. Search the dead man, he is wearing another amulet. You will find two more amulets on the Alien altar in the same building. You will find 10 runes at the bottom, from the seller in the market, in the canal area in the ditch after you shoot off the wooden board with a crossbow bolt. The next rune is in the house with the sign "Seized!" You will also visit the caretaker outpost, where you will collect the rune on the third floor (look for the safe, combination “423”). The amulet is on the 4th and 6th floors.
Having collected everything you need (along the way you will come across many things such as paintings, drawings, ingots that you should not miss) go to railway. From there, head to the institute.
Addermere Institute
Here your goal is to talk with Hypatia, but alas, the woman is infected. She can either be killed or cured. To cure, go to the research institute. There are opponents waiting for you on every floor here, so be careful. Try to either avoid or eliminate one at a time.
The healing serum can be made on the third floor. There, take a syringe, fill it with the blood of an infected person whose corpse you find nearby, and then use special equipment to prepare a potion.
Return to Hypatia and inject the syringe into her neck. Talk to the recovered woman on your ship. Before sailing, do not forget to turn off the observation tower.
You will also visit Royal Conservatory, Dusty District, Crack in the Ceiling, Grand Palace. And your missions will end The death of the empress.
Walkthrough of Dishonored 2 is not difficult, but we will give you some general tips:
- The first mission shouldn't take you long.
- For Emily, her main skill is Dominoes. You need to master it right away, it will help a lot in passing the game.
- If you kill someone, get rid of the corpse. And don’t forget to wind your watch - this will be a good distraction for your opponents.
- Dishonored 2 will be easier if you don't be afraid to follow along. The guards, oddly enough, only react to their feet. By not showing them, you will not be detected.
- Robots need to be blown up and torn apart.
- Corpse wasps are a nasty enemy, but don't use incendiary bolts on them. The game for this purpose provides something explosive near the hives - look for it.
By observing these simple tips, completing Dishonored 2 won't take you too long, and won't make you waste too much time.
Good luck with your passage!
And here we are again on the ship, discussing the plan with its captain Megan further actions. During the previous task, it was possible to find out that Kirin Jindosh, one of Delilah’s most important associates, a brilliant scientist and inventor, whose intelligence is quite comparable to the same Sokolov, is behind the kidnapping of Sokolov, but his sharp mind does not work for the benefit of people, but rather the other way around.
You still have to get to his estate, as always, however: the approaches are quite reliably guarded, so traditionally you will have to try a little to just get to the mansion. During this mission you can find six runes, one Alien altar, eight amulets, four drawings and six paintings at once. Before setting off on the mission, talk to Megan and Hypatia, from the latter you can take the maximum possible supply of potion to restore mana.
Having set off on a boat and arrived at the place, go up the steps, this is the Lower Aventa location, you can traditionally immediately start collecting runes and amulets - for this, take out the Heart. We need to board the crew, just like in the previous mission. And again, the crew cannot be reached so easily; the station is guarded by a light wall, and in front of it there is also a handful of guards.
To the right of the station, in the courtyards in the basement, there is another black market outlet, which can again be robbed, but this time without the keys - by blowing up the wall on the other side. If you decide to do this, stock up on a tank of blubber, otherwise the two bandits who had already started such an operation did not have enough blubber. You can get to the place from where you can set off an explosion through the balconies of the upper floors of that same high-rise building.
But our task is different, on the black market it is advisable to buy everything that there is enough money for; neither assembly tools, nor stun mines, nor grenades will be superfluous - everything will be useful. By the way, the leader of one of the local gangs, Paolo, will come here and behave extremely impudently, and if you try to deal with him (put him to sleep or kill him), he will turn into a pack of rats. We will meet him again if desired in the next task, but for now, having prepared, go to the Aventa station.
You can get inside the station using an installation tool (reprogram the light wall so that it recognizes you as one of its own), or in simpler ways. The most convenient way is to go in from the other side and climb onto the roof; there are openings in the roof through which you can freely enter. There is also a rune in the backyard, although there is a high concentration of guards. In the station building itself, you can open a safe if you bought the key to it on the black market, you can take an amulet, getting rid of a couple of enemies who have arrived, or you can just immediately go further by carriage to your destination.
It will not be possible to get to the mansion itself, since the crew’s path is blocked by a door locked with a combination lock. The code can be found from one of the guards in the building on the left, on the top floor. There are also various useful things in the building. There are also runes with amulets nearby, collect them using the Heart. By the way, from here you can already get to the Jindosh mansion even without a crew, but it’s easier to still open the gate, since getting back with Sokolov in your hands and dragging him with you, jumping over the abyss, is not the best idea.
Get the code for the door (it traditionally varies for the game, you won’t be able to tell it), at the same time getting rid of interfering enemies, of which there is a fairly large concentration here. The light wall to the left of the building can be turned off on the second floor of the same building by pulling out the blubber tank there. Now you can search the buildings behind the light wall, where those same runes with amulets are, and from where you can jump to the Mechanical Mansion without the help of a crew.
One way or another, you will arrive at that same mansion. You probably had an idea of what it was even before you started playing Dishonored 2 - the location was simply enchanting, which is why fragments of it were actively demonstrated in trailers before the game’s release. So, you went inside, you have a huge variety of options for moving towards your goal - levers are scattered throughout the not-so-small mansion, the activation of which rebuilds the mansion in the nearest rooms literally before your eyes. Each lever has two positions, so all rooms equipped with levers can appear in two different views.
And of course, for all the walls to move, you need mechanisms, and for mechanisms you need space. So there is also space behind the walls where you can move freely and this will not be a bug. So, you have entered, you are greeted - pull the first lever, go up the steps and talk to the owner of the mansion, who will easily recognize you. Therefore, he activates his main pride - the clock soldiers.
Let’s take a closer look here: these are real death machines if you don’t know them weaknesses. If you just try to fight them, mindlessly swinging your sword, the outcome will most likely be disastrous, because they have two limbs with long blades on each side, they hit painfully with electric charges, if you move away from the distance, they see you from the front, and behind, however, on the sides there is a blind spot, which should be used.
In addition, the head is very vulnerable; one shot at it can be enough to tear it off, after which the robot becomes blind and navigates only by sound. Because of this, he attacks anything that moves, including other robots and your enemies. The latter is worse if you want to go through the game without bloodshed. The simplest way eliminate the robot - approach it unnoticed at point-blank range and press the strike button near the knee as soon as you see the corresponding icon on the screen. And there are many records scattered throughout the mansion, from which you can learn about the weak points of the sentry soldiers.
Having dealt with the first two robots that attacked you, look to the left - there is a light wall that can be turned off by crawling under the floor and pulling out the blubber tank there. You can get under the floor by slipping through a gap in the process of restructuring a room; the restructuring is traditionally triggered by a lever. You have quite a few options to get to Jindosh’s bedroom; collect amulets and other useful items along the way.
Jindosh's bedroom is nearby, you need to go through the corridor where the light wall was, then turn right. True, you won’t be able to get through that easily; you’ll have to go into the next room and activate the lever there so that the room will be rearranged. If you go out into the room where there is a piano, it is better not to pull the lever, although with a high degree of probability your opponents will do this for you. The lever changes the piano to a light pole that kills you in one shot - Jindosh modified Sokolov's device.
There are several exits from the room with the piano - one leads towards the place where Sokolov is marked, and that’s where we’ll go. This is the testing room, it can be accessed not only through the hall with the piano/discharge column, but also through the space behind the walls, where you can easily get out through the windows. So you get to the billiard table, there is a lever there again that changes the configuration, activate it, go to the next room, the lever again, jump down as soon as a gap appears in the place of the table.
Once in the testing room, pay attention to the guard - if you play as Corvo, you can move into him provided you level up this skill in order to turn off the light wall that closes the corridor on the alternative path to Jindosh. Otherwise, it is better to stun him immediately. After going down the stairs to the labyrinth of durable glass, read the note on the table. Now you know a non-lethal way to eliminate Jindosh: as it turned out, he has an electroshock machine, which, if configured incorrectly, can erase almost all of the test subject’s memory, with the exception of primitive cognitive functions.
There is also a sentry soldier wandering around in the labyrinth, and our ally, Sokolov, is being kept under guard there. The labyrinth can hardly be called complex; there are buttons scattered on the floor, by stepping on which you lower some walls and raise others. The main thing is to quickly deal with the sentry soldier. You will make your way to Sokolov by finding a button clogged with boards on the far left side of the room. So you make your way to Anton, talk to him, then pick him up and take your feet away from here along the same route that you came here.
Only this time two more enemies will appear, who arrived on the elevator. You can go around them, you can deal with them - whatever is more convenient for you. It’s better to take Sokolov somewhere closer to the exit from the mansion; if you’ve brought a carriage, put him right in the carriage, he won’t go anywhere, and return to Jindosh’s soul. If the option of turning off the light wall in the testing room did not suit you in one way or another by moving in, then return to the room where the piano/discharge column is, there you can climb through the ceiling into top part rooms, from there follow to the right - this is where Jindosh’s already mentioned bedroom is located.
There is also a mention of an electric shock machine, by the way. And another hourly soldier. In the far part of the bedroom there is another lever that opens the exit to the balcony. Jindosh will assure you over the loudspeaker that from here - best view to Karnaca. From the balcony we need to climb onto the ledge on the right far below. There you will find a small hatch in the wall, open it, and get out into a small room with an elevator.
It is here that Jindosh's laboratory is located, two watch soldiers wander around in it, in addition to their owner and inventor. Don't cut off the robots' heads if you want to eliminate Kirin without killing him. However, it is still necessary to get rid of them. Jindosh himself should be put to sleep (with a dart or strangulation), and then placed in the chair of his electric shock machine. The latter does not have enough energy, so it is necessary to distribute its consumption so that the charge is enough to clear the inventor’s memory.
For this there are two remote controls - on the left and on the right of the machine. The proven working configuration is an optical stand on the left side, and an anatomical one on the right. All that remains is to pull the lever and watch how the former genius turns in terms of intelligence into something similar to a five-year-old child in terms of mental development. Now it’s time to get out of here if you’ve already collected everything you wanted to collect - runes, amulets, money, paintings and other valuables.
You can complete Dishonored 2 in this task by going through a spectacular corridor over an abyss with a folding floor - to lay the boards, just pull the lever. And the door is locked with a simple bolt. Then you won’t get lost, you’ve been here before. All that remains is to deliver Sokolov to the evacuation point. Near the station, instead of guards, there will now be witches - do with them what you want, you can just go around and not get involved. By delivering Anton to the boat, you will complete this mission.
Dishonored 2. Walkthrough (3)
|

- General information.
3. The Good Doctor
Addermere Institute
Dishonored 2 Walkthrough. Addermire Institute
Arriving at the station research institute, which is located on a separate island. After leaving the carriage, we look to the right, in one place the railing is broken, here we carefully jump onto the pipe, and then onto the rocks. We go under the roof, right under the carriage we find an amulet (1/5). We teleport back to the platform.
There are two staircases leading up, where 3 guards are waiting for us. We wait until two of them go their separate ways, one remains in the center, and we eliminate them all one by one.
1st floor. Lobby
Dishonored 2 WalkthroughAt the entrance to the building there are suitcases with things, they contain an amulet (2/5). We'll go straight away left side, so that the guard on the hill does not notice us, then we eliminate him, and another enemy in the office at the table. There is a wall of light ahead in the center; you can turn it off if you teleport to the second floor on the right and remove the tank with blubber. To the right of the wall of light stands painting of the Duke (1/3). There are several more warriors ahead. In front of the elevator there is a stand with level map.
In the left wing of the floor there is a restaurant and kitchen. There are 4 enemies in the hall, 1 guardswoman in the far corridor, and 2 more workers in the kitchen. You won’t be able to stun everyone one by one; you’ll have to use sleep darts on the central ones. A rune (1/6) hangs on a column near the central table as a decoration.
On the right are the Consultation offices, which have been converted into a kennel. We do not touch the guard in front of the glass; if we put him to sleep, he may fall and break the glass. (But if we don’t strive for a bloodless passage, you can break the glass on purpose by shooting a bolt from afar, because of this the wolfhounds will jump out into the corridor and tear apart all the guards, and then those who come running in response to the noise). To the right of the corridor are barracks in which one guard sleeps, near him there is a pair of sleeping darts.
We return to the lobby, in the near right corner there is a boarded up door, we can open it by first breaking the glass with a knife, and then the boards on the other side. There are many small gold items inside.

2nd floor
Dishonored 2 WalkthroughFrom the lobby we teleport to the right side of the second floor. Here is a dilapidated part of the building. In a distant dead end we find the decapitated victim of the royal assassin. There is also safe with combination lock. To find the code, we turn around, go from the safe to the opposite table, we find the code on the table to the left of the opposite one. In the safe there are bullion and drawing of combat sleep darts (1/4).
We go to the elevator, climb the stairs to the second floor. There is 1 guardsman in the center near the red chairs, another 1 guard in the side hall “The Salon” with hunting trophies. Having put the guard to sleep in the far corner, we break the boarded up door and find potions and gold inside the office.
The door to the left of the elevator is locked for now.
3rd floor
Dishonored 2 WalkthroughThere are a couple of guards standing on the landing.
To the left of the elevator is a locked door, to the right is an open-air terrace (East Terrace). To the right of the terrace there is a lone guard, we put him to sleep and hide him. There are three guards in the far left corner; it is better not to touch them at all.
From the terrace we can go through the door into a separate central sector of the floor. There is a lone guard here. On the table near the guard booth lies drawing "hardening" (2/4).
4th floor
Dishonored 2 WalkthroughAt the beginning of the floor, a guard and a guard are talking near a table. We go straight, we find ourselves in Hypatia's office. She herself is not here. We collect notes, an audiograph, on the table on the right is Hypatia's key.
On the right we go out onto the roof, there are separate rooms for patients. In the central room we find two runes (2/6 and 3/6) and the Alien altar.
Attic
Dishonored 2 Walkthrough
You can climb even higher along the interfloor stairs, but there is a trap with crossbows installed there, and the door is locked. You can climb into the attic by going out onto the roof of the 4th floor, and there you can teleport to the higher roofs, and then into the round hole. Or you can call the elevator to the 4th floor, enter it, climb up through the hatch inside, press the button on the roof of the elevator, this will raise it to the attic in the repair position.
In the attic above the elevator there is a rune (4/6). We leave here through the round window. We teleport to the next roof. On the most high tower we see the amulet, to get to it, we teleport to the top of the four pipes on the side roof, and from them we can teleport to the roof of the elevator shaft. At the top in the bird's nest we find black amulet (3/5).
Lost and Found Department
Dishonored 2 WalkthroughUsing the heart, we see that one of the runes is located somewhere in the basement of the house. But in the elevator the “-1” floor is crossed out and there is no such button, and the floor of the shaft on the 1st floor is boarded up. To get to the basement, you need to collapse the elevator. This must be done after all the guards have been killed or put to sleep, otherwise they will come running to the noise from all over the level.
We go up to the 4th floor, call the elevator there, climb through the hatch onto the roof of the elevator, press the red button. The elevator will rise as high as possible. We climb into the attic, from here we look towards the elevator, cut off its two cables with a knife, the elevator will fall down. We go down the shaft, jumping along the side boxes in the wall.
Thus we find ourselves in a half-flooded basement. Inside we find treasures, a rune (5/6) and painting by Sokolov (2/3). To get out of here, we climb onto the roof of the fallen elevator, on the 1st floor we press the red button at the bottom right, and the doors to the floor will open.
Hamilton Rescue
Dishonored 2 WalkthroughHaving received Hypatia's key, we quickly go down to the 2nd floor and open the locked door. You need to quickly neutralize the two guards before they kill Hamilton. We talk to the rescued man, we find Hamilton's key on him.
With this key we return to the topmost staircase, above the 4th floor, and open the room in the tower. Inside we find many weapons, gold, drawing (3/4).
Search for Hypatia
Dishonored 2 Walkthrough
Having received Hypatia's key, we return to the 3rd floor and open the door on the right. We find ourselves in the recovery rooms (Recuperation area). Corpse wasps have surrounded everything here, we are destroying their hives. In one hive we find the rune (6/6).
We walk along a circular corridor, but you can also get into the central room by breaking glass and boards, or crawl through one of the solariums. In the central room we find an amulet (4/5).
Through the far door in the corridor we find ourselves in the next two-story hall. Here below we see a laboratory, Hypatia is working at one of the tables. We go down with her, ask her about the killer, but she is out of her mind and mutters something incoherent. To the left of Hypatia is a drawing (4/4). At the dead end on the right we find an amulet (5/5) and a painting (3/3).
In another part of the hall, on the couch we find the half-dead body of Doctor Vasco. He tells us that Hypatia is the royal killer, he turns into a monster at night, under the influence of the poison that is specially injected into her. But Vasco found an antidote to this, all that remains is to prepare it, he tells us code for your safe. At this moment, Hypatia attacks Vasco, kills him, and begins to look for us. If you don’t remember the code, you can pick up a note with this code from the corpse.
We can simply kill the brutal Hypatia, but for a bloodless passage we need to cure her. It is impossible to put the girl to sleep either with darts or mines, so we quietly leave the hall without catching her eye.
Preparation of whey
Dishonored 2 WalkthroughWe go down the main staircase to the 2nd floor, open the locked door on the left. There are a couple of guards here, eliminate them, or go around the right room with wasps. There is a man on the left in the cell, he is not paying attention to us. We go to the code safe in the back room, enter the code we heard from Vasco. There is only a recipe inside, let's start executing it:
1. We find the syringe in the room on the right.
2. The body of the infected person lies in a room with wasps; we draw his blood with a syringe.
3. We go to the table near the safe, pour the contents of the syringe into a large flask.
4. Turn on the burner under the flask.
5. We take the resulting condensate from the small flask on the right.
With the resulting serum, we return to Hypatia’s hall, sneak up behind her and stick the syringe. After that, we communicate with her and invite her to our ship.
Disabling the observation tower
Dishonored 2 Walkthrough
We go down the stairs to the 1st floor, open the door behind the elevator. There are several more guards in the backyard. We gradually go left.

Rune on the second floor of Aramis Stilton's mansion in the past (35)
The last rune in Aramis Stilton's mansion is on the second floor in the past. While in the past, go from the entrance to the mansion forward to the tree, then climb the stairs behind the tree, and turn right and right again. Walk along the second floor straight to the employee and security guard near an unidentified or broken window. Knock them out or kill them, then warp back to the present and walk along the iron ledge outside the window to the second window on the right.

Enter the room and travel back in time, but beware of the guards. You will find the rune on the cabinet to the left of the mannequins.

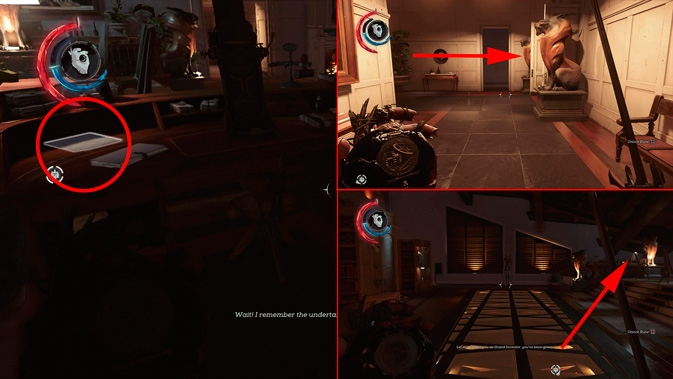
Rune location: Mission "Grand Palace"
Walkthrough of the mission " Grand Palace» will take you to the Palace Quarter, where the Grand Duke's Palace is located. IN the territory of the quarter you will find 3 runes and 2 more runes directly in the Grand Palace. Total: for the mission “Big Palace” you can collect a maximum of 5 runes.
Rune in the bathroom of an apartment building with a windmill (36)
Find apartment house with a windmill on the roof. It is located near the Winslow store, go right along the alley if you are facing the store. Climb onto the second floor balcony, which is located directly under the windmill, using your abilities. Be careful the house is infested with blood flies. Find the bathroom in the apartment and take the rune under the sink.

Runes on the Alien altar (37-38)
In the Palace Quarter there is an Alien altar on which you will find two runes. How to get there? Find a Winslow store. Go into the alley to the left of it, but beware of the enemies in it. Reach a group of townspeople gathered around the musicians. Behind them you will see a stone wall with a railing at the top. Climb up there along the boxes on the right and find a passage barricaded with wooden boards. Break the barrier and take two runes from the Alien altar.

You can also go into the Winslow store and get the code for the gate to the alley leading to the speakeasy. When leaving the store, turn left and go into the first aisle next to the store, under the "SEIZED!" poster. Enter the received code, climb the stone stairs to the underground shop, and then climb the fence, as if going around the building with the shop on the right. Walk along the grass to the fence, below you will see a square with musicians, and find the passage to the altar.

Rune in the flooded corridor of the Grand Palace (39)
We go in search of the next rune. From the dining room located on the ground floor, go to the passage that is located on opposite side from the elevator to the right if your back is to the elevator. Go up the steps and enter the door on the right. Behind it you will find stairs leading up and down. Go down to the section labeled "Personnel Only". Go forward to the semicircle shaped cabinet. To the left of it there is an aisle, and to the left of the aisle are shelving, where on the shelf at eye level you will notice a small button. Click on it a couple of times, go through the passage and turn left into the room with the Duke's altar. A small window will open there almost near the floor, through which you need to crawl. Swim through the room you find yourself in, and then dive into the passage on the left, where the water reaches the ceiling.

Having reached the end, you will find a rune. Take it and quickly go back before you start to choke.

Rune in the Guards safe in the Grand Palace (40)
The next rune is in the safe on the first floor. But first you must get the code to the safe, which lies on the table in the Duke's office. To get to the office, take the elevator to the third floor (“Office and Guest Rooms”). Enter the door on the right, between the two lion statues. The table is in the far corner on the right.
Having taken the code, take the elevator down to the first floor (“Reception and dining room”). After exiting the elevator, go right through the door between the two lions, then go right again up the steps and enter the Captain's office. Walk forward until you see a desk and a Guards safe in the corner behind it. Open the safe by entering the code found in the Duke's office and take the rune.

Rune location: Mission "Death to the Empress"
The final mission, Death of the Empress, takes you back to Dunwall, where runes are also hidden on the streets. In total, you can find 3 runes on the streets of Dunwall and 2 runes on the territory of the Tower of Dunwall and in the Tower itself. Total: 5 runes.
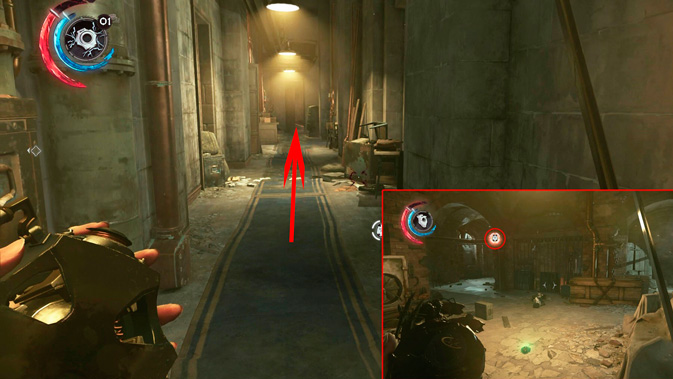
Rune in the Dunwall underground shop (41)
You can buy the first rune in the Dunwall underground shop for 400 coins. From the arrival point on the pier, go to the first building on the right, there you will find the black market.

Runes on the Alien altar in Dunwall (42-43)
You will find two more runes on the Alien altar. To get to it, follow from the underground shop deep into the city along the rails that run along the top, in any way convenient for you. Once you reach the broken rail, look around for the balcony shown in the screenshot below. Climb onto it using the Gravity ability and the neighboring buildings and their balconies in order to get to the desired one.

Enter the apartment and go to the second room with a large painting. There is a barometer on the right wall, use it to open the secret door. Behind it you will find an Alien altar with two runes.

Rune in the pumping station at Dunwall Tower (44)
When you reach the courtyard at the entrance to the Tower of Dunwall and the pavilion where Empress Jessamine was killed, go to the left of the stairs leading to the entrance to the Tower and go down into a small depression. Near the rise on the left you will find the entrance to the pumping station. You can also get there through a skylight, and from there it will be even easier to kill the witches inside.

Climb onto the metal platform above the pipes, find the hole between the wall and the platform and jump into it. There you will find a rune by walking along the pipe to the wall.

Rune in the security room in the Tower of Dunwall (45)
The last rune is in the security room, where you have to go on a mission to turn on the power to the Dunwall Tower elevator and get into the throne room to kill Delilah. The rune lies on the pipes running under the ceiling.
 Enjoy your game and find runes easily!
According to the plot task, we are interested in eliminating the Royal Assassin, about which Alexandra Hypatia will probably be able to tell something useful. In addition, she may know who kidnapped our ally Anton Sokolov and where to even look for him. Anton last time was spotted just not far from the institute, so we can kill two birds with one stone here.
As in the previous mission, we will immediately tell you about the key resources and interesting finds that are encountered during the completion of this task. So, there are six runes, one Alien altar, five amulets, a couple of drawings and three paintings. To search for runes and amulets, still use the Heart; there are no special problems with collecting here either, except that the rune in the basement of the institute is difficult to reach.
To get into the basement there is only one way to find the key to the door leading to the very top of the room along the stairs (the character named Hamilton has the key on the second floor), then raise the elevator, then break off its fastenings in its shaft by hitting with a sword. The elevator will fall down and collapse the wooden floor enclosing that very basement. In the basement there is a rune, a painting and other useful things. It won’t be difficult to collect the rest, just deal with the enemies, stunning them so that they don’t interfere.
As for the story mission: the goals are marked one by one with markers, you won’t pass by. Which route to get to them is absolutely irrelevant. If you enter from the main entrance, you will need to turn off the light wall on the way to the stairs and elevator on the first floor. It is fed by a tank with blubber, located on the right on the second floor, track it along the wire. On the same wing there is a safe with useful things; it can be opened by finding the code in a note in the same room.
But once you reach the stairs and elevator, you will have access to almost the entire huge building. On the ground floor on the left there is a kitchen and a restaurant; you can search the area for useful things. On the right are the kennels, there is also something useful there, but nothing that is needed to complete the task. By the way, dogs can be killed without fear of raising the level of chaos.
The second floor is already somewhat more interesting for us, but to open the plot important door it won’t come out to the left of the elevator - you need Hypatia’s key, and we’ll pick it up later. And on the right there are a couple of enemies, as well as a blocked door. By destroying it (you can just shoot it if the enemies are neutralized), you can replenish your supply of money by collecting gold. And so we immediately move on to the third floor, bypassing the security or dealing with it along the way.
On the third floor, the landing is guarded by two opponents at once. Having found a way to get rid of them or slip past, make your way to the right side of the elevator, where the “East Terrace” sign flaunts. After going through the door, continue through Disonord 2, getting rid of the enemy on the right. There will be three more in the distance, but they don’t really bother us now - get to the fourth floor.
There are only two guards waiting for you there, one of whom will sit at the table, and the other will stand next door. It is not at all necessary to touch them, our goal is not to knock out everyone here, but to penetrate Hypatia’s office. It's full of useful things, as well as informative notes, but the audiograph is key, listen to it. All that remains is to pick up Hypatia’s key, which lies on the right table; it will allow you to open several doors that were previously inaccessible to us.
The next task is to return from the fourth floor to the second to get Hamilton's key, which gives access to the upper part of the institute. The life of this character is under threat, you can save him and talk to him, you will find him in the room on the left side. There will be a box behind it, and in it will be the key we are looking for. Now return to the stairs and climb to the very top, along the way, use the key you just picked up to unlock the door; there are also traps on the approaches - be careful.
On the way to her workplace, Hypatia will have to overcome almost an entire floor, thoroughly infested with corpse wasps. Fortunately, there are plenty of bottles with flammable contents scattered around - pick them up and throw them into the hives. After making your way through this place, go through the far door that leads to the laboratory. That's where ours is located good doctor. Approach her and talk. In a woman big problems with your well-being and memory, after the dialogue, go further along the same floor to the opposite end of the room. There lies the seriously injured Doctor Vasco.
The latter claims that he can no longer be saved, but Doctor Hypatia is still very much possible. It is she, according to Vasco, who is the very Royal Assassin, as we will see very soon. Under the influence of poison at night, the doctor turns into a real monster - strong and inadequate. Immediately, Hypatia will finish off Vasco, and she won’t even notice you. The further passage of Disonord 2 has two options - kill the Royal Assassin, that is, Hypatia, or heal her.
Fortunately, before his death, Vasco gave a tip on how to make an antidote and provided the code to his safe where the recipe was kept. You can find the code in the information in the menu if you forget it. Now we have two marks - both Vasco's office and the Royal Assassin. We recommend healing the doctor, but remember that in her current state she is deadly, neither sleep darts nor stun mines affect her - you won’t be able to knock her out.
So just leave here the same route you came in, without catching the eye of the transformed doctor. Follow the marker to the second tier, if you haven’t eliminated the enemies there yet - now is the time to get rid of them, but there is an alternative path to Vasco’s office - a nearby corridor infested with corpse wasps. The office is at the very end of this wing, the safe will be to the left of the entrance, you won't miss it. Inside is the key to Vasco's laboratory and a recipe for making an antidote.
Not all the ingredients are available: if you take a syringe with the base of the antidote from the laboratory, you also need to acquire the blood of an infected person. You can find a suitable body for posthumous donation right there, in the corridor infested with cadaveric wasps. Take the blood with the action button and return to the room to the right of the safe, that is, to the laboratory. There you need to prepare the serum on a heating pad, having first poured the blood from the syringe into the flask.
The antidote is ready - it's time to return to Hypatia's laboratory. She is still in the form of a monster, and therefore very dangerous. It is necessary not to catch her eye and go from behind to introduce the antidote. This can be done by jumping from above, freezing time (for Corvo), or turning into a shadow (for Emily). Or banal teleportation right behind your back. There are many options, just save the game first and break through as soon as you see the right moment.
The serum will take effect almost instantly, you have saved Hypatia’s life and found an ally. Talk to her, all that remains is to evacuate from here. Let us remind you that we didn’t just get here by carriage: Megan could not sail on a boat because of the observation tower. Our task to complete the passage of Disonord 2 in this mission is to disable the tower. This is easy to do; you can pull out the tank with blubber that feeds this very tower. Well, do something with the enemies, of course. So all that remains is to get to the boat and return to the Fallen House. Don't forget to collect runes and amulets using the Heart before setting off.


