Fur vest for girls pattern. Children's sheepskin vests are an indispensable item in the wardrobe
Among the most stylish accessories for little princesses is a vest made of faux fur today it occupies, perhaps, one of the central places. Having been at the peak of fashion for quite a long time, its status has changed a little. During this time, having left the category of branded items, it became an element of modern practical style, and the components of its success were warmth, coziness and comfort. For a girl, a girl, a woman of any age, it will be a wonderful addition to the wardrobe, representing the main accent of an everyday outfit.
Which fur is preferable? Advantages and disadvantages
Modern designers offer a wide variety of vests. These are usually knitted and knitted models, however, faux fur vests still have the most chic look. Of course, a vest made from natural fur of a silver fox, arctic fox, mink or fox will look much more luxurious, but for little girls it is not entirely practical, and it is also quite expensive.
When dressing their young fashionistas, mothers still choose an alternative option, giving preference. Moreover, in their merits, such things are in no way inferior to products with natural fur. They are just as stylish, fashionable and warm, and also have high wear resistance. This practical and versatile wardrobe item can easily decorate both everyday and festive girls’ outfits and create a unique elegant look. 
A few tips: how and with what to wear a fur vest
If a young fashionista is preparing to go out, then it would be appropriate to complement the vest with a belt with bright decor. A vest for a girl looks good with jeans and leggings, as well as in combination with an elegant dress. Developing Casual style, underneath you can wear a turtleneck or any other tight-fitting blouse with long sleeves. A fur vest is a fairly striking piece of clothing, so when choosing accessories it is very important to maintain a sense of proportion. For example, designers recommend long earrings, large watches, a belt and nothing more.
 Variety of colors and textures
If we talk about textures, it should be noted that today the most popular vest for girls is made of faux fur with long pile. It goes well with fabrics of various textures. Modern fashion magazines and catwalks present models of the most different colors. Along with a vest that imitates natural color, its raspberry, turquoise and red counterparts will look quite relevant. Among the dominant prints I would like to note leopard and tiger. For older girls who attend fashionable discos, designers offer modern neon vests.
Another tip for moms who dress their dolls fashionably concerns shoes. A stylish fur vest for a girl does not go well with bulky boots or sneakers, so it would be wiser to choose neat shoes or narrow boots.
And in conclusion, I would like to add that a fur vest will become not only a stylish accessory in the wardrobe of a little fashionista, but also an irreplaceable garment that will keep her warm during any vagaries of nature.
Sew a fur vest for a girl with your own hands.
I offer simple patterns for a fur vest for girls in three sizes (104, 110, 116):
Please note that the sizes in the diagrams are recommended. Measure your child in the clothes you plan to wear the vest on. The measurement of chest circumference (CH) is important. Compare your measurements with the values on the pattern charts. If necessary, add/reduce 1-2 cm to the width of the back and the width of the shelf.
You can also change the length of the product.
1. fur vest for girls height 100-104, back length 35 cm.

2. fur vest for girls height 110, back length 37 cm

3. fur vest for size 116, back length 40 cm.

A cute fur vest for a young fashionista, sewn by the caring hands of a mother or grandmother, is undoubtedly a “you can’t buy it anywhere” item.
There will be no one left indifferent, be sure to sew!
You can use pieces of fur from old fur coats, or even better, buy a piece of faux fur. Nowadays you can find excellent fur in bright colors on sale. It is lightweight, easy to wash and sew without problems.
Using the same patterns, you can also sew quilted vests - just like for girls. same for boys.
Please note that the shelves do not have a fastener. Sew on hooks and loops, use a belt, or sew on a zipper. If you need a fastener with buttons or snaps, then add an allowance for the fastener of 1.5 cm on both parts of the shelf.
How to cut a fur vest:
- fur details with seam allowances of 1.2 cm:
back - 1 folded part
shelves - 2 parts. - lining details with 0.7 cm seam allowances
For the lining, choose a beautiful chintz, cozy flannel, viscose lining fabric, or fine ready-stitch synthetic padding. Do not make the lining too warm and thick, maintain the plasticity and lightness of the product.
More articles on the topic
Hello, dear Fashionni!
My name is Lydia, I'm 36 years old, I'm an artist from St. Petersburg. It's me:
That's mine youngest daughter Polina, she is 11:

I’ve long wanted to buy her a fur vest for going to the skating rink, but I haven’t found anything cheaper than 800 rubles. Having been impressed by Karmen’s master class on a fur vest here on the website, I decided to try to sew my own version of a similar thing for my daughter. I am not a professional in sewing, so the product is different in that it is based only on the child’s measurements without any pattern. It took only one evening to implement the plan. Did I succeed in this idea, please rate it!
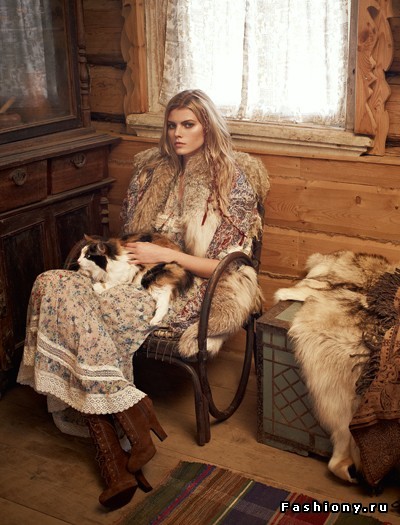
I was also inspired by Bryoff's recent post "A la Russe" with stunning photos:
I needed a piece of faux fur, a piece of artificial leather 30X14 cm, lining fabric 50X150 cm, 2 metal rings and a cord for fastening:

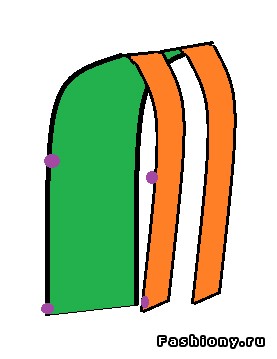
I sewed from a 30 cm piece of faux fur with a long pile 150 cm wide. The price of a meter was about 350 rubles, so a piece cost me only 100. On the sides, I connected the product with two strips of leatherette approximately 30 X 7 cm. Here is a diagram of the future vest: green - the back, orange - the shelves, lilac dots - along the borders of the seams of the side inserts.
Here are the stages of work:
1. You need to measure your figure - write down half the volume of your chest, waist, hips. I got 36, 31, 42 cm. These dimensions will help you estimate the required width and length of the item. Plus we measure the width of the shoulders, the distance along the back to the armhole of the future product, to the waist, and the desired length of the vest.
The width of the shoulders along the back is 40 cm, the distance to the armhole is 27, to the waist is 35, I decided to make the length different - 53 cm along the back and 57 cm in front, with a difference on the leather side parts:

2. Having these numbers, you can cut the fur. We mark it on the inside and carefully cut it, pushing the scissors through the pile to cut less of it. I cleaned the cutting edges directly with my hands, without bothering with a vacuum cleaner. I decided to make the back from two halves to save fur:

3. The backrest parts need to be folded front side to each other, paying attention to the direction of the pile. We connect using a medium zigzag on a machine. The long pile completely disguised the seam:

4. From the center line at the top of the back, we put 6 cm in both directions and 2.5 cm down. We connect with a smooth line - this is a neckline. On the sides of the back, measure 2.5 cm from the top. Connect with the cutout points for the collar. This is the shoulder line. From the waist line we put 6 cm up and down on each side and 2 cm towards the center. We connect with a smooth line - these are cutouts for the waist. And cut out:


5. We arrange 2 shelves so that the pile lies symmetrically to the center, because in our cutting, the pile on the shelves is located transversely (then it can be combed a little downwards). We measure on the sides of the shelves 3cm from the top. Connect with a line to the top point opposite side. Carefully cut off. These are the shoulders.


