How to shoot the moon and stars. Don't be alarmed that moonlight is like daylight
An article on how to photograph the Milky Way and the starry sky in general. There are some peculiarities in this type of photography, knowing which you can get an excellent result.
First, we need to take care of the camera. For photographing the stars, almost any modern SLR camera with a whale lens is suitable. We will not judge digital compacts with non-replaceable optics, this is a separate topic.
Advanced devices will have one significant advantage - high permissible photosensitivity (ISO). For example, the photo below was taken at ISO6400, which is unacceptable for cheap cameras.
Lens for night shooting
 As for the lens, aperture ratio is extremely desirable for shooting meteors and stars, which, as you know, cannot be too much. f / 2.8 is good enough. f / 3.5 is a bit dark, but you can still live. The width of the corner is also important: the stars are constantly moving, and this must be reckoned with. If you have a lens with a focal length (FR) of 18-24mm on a full-frame camera (or 12-16mm on a crop), then the shutter speed you can set is less than 20 seconds.
Take a test shot, look at 100% magnification, and you will see tracks of stars (stars instead of dots take the form of lines). If you do not need a high resolution of the final image, you can increase the exposure length to 30 seconds, and then reduce the size and publish it on the Internet - no one will guess that the exposure was long. for example, 30-second exposure footage can be shot with a 10mm fisheye attached to a full-frame camera to avoid the appearance of tracks. Rather, they are there, but they are visible only at 100% magnification.
For convenience, a table has been compiled. If you do not know which camera you have, see the third column.
Focal length - Shutter speed for FF - Shutter speed for crop
- 10mm - 40s - 30s
- 14mm - 35s - 25s
- 18mm - 25s - 15s
- 24mm - 20s - 12s
- 35mm - 12s - 8s
- 50mm - 8s - 6s
But you don't have to blindly follow the rules described above! If you want to capture the movement of the stars, then the shutter speed, on the contrary, should be increased up to 60 minutes. Accordingly, the ISO will have to be lowered, and the aperture closed, so as not to overexpose the frames.

Elbrus at night, exposure for 10 minutes. The sun has recently set
Now let's talk about ISO sensitivity for photographing the night sky.
The higher it is, the better. But don't be fooled! Explore the possibilities of the camera! For Nikon d7000, you can safely set ISO3200, or carefully 6400. For my Nikon d600, you can safely set 6400. Almost all shots of the Bermamyt Starfall were shot at ISO6400. But every camera has an upper limit, when the amount of noise starts to grow faster than new details of the starry sky are added. For example, on d90, never set the sensitivity higher than 1600, and then you would have to thoroughly noise reduction. Low ISOs can be compensated for with wider angles and slower shutter speeds, so go for it!
Aperture for shooting stars
In shooting the starry sky, and especially meteors, we need to get the maximum amount of light in the shortest possible time, so we have to open the aperture. All lenses have their own maximum aperture values, usually f / 1.4, 1.8, 2.8, 3.5, 4 - if you don't know what this is, then take a close look at your lens. It is written there =)
The lower the number, the more light hits the matrix. BUT! With all lenses, the picture quality is worse at the maximum open aperture than at the closed one. For example, shooting the sky at f / 1.4, you can get very disappointed: instead of stars, you get sad blobs. After taking one shot, enlarge it by 100% and study it carefully. If the stars are out of focus and have the appearance of blobs, then first check the focusing accuracy, and only then close the aperture, for example, to 2.8. The pictures will become darker, but the picture quality will improve. If you have a cheap kit lens, don't worry, set the maximum to 3.5 and shoot! You can't make it worse.
Focusing when photographing the sky
There are problems with this, and big ones. The fact is that for most lenses, the position of the “infinity” icon on the focusing ring does not correspond to real infinity. It's very easy to make sure of this: on a sunny day, go outside, find the most distant object or horizon, focus and look at the focusing ring. You will be surprised that the infinity icon does not exactly line up with the mark. Remember this position, or rather stick a strip of adhesive on the lens, on which make a mark with a marker. In the dark, you don't have to take thirty-five thousand frames, frantically turning the focus ring from side to side, trying to catch sharpness and missing falling meteors. And don't expect the camera to be able to focus on the automatic in complete darkness. Only with pens!
You also need a tripod and a remote control (or at least a release delay). But I hope you already guessed about it. However, you can shoot the stars without a remote control and not use the release delay: you will need a very rigid tripod, firm hands, and even when shooting a black sky, small camera vibrations during the first second do not affect anything at all.
Well, we have studied the technical part of the question, now let's get down to practice.
Where to shoot the stars and the Milky Way?
First of all, when planning to photograph the stars, remember: there is nothing to catch in the city. The city creates a lot of light, which illuminates the moisture and dust suspended in the atmosphere. By itself, this phenomenon does not prevent us from seeing the brightest stars, but it is impossible to see the Milky Way from the city (unless an energy catastrophe has occurred with a total shutdown of everything and everyone). Therefore, first of all, take care of the shooting location. From settlements you need to leave as far as possible, further, and even further. Even from Bermamyt, the light pollution from the KMV cities is clearly visible:

As you can see, the lower part of the sky above the horizon was lit up by city lights (and in cities there was generally haze, and the stars are almost invisible, ha-ha). Although on Bermamyt, such a phenomenon is no longer able to interfere, but only decorates the frame. In a city with the same shooting parameters, we would get a bright yellow sky without a single star.
When is the best time to photograph the starry sky?
When there is no moon in the starry sky!
Yes, the moon can ruin your nightlife very much, especially the full moon at Zenith. Therefore, when planning to go on a star hunt, check out the lunar calendar. For example, during a trip to Bermamyt, the month was very young and hung low above the horizon, and then completely disappeared, leaving only an interesting orange stripe on the horizon and a beautiful reflection on the slopes of Elbrus. And this is good.

View from the top of the plateau after sunset
Besides the moon, you have to take care of the good weather. How you will do this, no one knows. Someone helps to make a sacrifice to the gods, someone to pray, some luck helps if you stroke a cat, and some eccentrics even use weather forecasts. But the fact remains: we need a clear sky!
In which region of the sky to look for shooting stars?
It is said that the best part of the sky for shooting falling meteors is 45 degrees from zenith. It is somewhere in the middle between the horizon and a line going straight up (may astronomers forgive my dimness). However, interesting results can be achieved by taking pictures vertically upward with a wide-angle lens. And if you are shooting Perseids, then it would be logical to turn the lens towards the constellation Perseus, here is an example:

The above frame was shot on Nikon d7000, ISO6400, exposure 15 seconds. BUT! Don't be fooled, not all meteors hit the frame right away. More on this below. This is where you definitely shouldn't look for falling meteors - on the horizon. Firstly, the optical properties of the atmosphere will not allow you to see almost anything, and secondly, the horizon is usually bright.
How to find the constellation Perseus? Here's a picture from the Internet:

How to find the constellation Perseus
How to capture a meteor in the frame?
Point the camera at one point, make it continuously shoot, and wait, and wait, and wait. Sooner or later, meteors will start hitting your lens, and you will only have to choose from a thousand frames the very same 30 pieces with tracks of falling space debris, and bring them together. And it's not a joke! In the above example, the author took about 1200 frames, selected 38 of them with meteors, and then merged the images together. This is possible if you are shooting in the direction of the North Star. Then, when the frames rotate around the imaginary center - the North Star - they will be exactly aligned with each other. Cut off something superfluous, and such a rose of the meteor shower will remain.
In any case, patience, work and a dead bolt will grind everything!))
Happy staff!
Text and photo Pavel Bogdanov
It is not difficult for a modern photographer to find information about almost any type of photography: reportage, portrait, genre and many others. Not only foreign, but also Russian-language sources are full of articles on these topics. And it would seem that everything has long been told and shown, and it is impossible to imagine a sphere that was previously unexplored. But, summarizing the frequently encountered materials, it is easy to notice a similar feature - they all relate to photography at any time of the day, but not at night, not a single line has been written about this. Contrary to the belief that nothing is visible at night and the art of photography loses all essence, this article aims to radically change these subjective perceptions and show that night photography is also interesting, saturated with bright colors, full of scope for creativity and imagination.
Lack of natural light is the main problem that a photographer will have to face when working at night. In the dark, the photographer must catch the smallest glimpse, each photon of light, collect the smallest particles in the overall picture. Quite a laborious process, but this is what makes it interesting. After working with night photography, daytime photography will certainly seem easier and, perhaps, not so interesting.
The first step is the right equipment
As in any business that a master undertakes, for high-quality photography, first of all, it is necessary to choose the right tool for the job.
Camera
When choosing a camera model, you can trust the world's leading manufacturers, for example, Nikon D3x / s, Nikon D700, Canon EOS 5D Mark II, Canon EOS 1Ds Mark III, etc. Such devices can produce low-noise images in combination with high light sensitivity (ISO) and long exposures.
Colter Bay, Wyoming, US
Photo lens
The best resolution is typical for the lenses of the world leaders in the photo market. Better focusing distinguishes cameras with faster optics, respectively, it will be easier to achieve the desired composition, since the brightness of the colors in the image in the viewfinder directly depends on this characteristic of the device.
Note also that photographs of the starry sky with all its components are qualitatively better when using devices that use a wide-angle lens. The astrophotography photographers can express themselves even better with the 180-degree ultra-wide angle lenses.
For Canon cameras it is better to use Canon EF 14mm f / 2.8 L USM, Canon EF 50mm f / 1.2 L USM, Canon EF 24mm f / 1.4 L II USM or Canon EF 15mm f / 2.8 Fisheye lenses. It should also be borne in mind that whatever optics is used, the main thing is the skill of the photographer, his vision and feeling of beauty, inspiration and desire to get an excellent result.
Tripod
It is quite an ordinary element that does not require special quality characteristics, its main property is stability, which is also associated with damping the slightest vibrations.
It will not hurt to have a level on a tripod to level the horizon, because at night this is not so easy to do. If the tripod does not come with a level, then it is better to buy it separately. For example, the one that is placed in the flash shoe.
Photo flash
You can use a flash or even several to illuminate the foreground. But this is not at all necessary, it depends on the desire of the photographer. Natural night lighting is quite enough, which makes the photo real, lively and a little mysterious, like in a fairy tale.

Pentax K10D | Pentax SMC DA 18-55 / F3.5-F5.6 AL, 18mm | f / 3.5 | 550 sec | ISO 400 | Tripod
Nutrition
Night work is distinguished by its duration. Therefore, high-quality equipment can be completely useless if it has nothing to feed on. There should always be a supply of batteries, so that the "little thing" does not spoil the whole process. The battery grip will help you to almost double the operating time of the equipment. Those batteries that are waiting in line are best stored in a dry and warm place.
Programmable cable release (PST)
In the discussed type of photography, this non-standard accessory is very important:
· Makes it possible to take pictures without direct contact with the apparatus, which will significantly reduce vibration;
· Shooting in the "bulb" mode;
· Exposure can be programmed by setting the required exposure time from seconds to tens of hours;
· Continuous shooting at a specified interval is also possible - a very important function of this device. It also allows you to make a video from a series of shots, which will clearly show the movement of clouds, the change of day and night, or the movement of the starry sky;
· Setting the shutter release timer from seconds to hundreds of hours will allow the photographer to relax while the camera is waiting for the right moment.
The last three functions of the PST of the above cannot be replaced by any other device.
On a note
· When going on a night photo hunt, stock up on a flashlight. It will help you stay on track, in which case you can highlight the equipment and help the device focus on the foreground.
· A compass in combination with a map of the starry sky will help you navigate and find the right objects.
· Do not interfere with entertainment devices such as a phone, radio, tablet, etc. It is often necessary to wait for hours for the appearance of some objects in the starry sky, but this should not spoil the mood of the photographer and, even more so, put him to sleep.
· Warm drinks and food are an integral component that will help keep you strong on long nights and keep you warm.
· It is always colder at night than during the day. Therefore, it will be completely inappropriate to collect the equipment and go home in the midst of events only because the cold has penetrated to the bone. You need to stock up on warm clothing.
· You should constantly inspect the device with a flashlight for dirt and wipe it.
· A warm waterproof camera cover will save you from frost and rain.
· It is necessary to clarify in advance the exact time of appearance of certain objects in the sky.

Grovont, Wyoming, US
Conditions for photography
One of the main conditions is the transparency of the starry sky. It is influenced by:
· Height above sea level. The thinner the atmosphere above your head, the more transparent. That is, as you go up the mountain, the pictures will get better and better.
· The proximity of the equator has a positive effect on transparency.
· Time after precipitation: rain "nails" dust to the ground, so it is good to take pictures immediately after it ends.
· Availability of artificial lighting. Lanterns or light from windows, for example, reduce transparency.
· Even subtle clouds have a negative impact on the result.
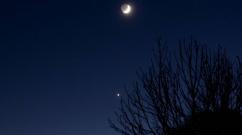
· Do not forget about such an important light source as the Moon. You do not need to avoid it, because it is also an interesting subject for shooting, but if the details of the starry sky are important, then it is better to work with a young moon or during its absence.
Focusing
At night, they often use open apertures to "capture" as much light as possible. It is more expedient to choose such compositions in which all plans are sufficiently far from the photo lens and are equal to infinity on the focus scale.
You can also use autofocus, but this requires a light source in the distance, which may well be the moon or even mountain peaks covered with white snow reflecting the light. When it comes to focusing on the closest shot, a flashlight will do. LiveView mode allows you to magnify the required areas of the image when focusing dozens of times.
Composition
Stars, most often, are a complement to such objects as mountains, rivers, forests, etc., a connecting link, a wonderful touch to the overall picture, but in no way the main subject of photography.
The favorite subject of night photography is the Milky Way. By itself, it is not particularly interesting, but in combination with a house on the edge, a tree or a silhouette of a person, it shows the power of the Universe and endless space.

Utah, US.
The rules for using moonlight are the same as for daylight, just the light is subtler and deeper. An exception is the situation when the Moon is at its zenith, then the light is harsh and unpleasant, the feeling of artificial light from the lamp is created.
Often so-called "unidentified flying objects" can get into the frame. All over the world they are credited with a fantastic character, although in fact they are of an earthly nature and represent satellites, airplanes, etc. If you're lucky, you can capture the beautiful tail of a passing comet or the track of a meteor falling and burning in the atmosphere. For such "luck" it is best to know in advance what time of year and under what conditions these natural phenomena are observed, with what frequency and in what part of the world.
If you wish, you can use the atlas of the starry sky and make certain constellations the center of the composition, without even involving foreign objects. The pictures will also turn out to be interesting.
Outlined an approximate composition, then you need to see how it will look through the camera's viewfinder. Before that, it is better to "adjust" the eyes - to let them get used to the complete darkness, otherwise you will not see anything through the device.
In the genre of night photography of stars, two main approaches can be distinguished:
1. Photographing celestial bodies (star clusters, galaxies, nebulae, etc.) as such in their static version, that is, the photograph will depict stars as the human eye sees them in ordinary life.
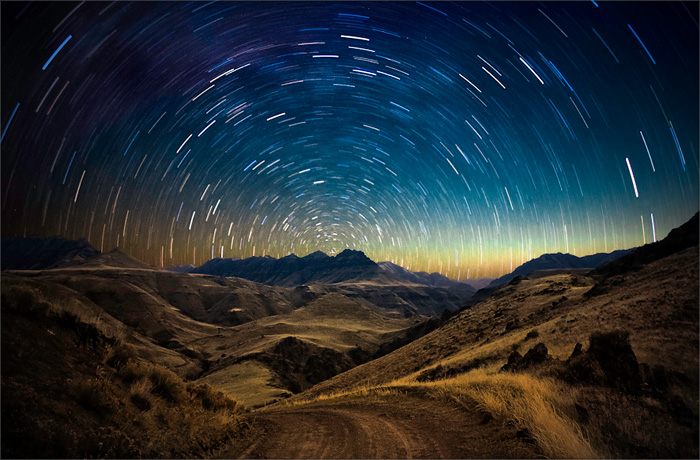
2. Photographing star tracks - the process of photographing at very long exposures, as a result of which a photo of the movement (trajectories) of stars along the slope of the sky around both poles of the Earth is obtained.
To work with the first option, you can get acquainted with such a device as a parallax mount with the possibility of guiding. It is used for astrophotography. One of the axes of such a mount is set in parallel with the world axis directed to the North Pole of the Earth.
First of all, let's get acquainted with a simple rule called the "600" rule. Its essence is as follows: when dividing 600 by the focal length of the lens, the maximum shutter speed is obtained, at which the stars will look like ordinary points, not the slightest movement will be noticeable.

United States, Colorado
Nikon D300 | f / 1.8 | 8 sec. | ISO 1600 | Tripod
Taking into account the described rule, the open aperture is set to the maximum (but so that the image quality does not suffer at the same time), then the photosensitivity value is selected.
Let's stop at the shooting of tracks. As mentioned earlier, this type of shooting requires a long exposure (from at least ten minutes to several hours). Accordingly, the longer the shutter speed, the longer the trajectories will be in the photo, since the subject will have time to travel a greater distance. The exact value of the holding time and the compliance of this time with the length of the tracks does not obey the rules. It is better to rely on your own experience, observation and trial.

Nikon D7000 | NIKKOR 10-24, 10 mm | f / 3.5 | 19800 sec. | ISO / Film 2000 | Tripod
Photo: Lincoln Harrison
There are several methods of such shooting:
1. "one frame"
2.series of shots that are then assembled on a computer
The choice of method is very individual. To be more precise, let's highlight the pros and cons of these two options.
In the first case ("one frame"), the disadvantages are:
· The presence of digital noise, even on the latest devices (the longer the exposure, the more it is);
· High risk of vibration;
· Danger of overexposure or underexposure of the photo, since it is difficult to correctly calculate a suitable exposure pair of light and shadow;
· The appearance over time of a large number of interference on the lens (dust, fogging, etc.).
Pros of Burst Shooting:
· for shots with slow shutter speeds, it is easier to calculate exposure pairs;
· Underexposure is impossible, as well as overexposure;
· When composing shots, spoiled or low-quality ones are simply not taken;
· The length of the tracks is regulated by the number of frames included in the composition ("gluing");
· It is possible to obtain static images by taking one frame from a series;
· This is an excellent option for editing video materials reflecting the movement of celestial bodies.
Note that the "Long Exposure Noise Reduction" function of the camera doubles the exposure time, this should be taken into account when shooting.
Obviously, the advantage remains with the second type of shooting. Let's dwell on its features. It is better to choose the RAW format and save copies of the photo in low quality, so that you can quickly and easily view the options for stitching a series of frames. As for the excerpts, then again it is necessary to use the above-described rule "600". The next step will be to set exposure parameters, that is, ISO and aperture, then connect and adjust the release cable. Better to set the minimum interval between frames, for example, one second. We also exhibit the number of photos in the series. It is interesting to note that with a zero value of this parameter, the device will take pictures until it uses up the entire battery resource.
Pole orientation
If the photographer wants to have rotation tracks at the exit, then the camera should be pointed at the North Star in the Northern Hemisphere or at Sigma Octant in the Southern Hemisphere. Knowledge of astronomy will not be superfluous for sure.
The North Star will also help with orientation on the ground. It is always towards the north, and by how high it is above the horizon, you can determine the latitude of the location.
As for the Southern Hemisphere, Sigma Octantha is the only landmark here. But this star is unremarkable, it is difficult to distinguish it from others, so it is difficult for a reference point. To find the South Pole, you need to know the location of the South Cross.
Programs to help
1. First of all, we note the simplest to use program Startrails Version 1.1. Despite its uncomplicated nature, it is irreplaceable. The program is used to combine a series of photographs, resulting in tracks, as described earlier. The only drawback is the nondescript design. All the user needs to do is to use the “Open Images” function to select the photos needed for the composition (the format must be the same), then press “Startrails”, and the program will do everything by itself. If you want to delete some frames, you can easily do this by unchecking the corresponding checkboxes on the left panel.
2. To calculate the place and time of dawn of both the Sun and the Moon, the program will be simply irreplaceable The Photographer "s Ephemeris (TPE) ... The program is compatible with different platforms and has a pretty attractive design.
3. Programs and applications for smartphones. The most useful ones are: Star Walk and SkyView (for iOS), Google sky map and Celeste SE (for Android). The program installed on your smartphone will help you easily calculate data on solar and lunar activity, taking into account real time and location. With the help of GPS, the navigation issue can be easily solved, of course, subject to the availability of the network. What until recently seemed like science fiction and fiction, today are the necessary tools for creating photographic works.

NIKON D800E | NIKKOR 14-24 f2.8, 14 mm | f / 3.5 | 6750 sec. | ISO / Film 1600 | Tripod
Photo: Lincoln Harrison
The article mentions only a small part of the programs that can greatly facilitate the work of the photographer and improve the quality of images. Everyone should individually select the functions they need, which will be useful to achieve the desired result with one or another shooting method.
Hey! We are in touch with you, Timur Mustaev. I often see images of stars in the sky from professional photographers. They were shot in different ways and from different angles, in different places, but they are certainly beautiful: a landscape against the backdrop of many starry objects, the Milky Way, or a real starfall created by the movement of luminous celestial bodies. Do you want to have such personnel in your portfolio? My article is at your service.
Focus of attention of the photographer
The main question is: how to photograph the starry sky? How to convey exactly the splendor that we see or how we wanted it to look? In Photoshop, we can work wonders, but it will not be so valuable, because there will be no documentary and real reality in the photo.
Therefore, I advise you to be in all weapons at the time of the photo session and try to get an almost perfect picture. To do this, you need to consider the following factors:
- Composition... Contrary to the possible notion that shooting a sky with stars is only stellar bodies and the firmament, it is worth concentrating on the environment as well. As with any kind of photography, you need to think about what objects will be included in the picture. For example, trees of an unusual shape, mountains, a valley, interesting natural objects, beautiful architectural structures - choose for yourself.
- Time... It is clear that you will have to take pictures at night, but when - when the stars are clearly visible and presented in the maximum number. The night should be without clouds. It is advisable to follow the phase of the moon: how bright it is and exactly where in the sky it will be at a particular moment. The time of year does not really matter.
- Terrain... Firstly, choosing a location is more or less picturesque, since you will probably want to shoot the landscape, at least partially. Secondly, going out into nature is useful not only in search of beauty, but also in order to avoid the light from the city lights falling into the frame. Artificial lighting illuminates the sky, it will, in principle, be superfluous in the picture.
- Technique... And here are two points: the camera itself + optics. Of course, it's good to have a quality camera that allows you to shoot in high resolution, to take clear pictures, and it would not hurt to have a separate noise reduction function. But don't be discouraged if you don't have a very advanced and modern camera. Even Nikon d3100 can take a good photo.
Pay more attention to the lens you choose. If you plan to increase the illumination of the photo due to the open one and play with the f-value, then you can go nowhere without high-aperture optics. Also, the device must be wide-angle, say, 16, 24 mm, etc. With such data, you can cover a very large part of the sky and the rest of the landscape.
- Optional accessories... Any of your illuminators will come in handy, even an elementary flashlight or flash, which in skillful hands is capable of much. The light will most likely be needed to illuminate nearby objects on which it was easier to focus. At this point, you can also remember about colored ones in order to make an original backlight.
But more importantly when shooting the sky at night, the other is good. It must be high enough and stable. It is he who will fix the camera when you set the long one. Why did I mention excerpt? You will find out below where we will talk about the settings.

How professionals do it
We will, of course, talk about the camera settings.
- Manual control... The camera can be almost anything, any brand (for example, Canon or Nikon). But what he definitely should have is a manual mode, with which you can adapt as much as possible to rather difficult external conditions.
- Low ISO... Perhaps beginners may be surprised: we shoot in almost absolute darkness, without high sensitivity, we will only get a black picture! This is not the case: the sensitivity should be no more than 200, so as not to create noise. The emphasis when shooting the sky and stars should be on exposure. And read on about it.
- Diaphragm... Too open it is not worth it, because we need the largest one, since we want to capture the entire landscape. A large aperture, by the way, in such circumstances, in any case, will not give a noticeable increase in illumination.
- Excerpt- is of paramount importance. It is on it that all the lighting depends, and how the stars will turn out, that is, either clear (short exposure), or blurry, in motion (long). It is better to select a specific value yourself, already at the filming location. Remember that the earth rotates, therefore, at the exposed average time intervals, the stars may also be fuzzy. Remember that in many low to mid range cameras, the highest values are 30 seconds. This is enough to show stellar movement, but within a small range. Thus, a slow shutter speed will both brighten the photo and turn the dotted stars into dash stars.
- Focus... The most difficult thing with him is: what to focus on in the dark? Turn off the auto mode immediately, it just won't help you at all. With the help of sleight of hand and a natural eye, we will have to adjust the focus. You will hardly see anything in the viewfinder, so it is worth finding at least some lights and focusing on them. There is an option to highlight the foreground of the scene, for example, with a flashlight, and focus on it.

When photographing with an amateur-type camera or a professional expensive camera, in any case, the image of the starry sky will have to be retouched to a certain extent. So don't worry if something goes wrong, but don't get carried away with post-processing either! Count on yourself and actively use the acquired knowledge.
If you want to know your DSLR camera better, what it is capable of, then a video course will be your assistant. Why these courses? It's simple. They are designed for aspiring photographers. In them everything is told and shown in a very simple language, which will become clear from the first viewing. Many beginners, having watched the course, talk to their DSLR on you!
DSLR for Beginner 2.0- who has NIKON.

My first MIRROR- who has CANON.

Bye! Look for something new, set goals, grow, and above all, above yourself! Don't forget to check out my blog - the blog of your faithful guide in the world of photography!
All the best to you, Timur Mustaev.
Photographer, blogger and traveler Anton Yankova continues to talk about the peculiarities of shooting the starry sky and night landscapes.
There are two main approaches to night photography:
1) shooting static stars, when in the final image we see them the same as our eye perceives them - in the form of many points in the sky;
2) shooting tracks using very long exposures, at which the trajectory of the stars in the sky around the South or North Pole of the world is captured in the photograph.
Let's take a closer look at each of them ...
Shooting static stars
In astrophotography, to obtain images of static stars, star clusters, galaxies, nebulae and others, such a device as a parallax mount with the possibility of guiding is used. Parallactic is such a mount, one of the axes of which can be installed parallel to the axis of the world, directed to the North Pole. Guiding is the process of controlling and correcting the tracking of a camera or telescope for the movement of celestial objects - as a rule, as a result of the diurnal rotation of the sky - during exposure.
Of course, all this is very interesting, but for some reason it seems to me that most ordinary photographers do not have such special devices, so in this article we will consider shooting only using a simple tripod, and those who are interested in astrophotography will easily find a lot of information on this topic. in the Internet.
So, what do we need to know in order to take a picture with a static, without tracks, starry sky? The most important thing is to remember a simple 600 rule, which is this: if you divide 600 by the focal length of your lens (equivalent to a 35mm camera), then we get the maximum shutter speed at which the stars in the sky will look like dots, and not dashes. So, for a 15mm lens, the maximum shutter speed when shooting static stars will be 600/15 = 40 seconds, and for a 50mm lens - 600/50 = 12 seconds.
Based on this rule, we set the resulting exposure in the camera and, if possible, leave the aperture as open as possible, which would give an acceptable picture quality. Now we just have to choose the value of light sensitivity, at which we get a balanced exposed image.
Note... Mirror lock-up can significantly sharpen exposures that are comparable in duration to mirror positioning times (~ 1/30 to 2 seconds). On the other hand, mirror shake is negligible for exposures much longer; as a result, mirror blocking is not critical in most cases when shooting at night.
Shooting tracks
Shooting the rotation of the starry sky requires the slowest shutter speeds - from 10 minutes to several hours, depending on the focal length and how long the trajectories you want to get in the picture. The exact value of the shutter speed is difficult to calculate, it can be determined only on the basis of your personal experience and preferences for the length of the tracks. For example, I know that a 50mm lens for beautiful, for my taste, tracks needs a shutter speed of 20–40 minutes, a 24mm lens - about 90–120 minutes, and so on.

There are two main approaches to shooting these types of scenes:
1) shooting in one frame;
2) shooting a continuous series of images with their subsequent stitching in specialized software.
Until recently, almost all photographers who wanted to capture the circular rotation of the stars in the picture used the first method. I highly recommend the second option. But in order for you to decide for yourself what is preferable for you, let's take a look at all the disadvantages of the first and advantages of the second approach.
So, the disadvantages of shooting in one shot:
- the difficulty of calculating the correct exposure pair, at which the picture would be worked out in a balanced way both in the shadows and in the light. It's sad to find an overexposed or underexposed shot even after half an hour exposure, let alone several hours of exposure;
- when using even the most modern digital technology at ultra-slow exposures, strong, sometimes simply unbearable, digital noise appears in the pictures (even at relatively low ISO values);
- high risk of shaking at such long exposures;
- if you don’t notice in time how your front lens has fogged up, then you’re lost.

The advantages of taking a series of images with relatively fast exposures and then combining them into one frame:
- the ease of calculating exposure pairs for frames with a short exposure (usually no more than 30-60 seconds), of which our series will consist;
- exclusion of the possibility of overexposure / underexposure;
- relatively imperceptible digital noise in the images, which after stitching all frames becomes even more uniform, if not completely indistinguishable;
- when selecting frames for final stitching, you can simply exclude the shots with shake or merge only the number of them that was taken before / after the camera was moved. Thus, we are completely insured against this problem;
- the ability to control the length of the star tracks. If in the final image we do not like the excessive length of the trajectories of the stars, we can simply exclude some of the images from the series, thereby changing the length of the tracks;
- as a result, we get not only one final shot with star tracks, but also a large number of shots with a static starry sky, some of which may turn out to be very successful;
- if during the shooting of the series we did not notice how the front lens fogged up in us, then we can use only good frames for stitching, excluding the defective ones;
- it is possible to use a series of obtained photographs for editing videos with the accelerated movement of stars across the sky.
Note... When shooting a series of night shots, do not forget to uncheck the Long Exposure Noise Reduction camera settings, otherwise the shutter speed you set will be doubled (the second half of the exposure will be noise canceling, subtracting the noise map from the picture you took).
As we can see from this comparison, the advantages of the second approach are much greater. It remains only to make out a few nuances of shooting such series. To begin with, it is worth noting that it is advisable to shoot them in RAW format with duplication in JPG of low quality, so that later it would be easier and faster to experiment with stitching different numbers of frames without their preliminary meticulous conversion. When it comes to exposure times, I personally recommend using 600-rule exposures to shoot a series of night shots.
Next, we set all the other exposure parameters - ISO and aperture, connect the programmable release cable to the camera, which was already mentioned earlier, set the minimum interval between shots (1 second) and the number of shots in a series (if set to 0, then shooting will continue indefinitely , until the battery in the camera or in the cable itself is discharged). That's all! We press the "Start" button and get comfortable in order to comfortably spend the next few hours.
Finding the poles
If it is necessary to get pronounced circles of rotation in the image, then the lens should be aimed at the North Star (in the Northern Hemisphere) or the Octantis sigma (in the Southern Hemisphere). To photograph landscapes with a starry sky, it is good to have a basic knowledge of astronomy, in particular, to be able to determine the direction of rotation of the Earth relative to the starry sky.

Since the majority of the Russian-speaking population lives mainly in the Northern Hemisphere and travels around it, let's look at it first.
Due to the rotation of the Earth around its axis, it seems to us that it is the starry sky that is moving. In the Northern Hemisphere, this rotation occurs counterclockwise around a point called the North Pole of the world. Near this point is the North Star.

Everyone knows that the Earth rotates around its axis with a period of ~ 24 hours. In a minute, it turns by about 0.25 °. Therefore, in one hour, a 15-degree arc is obtained for each star. It is longer if the star is at a greater distance from Polar.
The North Star is a supergiant, but it is not always easy to find it, since the distance from it to Earth is 472 light years. Therefore, in order to find the Polar Star, you must first determine the characteristic configuration of seven bright stars of the constellation Ursa Major, resembling a bucket (Big Dipper asterism), and then through two stars of the bucket wall opposite the handle, mentally draw a line on which to postpone the distance five times these extreme stars. Around the end of this line, there is the Pole Star, which is also the brightest in the constellation Ursa Minor, also similar to a bucket, although not so pronounced and noticeable in the sky.

The North Star is always located above the northern point of the horizon in the Northern Hemisphere, which makes it possible to use it for orientation on the ground, and by its height above the horizon, you can determine at what latitude we are.

Do you want to compare the Pole Star with the Sun? So she:
- 6 times heavier than the Sun;
- more than the Sun 120 times;
- emits heat and light 10,000 times more than the Sun;
- just like the sun, it is yellow.
But a ray of light from the Sun reaches the Earth in just 8 minutes, and from Polar - in 472 years, which means that at present we see a star as it was during the time of Columbus.
South pole of the world
In the Southern Hemisphere, the only star that points to the South Pole of the world is the Octantis sigma. But it is also barely distinguishable and does not stand out from the rest of the stars, so it is completely impossible to use it for navigation purposes, like the Pole Star in the constellation Ursa Minor. The position of this star can only be determined using the constellation of the Southern Cross, whose long crossbar points to the South Pole of the world (the line drawn through the gamma and alpha of the Southern Cross, approximately passes through the South Pole of the world at a distance of 4.5 times farther than the distance between these stars).

The Southern Cross (Latin Crux) is the most famous constellation in the Southern Hemisphere and at the same time the smallest constellation in the sky. It borders on the constellations Centaurus and Fly. Four bright stars form an easily recognizable asterism. The constellation is easy to find in the sky: it is located near the Coal Sack Nebula, which is visible to the naked eye as a dark spot against the background of the Milky Way.

Useful programs

Work examples
To inspire you, in addition to my work, I will give an example of 10 of the best photographs of stars that I could find on the Internet. Experiment and you will succeed!


© Chris Gray | Photo - winner of the National Geographic Photo Contest - 2009

© Tom Lowe | Photo - winner of the Astronomy Photographer of the Year 2010 | 32 sec, f / 3.2, ISO 3200, FR 16 mm (Canon 5D Mark II + Canon EF 16-35 mm f / 2.8 L USM)


© Mark Adamus; the brightest point - the planet Jupiter | 45 sec, f / 2.8, ISO 3200, FR 16 mm (Canon 1Ds Mark III + Canon EF 16-35 mm f / 2.8 L USM)

Conclusion
So that is all! Now you know what the stars are, what they eat them with and how to shoot them. I will be glad to any questions and comments.
In conclusion, I would like to say: in addition to the fact that night is a great time for photography, it is also an amazing, mystical time when you can be alone with yourself, get away from everyday life and worldly bustle, plunge into a dark abyss in order to rethink life values and just look at your being from the outside.
© 2018 site
Altair, Vega and Ras Alhage
Many people, admiring the starry sky on a clear night, have a desire to photograph the spectacle they see. Unfortunately, these attempts are far from always crowned with success, especially since a person who is accustomed to photographing exclusively during the day with an excess of light is often completely incomprehensible from which side to approach shooting in such seemingly unfavorable conditions. Nevertheless, getting a beautiful night photo with rich colors, well-visible constellations and a whitish stripe of the Milky Way crossing the sky is easier than it might at first seem, and in this article I will try to illuminate the practical side of the issue as far as possible. Note that we are not talking about high astrophotography, but rather about ordinary shooting of the starry sky in the context of landscape photography. Detailed photography of deep space objects (galaxies, nebulae, quasars, etc.) requires very specific skills and tools, while everyone can decorate a night landscape with a general plan of the Milky Way.
There are two types of starry sky photography. In the first case, the stars are represented as separate points, i.e. approximately the way we see them in real life. To obtain such photographs, relatively short (by night standards) exposures are used - up to 30 s. In the second case, very long exposures are used - up to several hours (or a series of short exposures is stitched together in the future using a special program) - and due to the rotation of the Earth, the stars manage to draw long glowing trails in the sky, twisting around the pole of the world. Such images look very unusual, but personally I like the first type of photographs more, as they are more realistic and at the same time more artistic. And since they, in addition, are much simpler in technical terms, then it is about obtaining such pictures, i.e. depicting the stars conditionally motionless, we'll talk.
Equipment
Camera
You will need a camera with a large sensor (crop factor no more than 2) and manual exposure settings, i.e. DSLR, mirrorless or, at worst, an advanced compact. A soap dish with a small sensor is useless even with manual settings, since any stars will drown in noise, even to the point of being completely indistinguishable. A mobile phone at a night photo shoot can only be useful as a flashlight.
I hate to write about this, but shooting a starry sky is one of those rare cases when a full-frame camera has an objective advantage over cropped models. All other things being equal, a full-frame sensor gives a gain in noise by about one stop compared to an APS-C sensor, which is quite a lot under conditions of severe light deficiency. However, as practice shows, moderately cropped devices also allow you to get pretty good pictures of the night sky - just the picture will be a little less clean.
DSLR cameras are preferable to mirrorless cameras due to the presence of an optical viewfinder. The electronic viewfinder of some mirrorless cameras sometimes fades in the dark, while the traditional optical viewfinder allows at the very least to compose the frame even in the light of the stars.
Lens
Get the widest and fastest lens you have. Wide-angle to fit more of the sky into the frame and reduce the blurring of stars due to the Earth's rotation, and aperture because there will be really little light, and the opportunity to open the aperture to an extra stop will seem more valuable to you than ever before.
The ideal option is a 20-24mm (35mm equivalent) fixed focal length lens with f / 1.4 or f / 1.8 aperture. A zoom or prime with f / 2.8 aperture is acceptable, but not nearly as good. However, even if all you have is an 18-55mm kit zoom with a maximum aperture of f / 3.5 at wide-angle, you shouldn't be discouraged: it will do too.
Usually I do not favor fisheye lenses, but for shooting the starry sky, they (if you know how to use them) are quite appropriate.
Tripod
Any tripod that can support the weight of your camera will do.
Remote descent
A remote control or cable release is convenient but not required. We'll be using exposures so slow that any vibration caused by the shutter release will only take up a small fraction of the total exposure time and will have little to no effect on the sharpness of the final image.
Lantern
A flashlight is needed to avoid falling into a ravine and stepping on a cow cake in pitch darkness, as well as to facilitate focusing. In addition, the flashlight allows you to highlight the elements of the landscape, if the artistic intent so requires. The more powerful the flashlight is, the better.
Place and time for shooting
The farther from the city, the less backlight from street lighting and the better the stars are visible. Light pollution is the main and most difficult to remove obstacle when shooting the night sky. It is because of him that the sky in night photographs, instead of black, often looks brown or even orange. In short, the more remote location you choose for shooting, the better. It is desirable that the nearest settlement with minimal street lighting should be at least a couple of kilometers, and the distance to large cities should be measured in tens of kilometers. If you wish, you can use the Blue Marble map to estimate the extent of light pollution in your area.
By the way, the moonlight also illuminates the sky quite well, and therefore, if your main goal is the stars, and not the landscape illuminated by the moon (which, in general, is also beautiful in its own way), then it is worth shooting, if possible, on moonless nights.
Obviously, the sky needs to be clear, so it's a good idea to check the weather forecast so that overcast clouds don't catch you off guard. On the other hand, the presence of insignificant translucent clouds in the sky can sometimes even beautify the picture. In fact, even the glow of light from cities lying at some distance can be used for artistic purposes, if you still cannot escape from it.
As for the shooting time, after sunset, at least two hours should pass (true for 54 ° north latitude, where I live). The closer to midnight, the better (by the way, in Belarus astronomical midnight occurs at about 1:00). The darkest nights with stars as bright as gems usually happen in winter. The only pity is that in winter our weather is most often cloudy and the stars are not visible in the sky, and the rare cloudless winter nights are always accompanied by severe frosts.
Composition
Composition, you say ... It's good if you can tell the sky from the ground when you look through the viewfinder. However, sometimes you can still see something. In this case, it usually makes sense to position the horizon line as low as possible. The earth is often too dark to be of serious artistic interest, but the starry sky, for which, in fact, everything was started, I would like to make the main area of interest. You can, for example, send the Milky Way through the entire frame from corner to corner, you can find familiar constellations, bright stars, planets (I recommend Stellarium for those who want to improve their knowledge of astronomy), and if there are separate clouds in the sky, use them as structure-forming elements. Vertical frames work well.
Do not completely exclude the ground from the frame - the picture will become too abstract. It is better to look for objects with an expressive silhouette (trees, boulders, old buildings), and place them at the bottom or on the sides of the frame. The main thing is that they do not take up too much space. If there is a lake nearby - great - you will have the opportunity to show not only the starry sky, but also its reflection in the water.
With a strong desire, you can highlight the foreground objects with a flashlight, if you are not afraid that they will distract the viewer's attention from the starry sky. As a rule, this is justified when the night is not too dark (light or moonlight interferes) and the sky does not look expressive enough to become the main compositional center.
Camera settings
RAW or JPEG?
I refer the reader to the corresponding article. In my opinion, RAW is preferable because night shots almost always require a lot of processing, but shooting in JPEG you can get decent (albeit less controllable) results.
Focusing
If you point the camera at the night sky and try to use autofocus, nothing good will come of it, most likely. The brightness of the stars is usually not enough for the autofocus sensors to catch on to them (with planets, it happens that it works). It is also unlikely that it will be possible to focus manually in the traditional way, since when using wide-angle optics, individual stars are practically invisible in the viewfinder. Therefore, the lens must be forcibly focused to photographic infinity. How to do it?
Older manual lenses allowed blind targeting to infinity by simply turning the focusing ring all the way. Modern autofocus lenses not only lack an emphasis, but also the focusing distance scale, to put it mildly, is not very accurate. In principle, such a scale can be used (if you have a flashlight, of course), but first you will have to carry out a kind of calibration by examining which values on the scale correspond to real photographic infinity. In daylight, let the autofocus focus on some object as far away as possible near the horizon and, looking at the scale, remember or write down the desired value so that you can use it when autofocus is powerless.
Some budget lenses lack even a primitive focusing scale. In this case, you still have to resort to using autofocus, even if it does not want to focus on the stars. Look around for any sufficiently bright object that is at the maximum distance from you (most often it will be distant lights of some settlement), and try to focus on it. If everything works, turn off autofocus and try not to touch the focusing ring in the future. If there are no suitable light sources in the vicinity (which, in general, is not bad, for the reasons described above), use a flashlight. Put the switched on flashlight on the ground, tree stump or stone, then move as far as possible and focus. If you do not suffer from excessive pedantry, then, on average, for wide-angle lenses, everything that is more than ten meters from the camera can be considered infinity.
Exposition
There is even less sense from the exposure meter in the dark than from autofocus, i.e. none at all, so the camera should be switched to manual mode and the exposure should be set by groping. Exposure assessment will be difficult for a number of reasons. First, the camera screen appears very bright in the dark, and therefore underexposed shots may look normal, and normal ones - overexposed. Secondly, exposing by highlights (as I usually advise you to do) is not a good idea in this case, since the stars are too bright objects and, trying to prevent clipping in the highlights, you will drown the frame in darkness. Therefore, you have to accept that both shadows and highlights will lie outside the dynamic range of the camera. Thirdly, long exposures make the experimental selection of exposure parameters an extremely laborious process.
Below I will try to show how, without further ado, to get a more or less correct exposure without using an exposure meter and without tedious selection.
Diaphragm
Open the diaphragm to the limit, i.e. set the minimum aperture number available for your lens. Every photon is dear to us now, and this is exactly the situation when for the sake of a less noisy picture, you can sacrifice a little sharpness.
Excerpt
The longer the shutter is open, the more light will enter the matrix, which, of course, is good, but the more the stars in the image will be smeared due to the rotation of the Earth, which is no longer so encouraging.
For such cases, there is a popular "rule of 600", according to which, dividing the number 600 by the equivalent focal length of the lens in millimeters, you can get the maximum allowable shutter speed in seconds. For example, for a lens with a focal length of 20 mm, the shutter speed will be 600 ÷ 20, i.e. 30 seconds. For a longer 35mm lens, a shorter shutter speed was required: 600 ÷ 35 = 17. Since not every shutter lasts 17 seconds, the result can be rounded up to 15.
However, in my experience, even using shutter speeds one and a half times slower than the 600 rule (call it the “900 rule” if you like), you get pretty decent shots. Yes, near the celestial equator at 100% magnification, the stars will be slightly blurred, but this effect will be so insignificant that it can be easily neglected.
For those who are just starting to master night photography, I would recommend an even simpler and more liberal approach: if you use a wide-angle lens (or standard zoom in wide-angle position), set the shutter speed to 30 seconds and do not fool yourself, especially since for many cameras 30 seconds is the maximum shutter speed available in standard modes, and you don't need to set a slower shutter speed.
ISO
If, following my advice, you set the shutter speed to 30 s and fully open the aperture, then, depending on the aperture of your lens, you should set the following ISO sensitivity:
| Diaphragm | ISO |
| f / 1.4 | 800 |
| f / 1.8 | 1250 |
| f / 2 | 1 600 |
| f / 2.8 | 3 200 |
| f / 3.5 | 5 000 |
| f / 4 | 6 400 |
The values indicated in the table should be taken as starting points from which it is permissible to deviate upward or downward if the need arises.
Noise reduction
If the camera allows, turn on Long exposure noise reduction, provided that you have the patience after each exposure to wait an additional half minute for the camera to take a test shot with the shutter closed. A photo taken at high ISO values will still turn out to be quite noisy - you need to be prepared for this, but if there is an opportunity to improve the image quality even a little, this opportunity should not be neglected.
White balance, like image style, doesn't matter when shooting in RAW, but in case you are shooting in JPEG, or just want your pictures to look decent already on the camera screen, let me give you a couple more recommendations. ...
White balance
Automatic white balance when shooting a starry sky is absolutely unacceptable, unless, of course, you are deliberately trying to give the sky a muddy gray-brown-crimson hue. You can set the white balance for incandescent lamps (Tungsten or Incandescent), i.e. about 3000 K, but in my opinion, this makes the picture too cold. The best out-of-the-box presets tend to be settings for fluorescent lamps, such as White fluorescent (3700 K) or Cool-white fluorescent (4200 K). If your camera allows you to manually set the color temperature, start at 4000 K and move Tint a little towards Magenta. The final values can be found experimentally.
Picture style
For a starry sky, the Vivid style or some similar style is best suited, i.e. with the most saturated colors and high contrast, and the color saturation can be further increased by tweaking the Saturation parameter. Unlike daytime landscapes, here you should not be afraid to get unrealistically saturated colors, since the scene will look very unusual in any case, and additional colors will not harm it in any way.
Thank you for the attention!
Vasily A.
Post scriptum
If the article turned out to be useful and informative for you, you can kindly support the project by contributing to its development. If you don't like the article, but you have thoughts on how to make it better, your criticism will be accepted with no less gratitude.
Please be aware that this article is subject to copyright. Reprinting and quoting are permissible provided there is a valid link to the source, and the text used should not be distorted or modified in any way.