Tie the bracelet with a slip loop. Elastic cord
A lot of people are engaged in the manufacture of beaded bracelets. Sometimes you get whole masterpieces, real works of art. Indeed, handmade items are unique and original. But often a certain difficulty arises here, since many do not know how to tie a knot on a bracelet. Meanwhile, it is a strong knot that can guarantee the safety of all labor. Be careful and careful! To make a bracelet a great piece of jewelry, you need to complete it well. Using a surgical knot, it will be possible not to worry about this, since it is the most durable and reliable. The main thing is to tie it correctly, because otherwise the knot will immediately untie and the bracelet will fly apart.

So, firstly, use an elastic thread to keep the bracelet stationary. So it will not tear when worn and will not fall off the hand. Secondly, when you have finally collected it, cut the thread. You should have free ends about an inch and a half. Stretch the thread and pull the ends a couple of centimeters. First, make a half-knot: take one end of the thread and hold it with your hand, and the second at this time will need to be circled near the first. Happened? Now make a second half-knot like this.
How to fix the thread finally? Many needlewomen do this: in the first half-knot, they twist the thread twice. In the second half-knot, the thread is wrapped around only once. In other words, you are mirroring the very first node. This is how the surgical knot is obtained. Why surgical? Yes, because surgeons connect the threads during the operation in this way.
So you tightened the knot, cut off the ends of the thread at a distance of about one and a half millimeters, now put them in the nearest beads. Some use glue, fixing for greater reliability. Well, if you can avoid getting glue on the bracelet, then give it a try. Each needlewoman has her secrets.
Ordinary

Try this node option. Pass one end of the thread through the loop on the other side. Now move the knot away from the loop and tie the ends of the thread with each other. True, it's not too good option, since the sharp edge of the beads can break even a thread folded in half.
Slipknot


To tie such a knot, you need a little patience and a bit of perseverance. First, prepare a cotton cord that is not too thick, no more than 90 cm long. Put beads on it in the right order, weave a bracelet. And now - attention, we tie a knot! Take the ends of the cord with your hand, so that there is a margin of 14 centimeters on each side, direct them towards each other.

Then bend its right tip so that the tip is outside and fits on the edge (see figure). The resulting loop must be fixed. Make sure that it is no more than 10 centimeters. Continue to work with the right tip, and the knot will slide along the left one.

Point the left tip from left to right, circle the eyelet and part of the lace with it several times, and then carefully lay the resulting “folds” in the opposite direction from you. Make three more such turns, holding the knot with your finger and adjusting the tension of the cord. Now pass the left and right tips through the resulting loop so that they can be pulled into a knot. Just do not tighten it very much, because the coils should move freely. So we made the first knot.

We proceed to the next, doing exactly the same steps as the first time. The resulting node will be passive. Next, make a loop at the second end of the lace, for which wrap it around five times with a free tip and tighten the knot. It turned out a loop into which you need to thread the remaining end of the cord. What's left can be cut off. For a special effect, the tips can be glued using universal glue.
Sometimes the bracelet is woven by bending the thread in half. How to tighten the knot in this case?
The ends of our thread should be two loops. These loops must be put on the right and left hands and tie a knot without removing the loops from the hands as follows:
With your right hand, cross the loop in the middle of the thread and hold it. At this time, you need to put on a loop with your left hand, tying a knot in such a way that our bracelet, worn on left hand, fit inside the loop. Now we skip the loop under the bracelet and pull it out from under the bracelet. We release the left hand from the loop, release the thread and pull it. It turns out a knot!
Another way: you need to make a loop on a thread or rope, then put it on your hand, closer to the elbow of the loop, which is on your hand. You thread the loop into the hole of another loop tied on your arm, and throw off the resulting knot on a thread.
These are the methods of tying knots on a bracelet that exist today. Now you know them and can use them. Good luck!
The easiest way to assemble a bracelet is with an elastic band. Use strong, reliable thread. If the thread is thin and stretches too much, or you are worried that it will fray, then it is better to take it in several additions. For assembly on an elastic band, it is better not to use heavy beads (large glass or stone) or beads with sharp holes. For such bracelets, a jewelry cable is more suitable.
To work, you need an elastic band, I use a thick silicone thread 1.2 mm thick, code on the site 351-011. It is soft, so you need another needle. If your thread is thinner, then use it in several additions. We select any suitable beads and decorative elements. I have metal cast hats and crystal translucent beads. Beads from polymer clay made in the mokume-gane technique:
I string beads on a thread. For easier threading into the eye of the needle, I melt the edge of the thread a little, there is no solid drop on this thread during melting, but the fibers become more ordered:

I tie the ends of the thread in a knot, the bracelet is ready. Read more about nodes below:

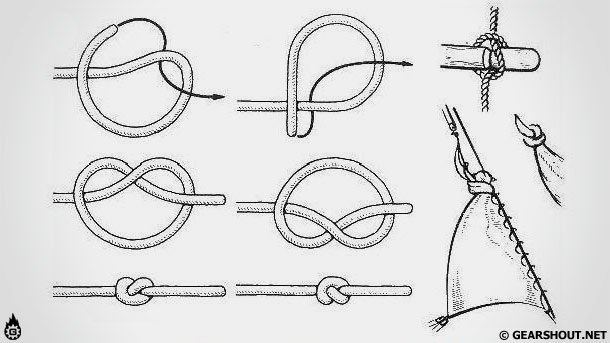
For securing synthetic threads, elastic, spandex and fishing line better use the following nodes:
Surgical node:

Look like him academic node:

Also reliable flemish knot:

Another knot that is very difficult to untie is water node, suitable for gum:

Also good for fishing line and synthetics furrier knot:

Great Lian Knot:

These knots all work well for costume jewelry, but come in different sizes, volumes, and patterns. If this is not important for the thin thread that I use, then for a round thick elastic band or waxed cord it can matter, so before making a product, it is better to practice on a piece of thread.
Now a few words about nodes, which should not be applied:
oak knot don't come near t for fixing synthetic threads and fishing line. When pulled, it slides easily and unties:

Also, it doesn't fit. Babi knot, although it is so common in everyday life. He will not be able to hold the gum at all:

The same insidious Mother-in-law's knot, also not for our purposes:

weaving knots well suited for threads, but slip on an elastic band:

The drawings and description of the properties of nodes are taken from the book by L.N. Skryagin " Marine knots", tested by me practically on an elastic band.
Here are some more photos of bracelets for example. Using different fittings and beads, we can change the style of the bracelet.
This bracelet uses crystal beads of different sizes, a shaped spacer bead, bead caps, a pendant holder, a connecting ring and a pendant with a sparkle effect:

In this work, polymer beads Natasha beads, crystal beads, bead caps and spacer beads with spirals:

These simple bracelets have a minimum of detail. Striped resin beads and wooden beads. With purple beads I put glass beads without faceting 6 mm.

Bracelet with rose pendant, crystal beads, polymer beads decorated with caps for jewelry. The rosette is attached to the bail with the help of a connecting ring.

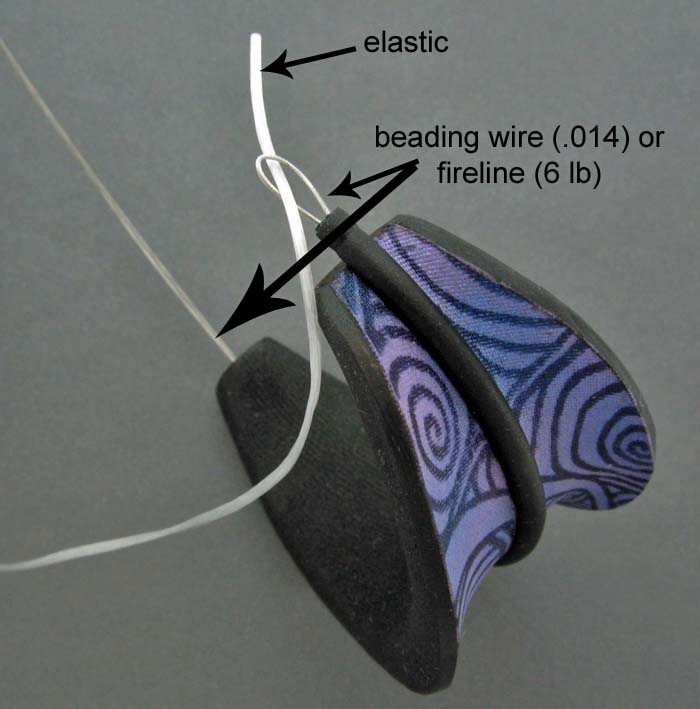
To complete the collection, I will add a link to another master class. How to stretch an elastic band inside a long hollow tube. Description link. Briefly, a loop of jewelry cable or wire is inserted inside the bracelet, a soft elastic band is hooked into it, when the cable is pulled out, the elastic band is also removed from the other side:
Good luck and creative mood! I hope that you will get the most beautiful and reliable bracelets!
See also other tutorials.
14.06.2012 13:34
Many people think that making jewelry requires a lot of materials, time and knowledge, and even special tools. But you will need a minimum of materials to make bracelets "with an elastic band", that is, bracelets using an elastic cord.
Elastic threads used to make bracelets, while the big plus in creating such bracelets is that we do not need any special tools. Also, making bracelets on an elastic cord will take literally 10-15 minutes.
All we need is beads of various colors and shapes, and to add originality we can take pendants, rondels, caps for beads and other accessories for jewelry that you have at hand. Here, as they say, it all depends on the flight of your imagination.

For the bracelet, I decided to take a black elastic cord 0.8 mm thick. By the way, with regard to the thickness of the cords, if you want to take beads for the bracelet large diameter, then it is better to use a cord thicker, for example, 1 mm, and for small beads or bracelets for children, cords with a diameter of 0.6-0.8 mm are more suitable.
We did not reinvent the wheel and used the wonderful technology of stringing beads and tying a knot, which Tatyana Zakharchenko spoke about in her article. So, we read:
First, determine the size of your wrist. This is especially true if you want the bracelet to sit tight on your hand. Wrist sizes are usually different people lie in the range of 15-19 cm. In addition, please note that the left and right wrist differ in size, in right-handers, as a rule, right hand a little thicker. Therefore, it may well turn out that a bracelet made on the left hand and sitting well on it will put pressure on the right. Not much, but after a few hours of wearing it can cause discomfort. Of course, if you want to make a bracelet that dangles freely on your hand, these remarks will be irrelevant.

If the holes in the beads are wide enough, you can string them directly onto the thread. It is more convenient (and faster) for me to use a needle and auxiliary thread, as shown in the photo below.

Collect beads and beads on an elastic thread as you like. The length of the dialed segment should be slightly larger than your wrist. Please note that too narrow a bracelet will squeeze the hand, too wide - dangle. However, you can intentionally make a loose bracelet.

When tying beads, it is necessary to take into account the rapport of the pattern and the size of the largest beads.
In the photo, the yellow arrow indicates the size of the wrist, the blue arrows indicate the possible options for completing the set. I do not recommend making the bracelet smaller than the wrist - it will press, and after a few hours of socks, traces will remain on the skin. It's always best to anticipate small stock for a free fit. And for small beads, half a centimeter is enough, for large beads, even up to 2 centimeters may be needed - please note that the final inner diameter of your bracelet directly depends on the size of the beads.

After the beads are cast on, pinch the thread at the base of the beads and cut (the thread is not stretched!). You have free ponytails of about one and a half centimeters.

Now pull the thread and pull out the tails for another one and a half to two centimeters. This will be enough to make it convenient to tie a knot, the thread in the bracelet will be taut, but not too much. Tie a knot.
First half knot:

Since the thread must be taut when tying a knot, hold it firmly with your left hand, and circle it with a free tail with your right hand as shown by the arrow (If you use the knot recommended by me, then you will need to circle it twice, pressing the turns with the fingers of your left hand)
Second half knot. To make it more convenient, press the first half-knot with your middle finger.

Now about that how to tie an elastic thread?
Most importantly - do not knit a "regular" woman's knot - it will not hold! You can tie a straight knot. But there is a better option.
For the first half-knot, wrap the thread not once, but twice - as shown in the photo:

Knit the second half knot as usual. Pay attention to the fact that it is knitted in a mirror ("to the other side") relative to the first (according to the principle of a direct knot).

Knot in a tightened state. This is a surgical site. It is this knot that surgeons use to connect threads to each other during operations.

And here is an example of an incorrectly tied surgical knot: the second half-knot is tied "in the same way" as the first:

In a tightened state, such a knot unfolds:

This is what a knotted elastic thread looks like:

And this photo shows a possible assembly error - before tying the knot, the thread was not tightened enough, and the beads are now dangling. To eliminate the defect, pull the thread, cut the thread close to the knot, and tie the knot again, trying to leave short tails.
In this article, we will start showing and talking about rope knots, their types and different ways their knitting, The information will be translated and updated as new video instructions are filmed. Sometimes knots haunt a person at every step, leaving the house, we tie a tie and shoes, in everyday life and in nature, we have to knit knots. Any fisherman or hunter already knows how to tie various knots for their needs. And in mountaineering or in the marine business, people simply have to be able to tie a dozen knots.
Knots exist for a variety of purposes and purposes, making loops that tighten or not, connecting ropes of the same or different diameters, for tying rope to various objects, and so on. But it takes practice to tie knots correctly. And it is better to abandon the knot, and use another one if you have any doubts about its knitting. We will start with the simplest knots, and with each new knot we will get closer to more complex knots.
simple knot
A simple knot used to connect ropes and is a component of many knots, it can also be tied at the end of a rope to prevent it from unraveling. Perhaps this is the simplest of all knots and the smallest. But when the cable is pulled, the knot is strongly tightened and sometimes it is difficult to untie it. A simple knot strongly bends the rope, which reduces the strength of the cable by more than 2 times. But, nevertheless, this is the most popular node.


Straight Knot (Reef)
A straight knot is used to connect ropes of approximately the same diameter. It is not safe to tie ropes of different diameters with this knot, as a thin rope will tear a thicker rope. The direct knot was known as early as five thousand years BC in Egypt. And the ancient Greeks and Romans called him Hercules, because this is how the mythical hero Hercules tied the skin of a lion on his chest. The straight knot has four knitting options, but it is enough to know and be able to knit one of them. Control nodes are required at the root ends.


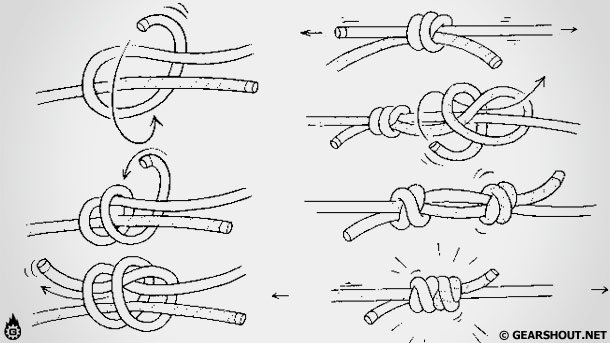
Hunter's Knot (Hunter's Knot)
In 1968, English doctor Edward Hunter (Edward Hunter) accidentally invented a knot that holds perfectly on cables and even on synthetic fishing line. In essence, it was a successful interlacing of two simple knots tied at the ends of two ropes. This invention caused a sensation in certain circles, and British patent experts issued a patent for this invention to Edward. The Hunter knot is held on all ropes, especially on soft ones, as well as on ribbons and fishing lines. The author of the book "Sea Knots" L. N. Skryagin gave this knot a different name - "Hunting Knot" since the surname Hunter is translated from English as a hunter.

counter eight
Another of the oldest knots for tying two ropes. This knot has another name "Flemish knot". This is a reliable and durable knot, it practically does not reduce the strength of the rope. To begin with, a figure eight is knitted at the end of one of the ropes, and then all the bends of the figure eight on the first rope are repeated with the running end of the second rope and passed towards the root end. After that, tighten. The counter eight is relatively easy to untie.
knot grapevine
Grapevine is the strongest of the knots designed for tying ropes of the same diameter. This knot has the lowest rope loosening ratio of 5%, other knots do not have such indicators. When tying the Grapevine knot, you can do without control knots, it still remains quite safe.


Knot Bayonet
This knot is a non-tightening loop that can hold a load acting in almost any direction. Another main advantage of this knot is that it can be easily untied even under load, which is very convenient. Make one and a half turns of the rope around a tree, post or even a stone. Lead the running end over the root end, bring it down and pass from under the root end into the loop formed (this is how you got the hose). Tighten and make another hose, and at the end be sure to tie a control knot.


Knot Quick Untie
The next knot can be named: pirate knot, bucket knot. This knot is quite secure if properly tied, and it can also be untied very easily and quickly by pulling on the running end. Recommended for temporary fastening, where you need to quickly untie the knot. Or it can be used in descending situations where you need to return the rope after descending by pulling on the running end.

Grasping Prusik knot
This knot is mainly used as a belay when descending or ascending a rope. In the event of a person falling off during the descent, this knot is tightened and prevents him from falling. And when climbing a rope, this knot can be used as a jumar. Pulling the knot up from the bottom, when loaded, the knot will tighten and hold the person. The knot was invented by Karl Prusik, president of the Austrian Alpine Club in 1931, and has proven itself in mountaineering and mountain tourism. But the knot does not work well on a wet and icy rope.


Austrian conductor
The knot is used when you need to make a loop in the middle of the rope, to create an anchor point in case of belaying, or if you need to separate the frayed section of the rope. This node also has other names: Alpine Butterfly, Middle Node, Median Conductor, Median Conductor.

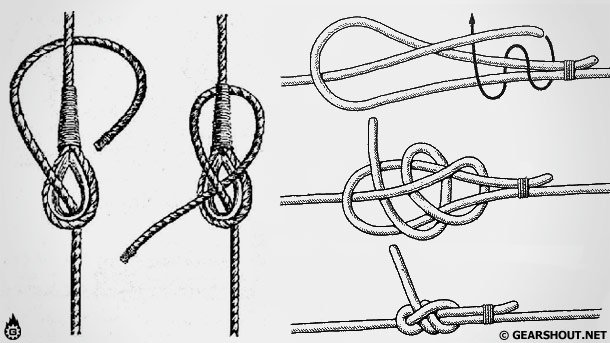
Bowline Knot (Arbor Knot)
This is one of the oldest and most popular knots. Bowline can be safely called the "king of knots" for its simplicity and reliability. This knot is knitted at the end of the rope and is a secure, non-tightening loop. The gazebo is used in maritime, mountaineering and tourism. It will also be very useful to be able to tie this knot with one hand, which can be useful to you in an emergency.
Shkotovy and Bramshkotovy knot
These knots are used for tying ropes, both of different diameters, and the same. Knots are fast and easy to tie. Control nodes are also required for these nodes.


Bunny Ears (Double Conductor)
This is a knot that resembles a double bowline. Hare ears form two non-tightening loops. This knot does not require control knots, but after a heavy load it is difficult to untie. It is used mainly in mountaineering and in the case when it is necessary to transport the victim down to a shallow depth.
Rope bottom harness
To work, you need a cord about 90 cm long, depending on the thickness of the cord. The cord can be anything, but it is more difficult to tie a knot on slippery cords, so for mastering, take a regular waxed cotton, not very thin.
First, you need to put on the cord what should be there: beads or a pendant (pendant). It will be interesting to look like an option with one big beautiful bead, perhaps in ethnic style. It is better if the bead is not round: cylindrical or flattened. But the option with a few ordinary beads can also work out well.
Step 1. Take the ends of the cord in your hand towards each other. The length of the ponytails for work is approximately 15 cm.
Bend the right cord with a loop so that the tail itself is on the edge. The size of the loop is up to 10 cm, it can be less. Now we have a working cord - the right one, and the left one - the one on which the knot will subsequently ride.
The tip of the left cord is not visible in the photo - it turned out to be long and did not get into the frame. The left cord runs from left to right and ends somewhere behind the top edge of the photo. By the way, it is more convenient to tie a knot not on the edge of the cord (in my case, this is the left cord), but stepping back - the knot will still move, and later you will move it where you need it.
Step 2 Circle the cords with a tail several times, lay the coils towards each other in the direction away from you.
First turn:
And two more:
When you knit a knot, hold it with your fingers all the time so that the coils do not loosen. I removed it for a photo. forefinger to show what the coils look like. But the usual working position of the finger is as in the photo below.
Step 3 Make a few turns (three is enough, but you can have more - to your taste) and then pass the tail through the loop:
Now tighten the knot well, pulling both ends of the cord alternately.
The tied knot looks like this:
The knot must be tight. But here you have to practice: if you tighten the turns too much, the knot will be hard to move along the cord, if it is weak, it will loosen.
Now you can start tying second node.
Do the same loop...
Then do a few turns...
Pull the tail through the loop and tighten the knot.
For clarity, I tied knots close to each other. You can tie them anywhere in the cord, as long as the tail, which then remains superfluous, is not very long.
When both knots are tied, check the overall length of the beads and how the knots move along the cord. If necessary, the knot (one or both) can be tied up.
After that, tighten the knots again and secure them with second glue or varnish - just a drop of glue at the point where the tail passes through the loop. Cut off the excess at a distance of 0.5-1 cm from the knot and also fix the cut with glue or varnish.
All! You can put it on and enjoy the new thing.
Since the necklace assembled in this way will be worn over the head, the length of the beads should not be smaller size heads. Usually it's about 56-58 cm excluding hair :-) In addition, you need to add the length of the cord, which will go directly to the knots: in my example, a 2 mm thick cord was used and it took 7 cm for each knot (of course, for a thinner cord you will need less: on a regular waxed cord, the knot takes 5 cm). Add to this another 10-15 centimeters for the "tails" (for the first time, then, when you learn, you will need less) and 2-3 cm for a loose fit - a margin to put on freely over your head.
In total we get: 58 + 7x2 + 15 + 3 = 90 cm. This is the approximate length required for work for a cord of 2 mm. If you want to make the beads longer than 58 cm - make the appropriate amendments.
Little trick. The cord does not need to be cut to work. You can put beads on the cord of the length that you have (even if it is a whole coil), tie the first knot with the free end of the cord. Then estimate the required length and cut the cord. Then knit a second knot.
How to determine where to knit the second knot.
It depends on the design of the thing you want to get. In any case, you are limited by two parameters: The circumference of your jewelry in the most tightened position should not be less than the girth of the neck, and in the most open (when the knots are next to each other) - a little more than the volume of the head, that is, about 58-60 cm.
Before knitting the second knot, I try on the neck. In this case, the first knot should be in the place where I want to see it when worn, and the total length of the beads should be the shortest that suits me (or the way I will wear it). At the free end of the cord, I mark the place that corresponds to the position of the second knot. It is necessary to bend the cord at the mark and make the knot as close to the loop as possible (so that the loop is small).
The second option is to use a ruler. Suitable if you know how long your product should be.
In the photo, the label on the cord is highlighted with a blue dot. In these beads, I decided to move the cords as far forward as possible, so that when they are worn, they fix the beads.
And the hero of our lesson in close-up:
Happy creativity!